Just Cheeky – Tic Tac Toe Challenge #56

Whimsy-Stamps-Baby-Chick-Totem-Spring-and-Easter-Card-Idea-Shannon-Jaramillo-stampinup-SU

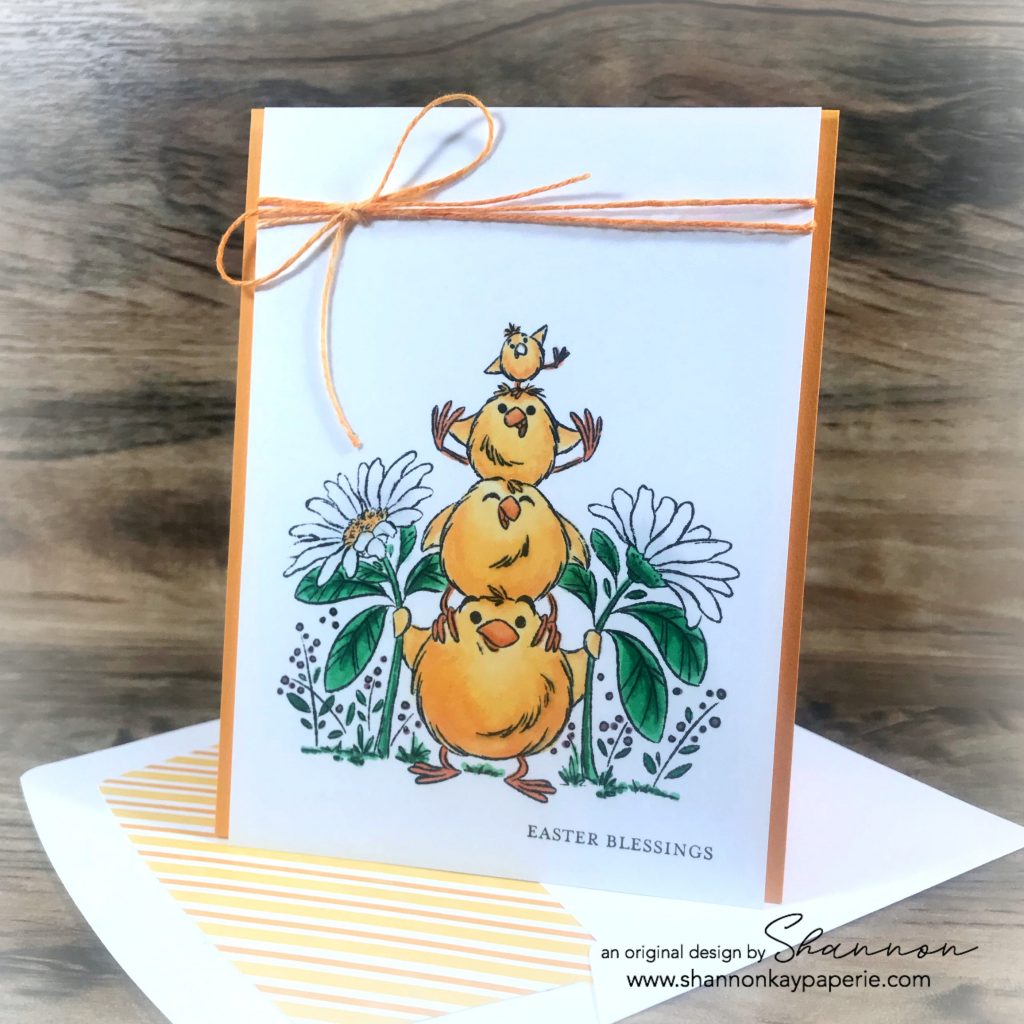
It’s Thursday which means it is time for another Tic Tac Toe Challenge! We’re using a board created for us by our featured designer, LeAnne. Pick a row, column or diagonal and play along! This time I went for the far left column and chose Easter Sentiment, Chick, Yellow.

Whimsy-Stamps-Baby-Chick-Totem-Spring-and-Easter-Card-Idea-Shannon-Jaramillo-stampinup-SU

I’ve gone through ALL of my stamps and pulled out everything Spring and Easter related so fair warning that there will be lots of cheerful cards on my blog for the next while!!

Measurements:

  • Mango Melody Card Base 4 1/4″ x 11″ scored at 5 1/2″
  • White Card Stock  4″ x 5 1/4″

Details:

  • This sweet card began with the cue word chick. I have very recently purchased this red rubber stamp called Baby Chick Totem from Whimsy Stamps. It just cracks me up, I love it so!! And it really reminds me of the characters by the Current Catalog company from many years ago, I believe entitled Suzy’s Zoo. I wonder if they are still around?!?

Whimsy-Stamps-Baby-Chick-Totem-Spring-and-Easter-Card-Ideas-Shannon-Jaramillo-stampinup-SU

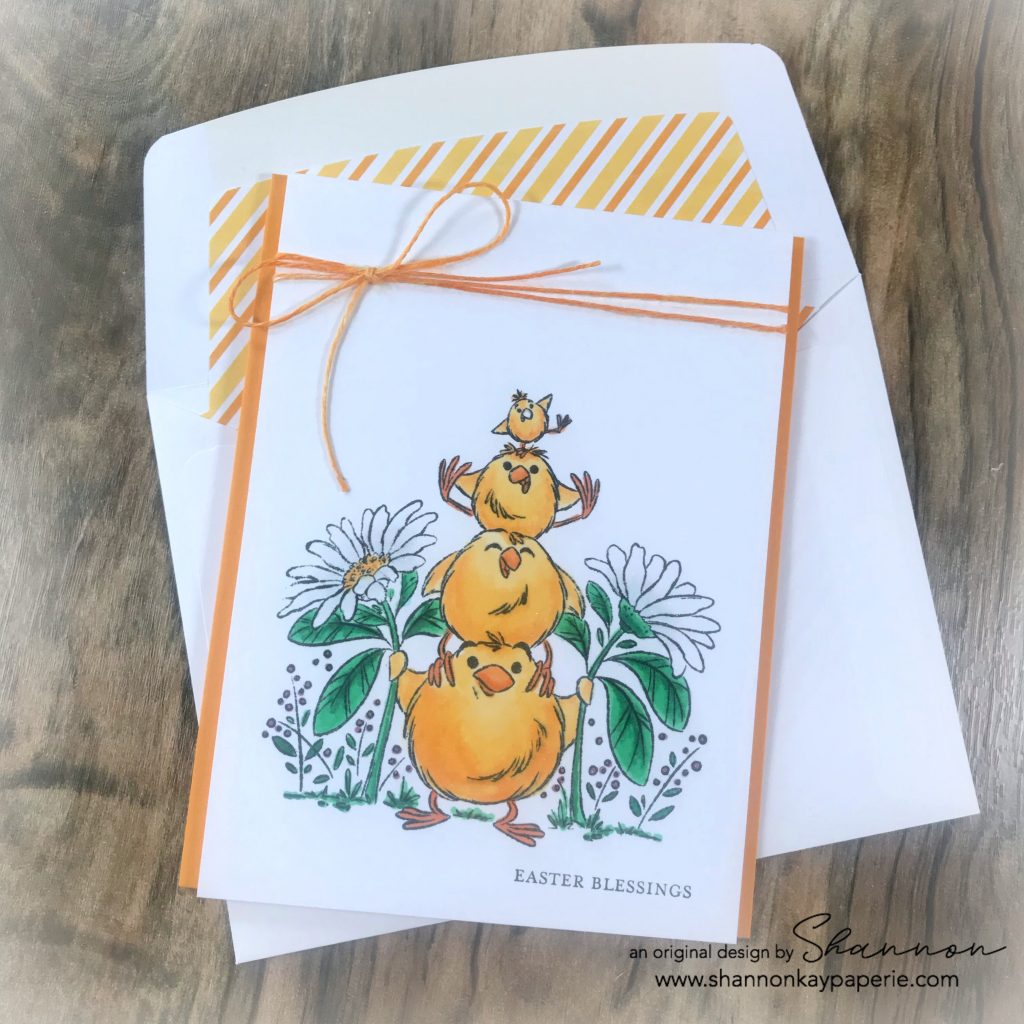
  • I went really bright with the colors today – I’m so pleased that Stampin’ Up! has added some really bright colors to their offerings. I started the chicks with a base of Light So Saffron, and then blended in both Light and Dark Mango Melody. Their beaks and limbs are Light and Dark Pumpkin Pie, the leaves are Light and Dark Call Me Clover, and the teeny flowers are Light Blackberry Bliss.
  • The Easter sentiment is from Stampin’ Up!’s Itty Bitty Greetings – itty bitty was perfect for this card!

Whimsy-Stamps-Baby-Chick-Totem-Spring-and-Easter-Cards-Idea-Shannon-Jaramillo-stampinup-SU


  • I found some white baker’s twine in my stash and colored it with my Dark Mango Melody Stampin’ Blend – it’s SO fun to make custom colors!!
  • And of course both the flowers and the chicks have had Wink of Stella added – I just LOVE the sparkle!

Whimsy-Stamps-Baby-Chick-Totem-Spring-and-Easter-Cards-Ideas-Shannon-Jaramillo-stampinup-SU.jpg

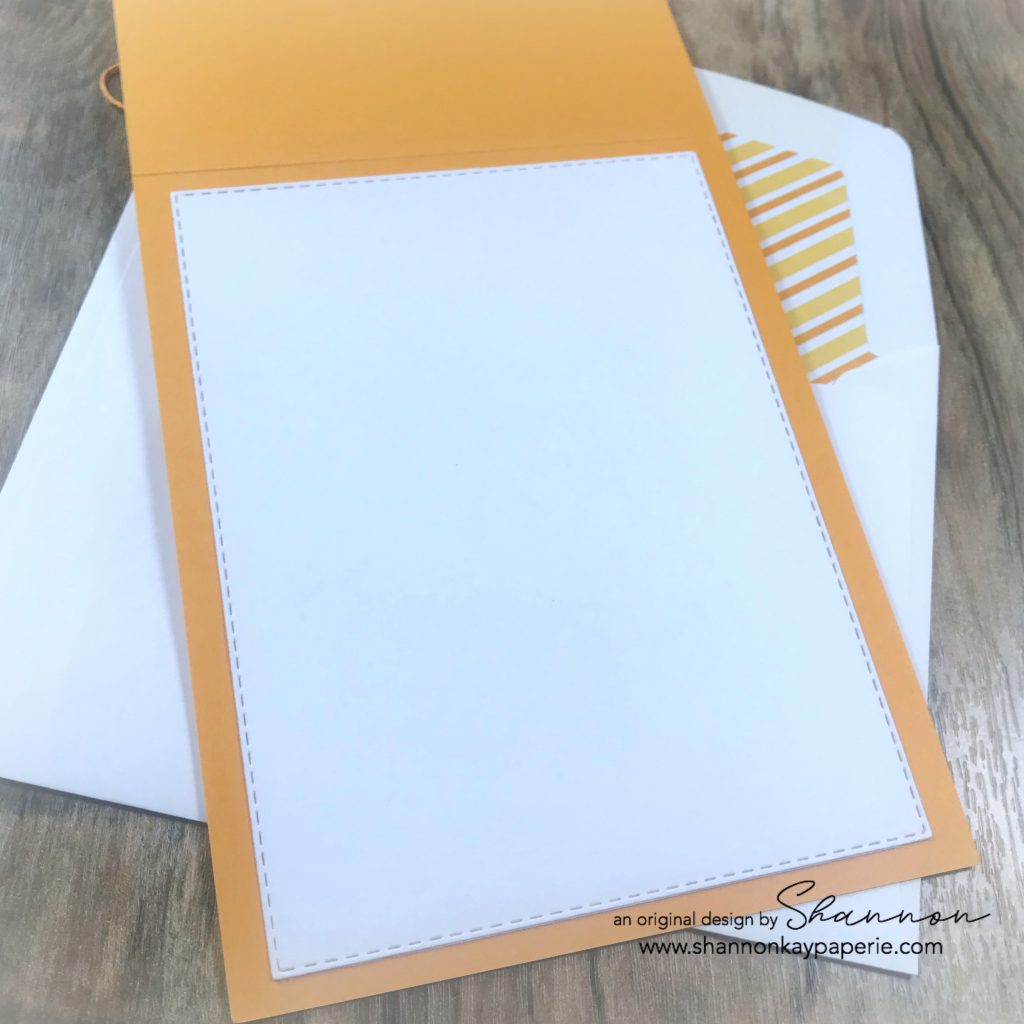
  • The interior of my card is quite simple, just a stitched rectangle as I wanted it to be in keeping with the rest of the card – clean and simple, letting the colored image take center stage.
  • I adore this darling DSP that I found to match everything perfectly – it’s from the Birthday Bonanza DSP!

I hope you are inspired by both the board and my card and that you find some time to play along with the Tic Tac Toe Challenge this week! Please pop on over to the challenge to see the wonderful inspiration from the rest of the design team!!

Blessings to you!

Supplies (all Stampin’ Up! unless otherwise noted):

Card Stock: Mango Melody; Neenah Classic Crest Cover Solar White (80 lb)

DSP: Birthday Bonanza DSP Stack (Mango Melody)

Ink: Memento Tuxedo Black and Versamark Onyx Black

Stamps: Baby Chick Totem by Whimsy Stamps; Itty Bitty Greetings by Stampin’ Up!

Coloring Tools: Stampin’ Blends – Light So Saffron and Light & Dark Mango Melody (chicks); Light & Dark Pumpkin Pie (chick’s beaks & limbs); Light & Dark Call Me Clover (stems & leaves); Light Blackberry Bliss (teeny flowers). ShinHan Twin Touch – CG0.5 and CG1 (cool Grey)

Dies: Stitched Rectangles Dies 

Tools: Big Shot; Stampin’ Trimmer (both retired)

Embellishments: White Baker’s Twine

Other: Whisper White Envelope

Wrapping Up Christmas Part IV – Quilted Watercolor Christmas

Stampin-Up-Watercolor-Christmas-Card-Idea-Shannon-Jaramillo-stampinup-SU

My last Christmas share for the year is this little darling! The story on this card is that I had a whole package of these quilted embellishments from last  year’s Christmas catalog. After doing a big organization of supplies I had NO idea where to store these guys. The bag was bulky and didn’t fit in my system so it’s been camped out on my craft table for MONTHS! It’s not the only orphan, I still have a small pile left, but I have been working on that pile for awhile and finally decided that I’d had enough, it was time for them to either be used or sold! And I couldn’t bear to sell them because a card created by Brian King had enabled me to purchase them in the first place, and I hadn’t CASE’d that card yet! And that is how I arrived at the design for today’s card…inspiration can be funny!

Measurements:

  • Real Red Card Base 4 1/4″ x 11″ scored at 5 1/2″
  • Gray Granite Card Stock Layer 3 7/8″ x 5 1/8″
  • DSP Layer 3 3/4″ x 4 7/8″
  • Smaller Gray Granite Layer 3 1/4″ x 3 1/2″
  • Stamped White Card Stock 3 1/8″ x 3 3/8″

Details:

  • I pulled out the retired Quilted Christmas 6″ x 6″ DSP pack to use for this project. I had 15 embellishments to work with: 5 stars, 5 Christmas trees, and 5 holly berry/leaves so once I had the measurements figured out, I started mixing and matching.
  • This design pictured today was one of my favorites…I love the combination of Real Red with Gray Granite!

Stampin-Up-Watercolor-Christmas-Card-Ideas-Shannon-Jaramillo-stampinup-SU

  • Again, this is a fun layout that can be turned into any kind of card, but I think it looks especially lovely with this sentiment from the retired stamp set Watercolor Christmas, with which I will never part 🙂
  • And just in case you have these embellishments too, glue dots DO NOT work with these quilted embellishments!! I used my favorite liquid glue, Ranger Multi Medium Matte. Sorry everyone, this glue dries clear with NO residue. This is important to me because I am liquid glue challenged! No matter what I do, I make a mess!! This way at least it dries clear!! lol

Stampin-Up-Watercolor-Christmas-Cards-Ideas-Shannon-Jaramillo-stampinup-SU

  • A quick peek at the inside of the card with a sentiment from the same stamp set.

I originally made these 15 cards just to use the embellishments up, but I ended up going in to my stash of these cards this Christmas and ended up using 12 of the 15! (Which is why I don’t have photos of the others!) I am SO glad I had them!!

I hope you have enjoyed these days between Christmas and New Year’s! See you next year!!

Wishing you joy and blessings!

Supplies (all Stampin’ Up! unless otherwise noted):

Card Stock: Real Red, Gray Granite, Whisper White

DSP: Quilted Christmas (retired)

Ink: Versafine Onyx Black

Stamps: Watercolor Christmas (retired)

Dies:  None

Tools: Stampin’ Trimmer

Embellishments: Stitched Felt Embellishments (retired)

Other: Whisper White Envelope

Wrapping Up Christmas Part III – Snowflake Sentiments

Stampin-Up-Snowflake-Sentiments-Christmas-Holiday-Card-Idea-Shannon-Jaramillo-stampinup-SU

After working with the realistic ornament pattern paper (here), I thought I would tackle another pattern in the same DSP pack, All is Bright. I’m feeling a little more adventurous now, isn’t it pretty?!?

Measurements:

  • Mossy Meadow Card Base 4 1/4″ x 11″ scored at 5 1/2″
  • White layer is a die cut!!
  • DSP Layer #1 3 1/4″ x 3 3/4″
  • DSP Layer #2 2 3/4″ x 4 1/4″

Details:

  • This card came together VERY quickly! The biggest challenge was deciding on the size of the rectangles of DSP 🙂
  • The sentiment is from Snowflake Sentiments and is a favorite of mine, it looks so gorgeous when stamped!

Stampin-Up-Snowflake-Sentiments-Christmas-Holiday-Card-Ideas-Shannon-Jaramillo-stampinup-SU

  • I die cut the sentiment with the Layering Ovals Framelits Dies and then popped it up on a Real Red base, using the Stitched Shapes Framelits Dies.  I feel like there should be a size of framelits between the two I used, but I wasn’t able to find one 🙁 It’s probably just user error!

Stampin-Up-Snowflake-Sentiments-Christmas-Holiday-Cards-Idea-Shannon-Jaramillo-stampinup-SU

  • The darling poinsettias are from the Dashing Deer Thinlits Dies. I was originally looking for poinsettias to stamp and die cut (which are in this same set as well), but decided these little guys were too cute to pass up. I popped them up on itty bitty pieces of Stampin’ Dimensionals and then added some Artisan Pearls to the center. So cute!! Baker’s Twine in Mossy Meadow adds a touch of texture.

Stampin-Up-Snowflake-Sentiments-Christmas-Holiday-Cards-Ideas-Shannon-Jaramillo-stampinup-SU

  • I die cut the sentiment panel for the inside, trimmed it out with some Real Red card stock and stamped a few of the poinsettias that I mentioned above. I added a bit of yellow to the centers with Stampin’ Blends in Daffodil Delight.

Only one more holiday card to share (tomorrow)! I’m a bit sad to put Christmas away, I will for now but not TOO far away as we only have 363 days until Christmas rolls around again! I am determined to be prepared!! lol

Blessings to you!

Supplies (all Stampin’ Up! unless otherwise noted):

Card Stock: Mossy Meadow and Real Red; Stamper’s Select White by Papertrey Ink

DSP: All is Bright

Ink: Versafine Onyx Black

Stamps: Snowflake Sentiments, Dashing Deer

Dies: Stitched Shapes Framelits Dies, Layering Oval Framelits Dies, Rectangle Stitched Framelits Dies, Detailed Deer Thinlits Dies

Tools: Big Shot, Stampin’ Trimmer

Embellishments: Artisan Pearls & Festive Farmhouse Cotton Twine in Mossy Meadow

Other: Whisper White Envelope

Wrapping Up Christmas Part II – Farmhouse Holidays

Stampin-Up-Farmhouse-Christmas-Holiday-Card-Idea-Shannon-Jaramillo-stampinup-SU

Need to use up some DSP? This sweet layout can help with that, and the design can easily be translated to any card you need to make in the moment!

Measurements:

  • Crumb Cake Card Base 4 1/4″ x 11″ scored at 5 1/2″
  • White Card Stock Layer 3 7/8″ x 5 1/8″
  • DSP Layer 3 3/4″ x 4 7/8″

Details:

  • CASEing cards has helped me keep my sanity this holiday season! Today’s design was case’d from Britney Vanderlaan, I just changed up the sentiment and the embellishments!
  • I tend to forget to use big banners on my cards, that’s another benefit of looking at other designers’ cards! These wide banners really ground the sentiment from Farmhouse Christmas, which is still available through Jan 3, 2019 so grab it if you like it!
  • Can you see the texture on the Crumb Cake banner? That’s the Corrugated embossing folder – SO awesome for a rustic look!

Stampin-Up-Farmhouse-Christmas-Holiday-Cards-Idea-Shannon-Jaramillo-stampinup-SU

  • This darling sentiment was stamped in black and then die cut using the Stitched Shapes Framelits Dies and the coordinating scalloped circle in Mossy Meadow was die cut using the Layering Circles Framelits Dies. I really like how just a hint of the scallop shows up, creating a subtle bit of depth 🙂
  • I stamped the sentiment again in Cherry Cobbler and the stitched banner die from the coordinating Farmhouse Framelits Dies was used to create the banner. I then layered it on top of the circle die with Stampin’ Dimensionals. Super Cute!
  • A bit of Festive Farmhouse Cotton Twine in Cherry Cobbler was used to tie a double bow. Hint: I cut two short pieces of the twine, laid them across the card front, adhered the tails to the back of the card stock, and then used two other lengths of twine to tie the bow onto the front of the card.
  • The finishing touch was 3 retired Cherry Cobbler enamel shapes – I love how things I’ve purchased in the past coordinate so easily with current product – that keeps me coming back for more!! 🙂

Stampin-Up-Farmhouse-Christmas-Holiday-Cards-Ideas-Shannon-Jaramillo-stampinup-SU

One more close up, just because I’m so tickled with how this came out! I think the colors are GORGEOUS!! Plaid, twine, stitching and corrugated paper – yum!

Thank you for visiting me today and hope you have time to be crafty, if not now, soon!!

Blessings,

Supplies (all Stampin’ Up! unless otherwise noted):

Card Stock: Crumb Cake, Mossy Meadow, and Cherry Cobbler; Stamper’s Select White by Papertrey Ink

DSP: Festive Farmhouse

Ink: Cherry Cobbler and Versafine Onyx Black

Stamps: Farmhouse Christmas

Dies:  Stitched Shapes Framelits Dies, Layering Circles Framelits Dies, Farmhouse Framelits Dies

Tools: Big Shot

Embellishments: Cherry Cobbler Enamel Shapes (retired) and Cherry Cobbler Festive Farmhouse Cotton Twine

Other: Whisper White Envelope

Wrapping Up Christmas Part I

Stampin-Up-Season's-Greetings-Holiday-Card-Idea-Christmas-Shannon-Jaramillo-stampinup-SU

Hello everyone! I hope that the past few days have found you happy and surrounded by love! I created a few last minute cards and want to share with you even though the season is past. The layout and design could easily be converted into whatever type card you might want to make…including getting started on next year’s holiday cards!!

Measurements:

  • Crumb Cake Card Base 4 1/4″ x 11″ scored at 5 1/2″
  • Everything else is a die cut!!

Details:

  • CASE (copy and share everything). We’ve talked about this recently, it’s perfect for inspiration because, if you are like me, the moment there is any pressure on me, my creativity flies right out of the window! So I save photos of cards I like for future reference and today’s project is based on one of those saved photos!

  • I intended to copy this lovely card exactly, but when reading the details of the card’s creation, realized that although the embossed cardstock behind the deer appears to be a soft green (which is what caught my eye), it is actually Very Vanilla. I prefer to create with other neutral colors so I switched gears and just used her lovely card as a jumping off point for mine!
  • I used the upcoming rectangles dies to create all of my layers again! I LOVE having rectangle dies! (and ones that are so different from anything else out there on the market)

Stampin-Up-Season's-Greetings-Holiday-Cards-Idea-Christmas-Shannon-Jaramillo-stampinup-SU

  • Here’s a close up of the large die used for the DSP, the smaller size for the vellum, and the long and skinny one used for the sentiment. They look lovely layered together!
  • I inked up a sentiment from the Bring on the Presents stamp set with Versamark Ink and added gold embossing powder and then heat set it with my Heat Tool. Such a classic font!

Stampin-Up-Season's-Greetings-Holiday-Card-Ideas-Christmas-Shannon-Jaramillo-stampinup-SU

  • I’m enjoying working with patterns that I initially find overwhelmingly busy such as this pattern from the All is Bright DSP pack. I loved how my inspiration card exposed just a bit of it, adding layers really tones it down. I chose to use vellum rather than cover the pattern up completely. I think that all of the gold accents really showcase the beauty of the design.
  • A few strategically placed Artisan Pearls and some gorgeous gold metallic twine finish it off perfectly.
  • Note: I adhered the vellum to the DSP using glue dots placed underneath the deer so they wouldn’t been seen. I trimmed Stampin’ Dimensionals down and placed them behind the die cut deer to adhere him to the vellum as well as trimmed down Stampin’ Dimensionals behind the greeting to adhere that die cut to the card.

No photo of the inside of the card today as I used simple undecorated white card stock and chose to include a personal message rather than a stamped sentiment.

Thank you for stopping by today! I would love to hear from you and how you celebrated (or not) the holidays!

Blessings!

Supplies (all Stampin’ Up! unless otherwise noted):

Card Stock: Crumb Cake and Vellum

DSP: All is Bright

Ink: Versamark

Stamps: Bring on the Presents

Dies:  Rectangle Stitched Framelits Dies, Detailed Deer Thinlits Dies

Tools: Embossing Buddy, Heat Tool Big Shot

Embellishments: Artisan Pearls & retired gold metallic twine

Other: Whisper White Envelope