All Because Two People Fell in Love – Sunday Stamps 170


Lil-Inker-Because-Love-and-Friendship-Card-Idea-Shannon-Jaramillo-lilinker

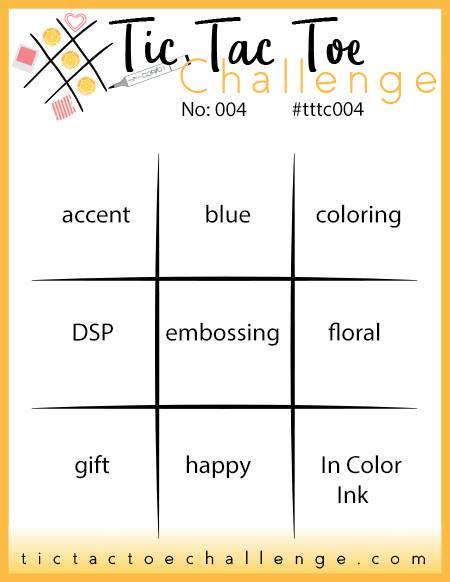
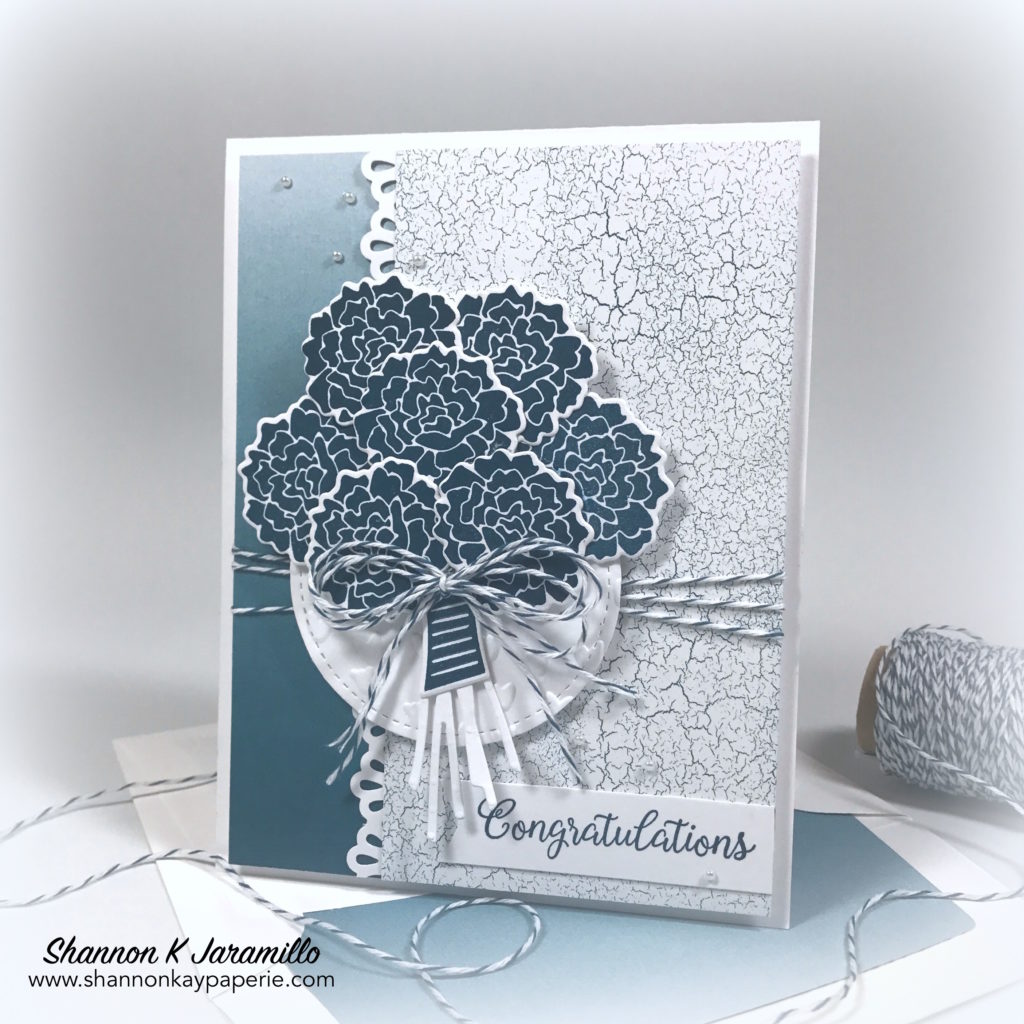
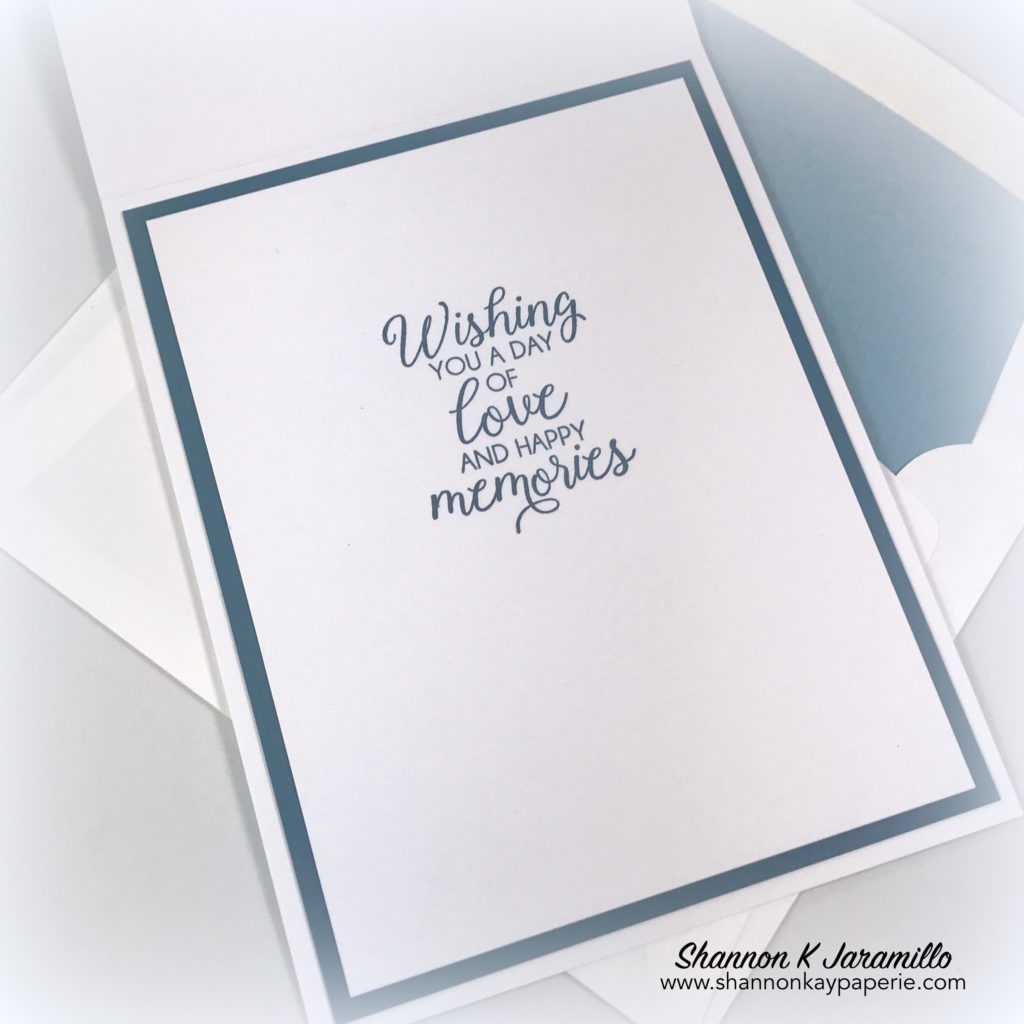
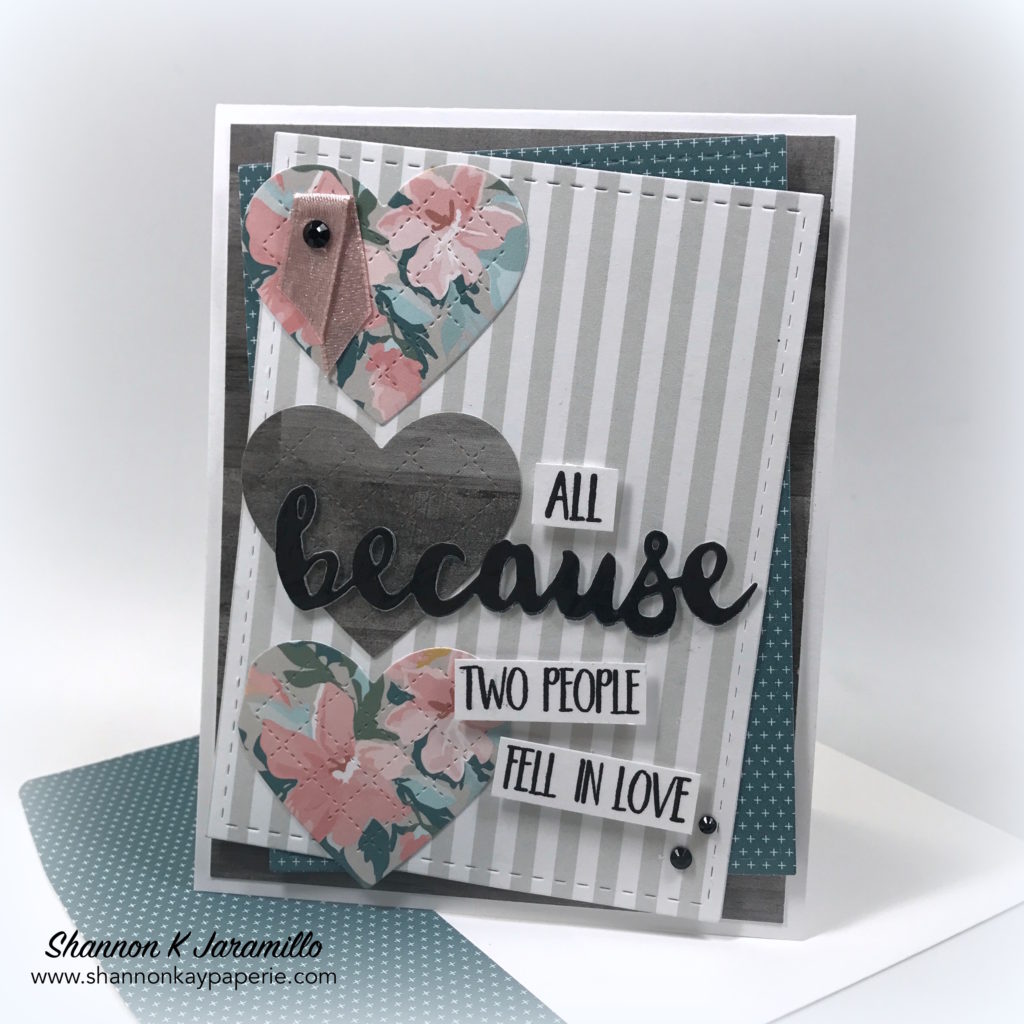
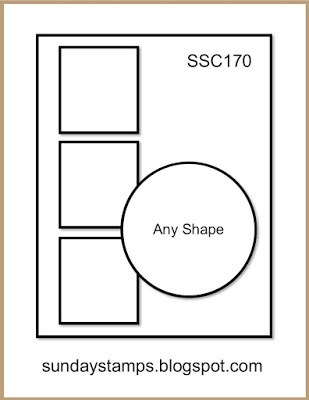
I decided to break out new paper, stamps and dies for this card that I made using the most recent Sunday Stamps sketch. I chose this sketch for the simple reason that the idea of three squares down one side of the card boggles my mind. So…challenge accepted!

Measurements:

  • Card Base 4 1/2″ x 11″, scored at 5 1/2″
  • Base Panel 4″ x 5 1/4″
  • Blue Layer 4 7/8″ x 3 5/8″
  • Striped Layer 4 7/8″ x 3 5/8″

Details:

  • I adore this new quilted heart die that I got for FREE with my order from Concord & 9th. And I saw this sentiment stamp and die set from Lil ‘Inker and knew that was the perfect sentiment for this card…but how to merge the two and still keep with the inspiration sketch? Hmmm…
  • Once the stamps and dies were chosen…now paper! My favorite accessory! I literally went through all of my 6 x 6 paper stash and had lots of fun options, but I have been purchasing scrapbooking kits from Felicity Jane and these papers from the ‘Heidi’ line are GORGEOUS!!!

Lil-Inker-Because-Love-and-Friendship-Card-Ideas-Shannon-Jaramillo-lilinker

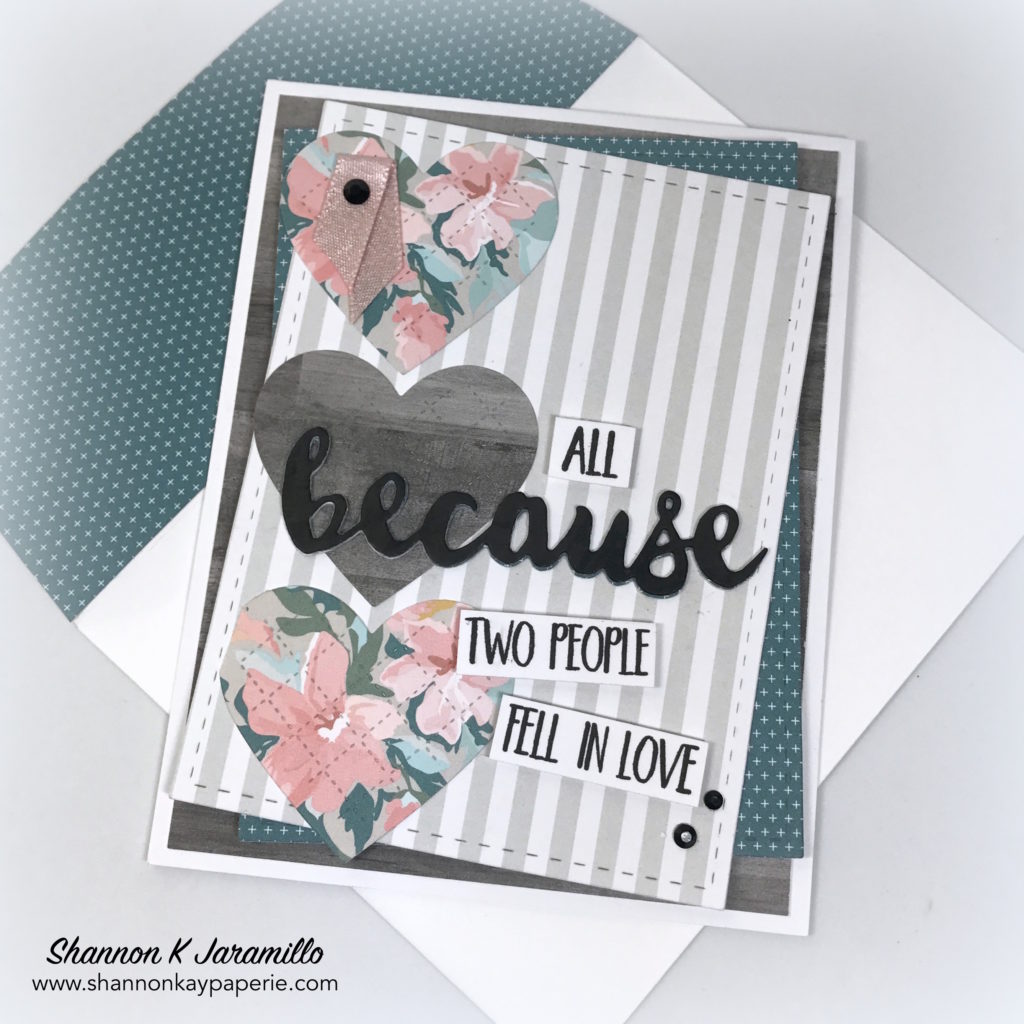
  • I used the weathered wood paper for one of the quilted hearts and for the base layer as well. Then I chose two patterns from the same line and die cut them with a stitched rectangle die and added them at canted angles for a fun effect.
  • Everything being a little wonky made trying to line my hearts up straight a bit of an issue! I finally (and don’t laugh) took a piece of twine, lined it up on my Stampin’ Grid Paper, taped it down at the top and bottom, and then slid my card base under the twine. One I made sure the card was straight as well, I used the line of the twine to aline the center points of the each heart, at the top and at the point. That made it much easier to be straight, but I’m sure there is a better way to have done this!

Lil-Inker-Because-Love-and-Friendship-Cards-Ideas-Shannon-Jaramillo-lilinker


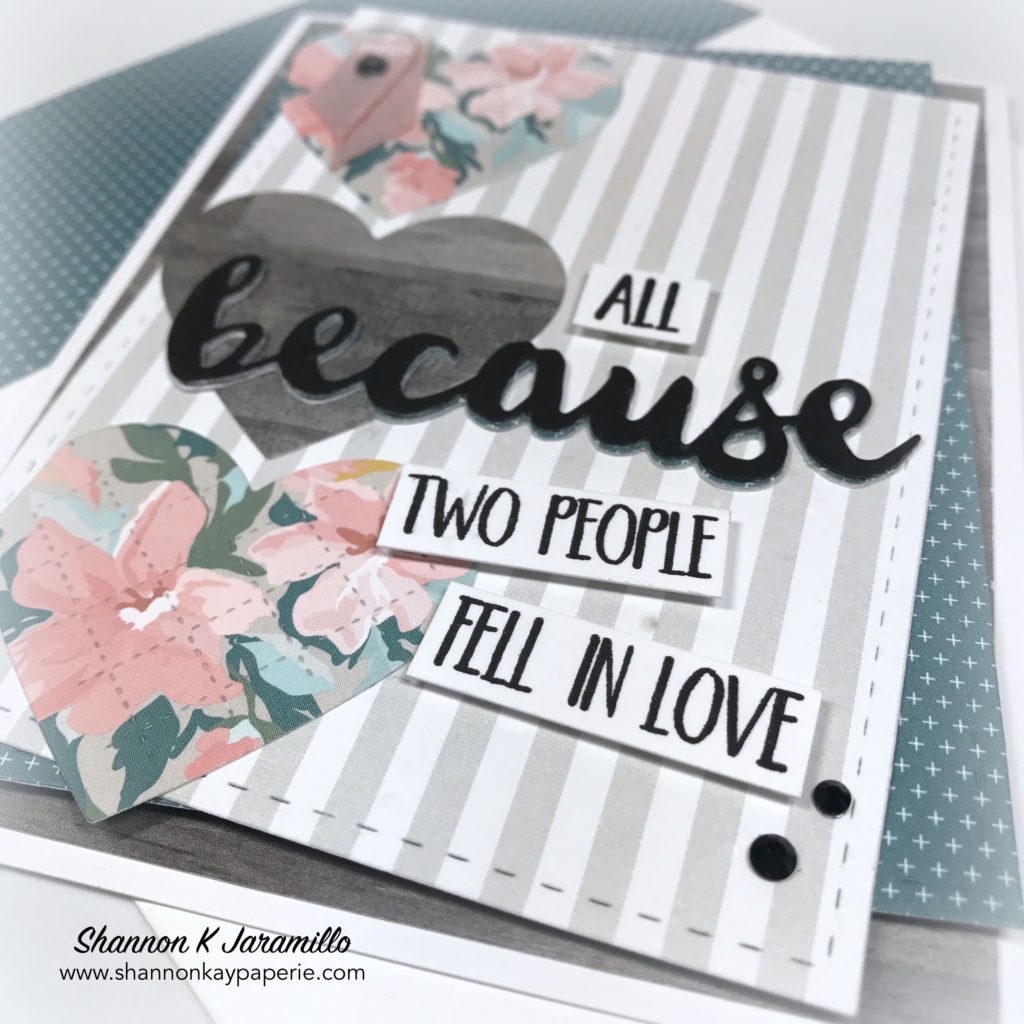
  • The ‘because’ die has a matching stamp. I tried stamping the stamp and then die cutting it, but couldn’t line everything up, then I tried cutting the die cut out and lining it up with the stamp set in my MISTI and that worked better but the ‘s’ in the stamp and the die aren’t quite the same! Third time is a charm, right? I simply took the stamped die and turned it upside down into my Onyx Versafine ink! That did the trick! And it’s REALLY black! I love it!
  • I added a bit of Powder Pink shimmer ribbon in the upper left hand corner and anchored it with a Black Rhinestone Jewel.A couple more in the lower right hand corner for balance and voila!

I’m pretty happy with how the card turned out. I wanted to try to create a more modern, maybe a little of a ‘Joanna Gaines’ type valentine card and think I achieved that goal. Enjoy the rest of your day and I will see you soon! If you have a minute, I would love hearing your feedback!

Here’s the sketch I used from Sunday Stamps:

I’m also playing along with the Simon Says Stamp Wednesday Challenge which is Use Patterned Paper.


Blessings to you.

Supplies:

Card Stock: Stamper’s Select White by Papertrey Ink

Pattern Paper: Heidi by Felicity Jane

Ink: Versamark Onyx Black

Stamps:  Because by Lil ‘Inker

Dies:  Quilted Heart by Concord & 9th; Because and Stitched Mats: Rectangles by Lil ‘Inker; Envelope Liner Die (retired) by Stampin’ Up!

Tools: Big Shot by Stampin’ Up!

Embellishments:  Powder Pink Shimmer ribbon and Black Rhinestone Basic Jewels by Stampin’ Up!

Other: Medium Whisper White Envelope by Stampin’ Up!

Wishing You a Day of Love and Happy Memories

Hope-Wedding-Card-Idea-Shannon-Jaramillo

Good morning and welcome to another Tic Tac Toe Challenge! This is my week off but my niece requested a wedding card so I thought “why not?!” Happy to have an excuse to make a card, lol!

This is the challenge board this week. I chose the bottom left to top right diagonal, gold, embellishment and celebrate:

Now, if you read my last post, I used a layout that I thought could be very versatile simply by changing the paper up…I think this card proves that point!! You may notice I have used some products that are not Stampin’ Up!, but I’m sure you can easily find something in your stash to recreate the general design!

Measurements:

  • Card Base 4 1/2″ x 11″, scored at 5 1/2″ Stamper’s Select White by Papertrey Ink
  • Next layer 4″ x 5 1/4″ Sweet Blush by Papertrey Ink
  • Next layer 3 3/8″ x 5 1/8″ Soft Stone by Papertrey Ink
  • Top layer 3 3/4″ x 5″
    • Left 1 1/2″ x 5″
    • Top Right 2 1/4″ x 3″
    • Bottom Right 2 1/4″ x 2″
  • Sentiment Base 3 1/4″ x 3 1/4″
  • Sentiment Middle 3 1/8″ x 3 1/8″
  • Sentiment Top 3″ x 3″

Details:

  • I’m going to share a secret…the words “pink” and “gold” together in relation to a card evoke a primal fear response in me. I know, but they do.  But when I saw this pattern paper with the grey undertone to compliment the pink and the gold, I thought “I can do THAT”. So I bought it! I chose the grey paper with the shiny gold letters as the main pattern with one floral and one simple repeat pattern to compliment it.

Hope-Wedding-Card-Ideas-Shannon-Jaramillo

  • On my previous card I stamped the sentiment repeatedly on the popped up panel but for this card and this sweet sentiment, I visualized it on a banner, in grey to compliment the pattern paper, and embossed in gold to really bring that element out. So…I pulled out a sentiment from Clearly Besotted Stamps and set to embossing a banner! Next, I pulled out a stamp set I JUST added to my stash last month from Concord and 9th called “Hope”. It has these lovely blooms in the set which I stamped in Sweet Blush and Pale Peony with Prairie Grass and Olive Twist leaves, colors by Papertrey Ink. Look at the floral pattern paper, don’t you think the inks match perfectly? Squeee…..
  • The flower centers were stamped in Versamark Ink and then heat embossed with Stampin’ Up! gold embossing powder.

Hope-Wedding-Cards-Idea-Shannon-Jaramillo

  • I added a length of pink fiber from my Making Memories stash along the vertical seam line and the looped Stampin’ Up!’s Gold Metallic Thread around the back of the raised panel to add more of the gold element. I also added two of Stampin’ Up’s Gold Faceted Gems to the bottom right and top left of the corner to provide balance (and more bling!)

Hope-Weddings-Cards-Ideas-Shannon-Jaramillo

  • I used more of the pretty floral pattern on the inside of the card and then stamped the bloom again in Sweet Blush with Pale Peony Accents and then stamped this lovely sentiment from Stampin’ Up’s Beautiful Bouquet in Smokey Shadow ink. I’m so pleased with how this turned out!

I hope you will take a minute to view the inspiration from the Tic Tac Toe design team for this week’s challenge and perhaps even play along!!

Blessings to you!

Supplies:

Card Stock: Stamper’s Select White, Sweet Blush, Soft Stone and Smokey Shadow by Papertrey Ink

Pattern Paper: Heart of Home by Jen Hadfield

Ink: Sweet Blush, Pale Peony, Prairie Grass, Olive Twist and Smokey Shadow by Papertrey Ink

Stamps:  Fancy Sayings by Clearly Besotted; Hope by Concord & 9th; Beautiful Bouquet by Stampin’ Up!

Dies:  Pierced Fishtail Flags by MFT Stamps; Envelope Liner Die (retired) by Stampin’ Up!

Tools: Big Shot, Heat Tool and Gold Embossing Powder by Stampin’ Up!; MISTI by My Sweet Petunia

Embellishments: Fibers by Making Memories; Gold Faceted Gems and Gold Metallic Thread by Stampin’ Up!

Other: Medium Whisper White Envelope by Stampin’ Up!

More Painted Harvest Inspiration! – Freshly Made Sketches #301

Painted-Harvest-Wedding-Card-Ideas-Shannon-Jaramillo-stampinup

I just wasn’t quite ready to put Stampin’ Up!’s new ‘Painted Harvest’ stamp set away…so I tried another soft and non-fall color combination out on a card I need for an upcoming wedding…what do you think?

Details:

  • The new Powder Pink in-color has to be my favorite pink ever and when combined with Smoky Slate…swoon!
  • I’ve had many questions about the stamping of this stamp set so I want answer them all:
    • The only color I used on the flowers was Powder Pink
    • I DID NOT do any stamping off
    • I used my Stamp-A-Ma-Jig to stamp each of the two flower petal stamps three time each
    • There is a notch next to the flower stamp on the stamp index that shows how to line them up
  • The magic is in the design of the stamp set itself…the depth you see is built right in! Honestly, it’s amazing.

Painted-Harvest-Wedding-Cards-Idea-Shannon-Jaramillo-stampinup

  • If you are a free spirit, instead of stamping three (or four) times in the same spot, turning the stamp once between stamping will achieve a different look. Isn’t it wonderful to have so many options? Each artist can create their own, one of a kind design!
  • If there is just one shout out I can give to Stampin’ Up! this year, it’s fonts. They have really delivered some timeless, elegant sentiments. The two I used today (one is on the inside) are from the Beautiful Bouquet stamp set (another favorite of mine).
  • DSP. I have been having so much fun mixing old and new product. The Smoky Slate pattern on the card front is from the retired Neutrals Designer Series Paper Stack. It looks so sweet with the coordinating bow and flower centers. And it sets off the yummy Powder Pink pattern (Whole Lot of Lovely DSP Pack) on the envelope flap perfectly!

Painted-Harvest-Wedding-Cards-Ideas-Shannon-Jaramillo-stampinup

  • The 1/2″ Smoky Slate Gingham Ribbon…seriously, is there anything better than gingham? Well, yes, gingham in every color. Just sayin’!
  • Love the bow? I learned from the best, fellow Pal Ann Schach. Watch her video and learn to make one too! Everyone can do it, I promise.

Painted-Harvest-Weddings-Card-Idea-Shannon-Jaramillo-stampinup

  • I only stamped the Powder Pink flower one time with each stamp on the card interior, and I DID stamp off for the Smoky Slate flower center as I was worried the sentiment wouldn’t show up otherwise. I’m in love with stamping a design underneath the sentiment, it’s such a pretty effect!

The layout for today’s card is courtesy of this week’s Freshly Made Sketches challenge…

…oops, I took a few liberties with my design! lol, that’s what happens sometimes!! I loved the idea of the angle and enjoyed playing along!

Blessings!

Supplies:

Country Chic Wedding – Tic Tac Toe Challenge #4

Happy Tic Tac Toe Thursday to you!! It’s time for a brand new Tic Tac Toe Challenge board! The team I am on is “off” this week so you are in the very capable hands of Team “O” this week. The uber talented Jeanie has designed a fun challenge for us!

It’s so easy to play along! Create a new project and use any elements/supplies as long as they fit within the three elements (in a row, column or diagonal) of your choosing from the tic tac toe challenge board. That’s it! So fun to challenge yourself!!

Stampin-Up-Beautiful Bouquet-Wedding-Card-Idea-Shannon-Jaramillo-stampinup

This week I chose to use the middle row: DSP (i.e.:pattern paper), embossing and floral. I was torn on what type of embossing to use…heat embossing, an embossing folder, or embossing paste? Decisions, decisions. I went with embossing folder but feel free to choose any type of embossing.

Details:

  • I looked at all of the elements on the board and the first one to speak to me was ‘blue’. So I looked through all my DSP and found these patterns in the Color Theory Designer Series Paper Stack. When I laid them side by side, they screamed “COUNTRY CHIC WEDDING”. Yes, that loudly. It could be because the series I’m reading has dedicated an entire book to preparing for two upcoming low country weddings. Low Country as in Charleston. And my mind made this association! I don’t really know if this is country chic but it sure is pretty to me!
  • I again reached for the Beautiful Bouquet bundle. I thought a simple bouquet of these darling blooms in Dapper Denim would be so elegant!

Stampin-Up-Beautiful Bouquet-Wedding-Cards-Idea-Shannon-Jaramillo-stampinup

  • Do you love the decorative ribbon separating the two pieces of DSP? I used the new Decorative Ribbon Border Punch to create it. It creates such a pretty transition between the two papers!
  • I used the Stitched Shapes Framelits to create a base for my bridal bouquet and then ran it through the Big Shot using the retired Falling Petals embossing folder because I think they look like hearts 🙂
  • This Dapper Denim Baker’s twine is so yummy and perfect for this card design!
  • Super teeny tiny Pearl Basic Jewels add just the right splash of elegance as does the sentiment in this dreamy font…

Stampin-Up-Beautiful Bouquet-Wedding-Cards-Ideas-Shannon-Jaramillo-stampinup

  • The same dreamy font carries through to the inside of the card as well. Both of these sentiments as well as LOTS more can also be found in the Beautiful Bouquet Bundle. You can purchase the Beautiful Bouquet photopolymer stamp set and the Bouquet Bunch Framelits Dies separately or purchase them together and save 10%!

Nance with The Paper Players design team has created a fun sketch which I used as my guide this week…it always helps to work with a sketch! Please be sure to stop by The Paper Players and check out their awesome inspiration this week!

So what do you think? Is this Country Chic? That crackled paper makes my heart go pitter patter! I would love to hear your feedback!

Make sure you pop over to the Tic Tac Toe Challenge and see what Team “O” has designed to inspire you this week and maybe even play along!!

Thank you for stopping by and have a great day!

Supplies:

Price: $110.00

CASEing the Cattie – Beautiful Bouquet

CASEing the Cattie?? Whatever am I talking about?!? CASE is an acronym that stands for Copy And Share Everything. Yes, if you see a card you like, CASEing is perfectly acceptable. Many time CASEing isn’t an exact copy, it can be a jumping off point. In my CASE (haha, see what I did there??), I copied the card in the current Stampin’ Up! catalog almost exactly. Why would I do this? Because it is a beautiful card! See for yourself:

Stampin-Up-Beautiful-Bouquet-Wedding-Card-Idea-Shannon-Jaramillo-stampinup

Such a beautiful bridal bouquet, but really the potential for this set is unlimited.

See the stems die? It’s amazing that a die can be made like that. And it has a coordinating stamp image! And so many other pretty dies, I can’t wait to sit down to stamp and die cut each and every one! Here’s a closer peek:

Stampin-Up-Beautiful-Bouquet-Wedding-Card-Ideas-Shannon-Jaramillo-stampinup

And the sentiments! Isn’t the font lovely? Look at the companion sentiment for the inside!

Stampin-Up-Beautiful-Bouquet-Wedding-Cards-Ideas-Shannon-Jaramillo-stampinup

I hope you have enjoyed todays card…remember CASEing is always okay. You don’t HAVE to come up with a unique idea every time you sit down to create. If you publish your card, please do give credit to the original designer.

Thanks for stopping by…Have a great day!

Supplies:

Price: $110.00