Inspiring Iris Thank You – Tic Tac Toe Challenge #52

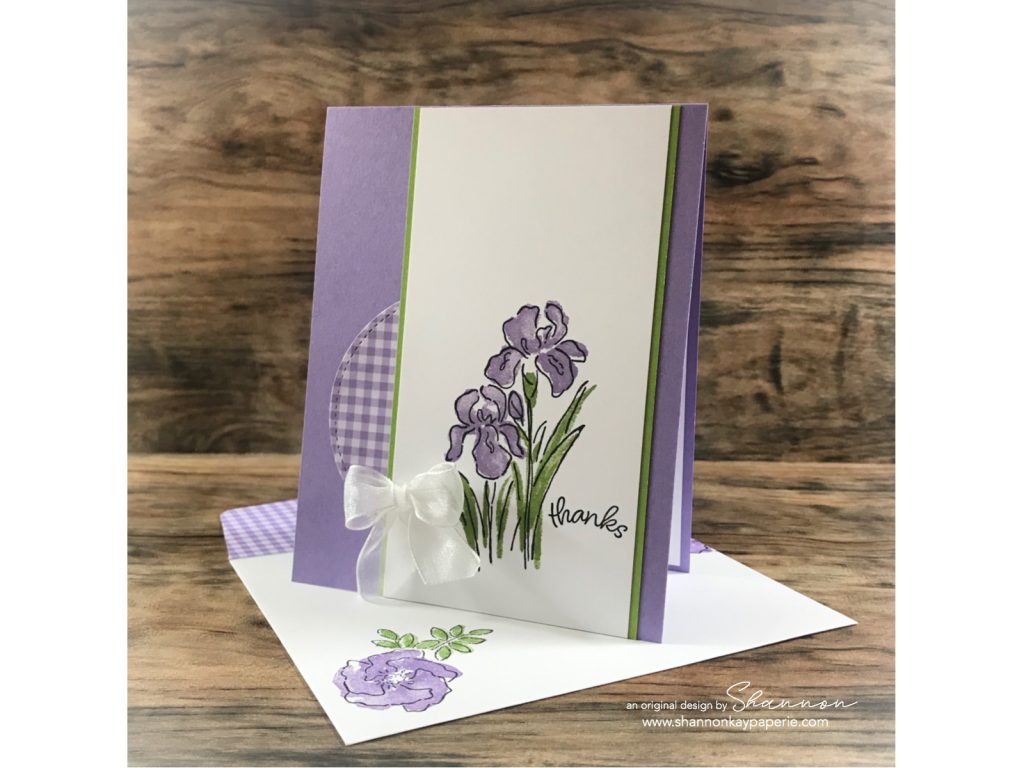
Hello and welcome! I have a brand new Tic Tac Toe Board for your crafting pleasure today! Our designer this week is Amy – I have so much fun deciding which row or column to choose each challenge and then seeing what all the participants decide to use and HOW they use the elements…we are all so uniquely different in our interpretation! This week I chose to use the top row: Die Cut, CAS (clean and simple); Purple.

Stampin-Up-Inspiring-Iris-Thank-You-Card-Idea-Shannon-Jaramillo-shannonkaypaperie

Using purple takes me back to my high school days and Prince. Everything in my life was purple – even my ball point pen! Most teachers refused to let me use it but Mrs. King, bless her heart, let me use it, even though all of those biology notes in purple HAD to be difficult on her eyes! In adult life I rarely use purple for anything – except the flowers I choose to plant in the yard. My hubby was the one who noticed that they were all purple and suggested I chose a different color once in awhile! 🙂 Anyhoo, card making…

Measurements:

  • Highland Heather Card Base 4 1/4″ x 11″ scored at 5 1/2″
  • Strip of Granny Apple Green Card Stock  2 7/8″ x 5 1/2″
  • Strip of White Card Stock 2 3/4″ x 5 1/2″

Details:

  • I tend to fuss a bit with my cards so it’s refreshing to take a clean and simple viewpoint once in awhile. Purple gingham, a circle die cut, one stamp set and three inks. Simple!
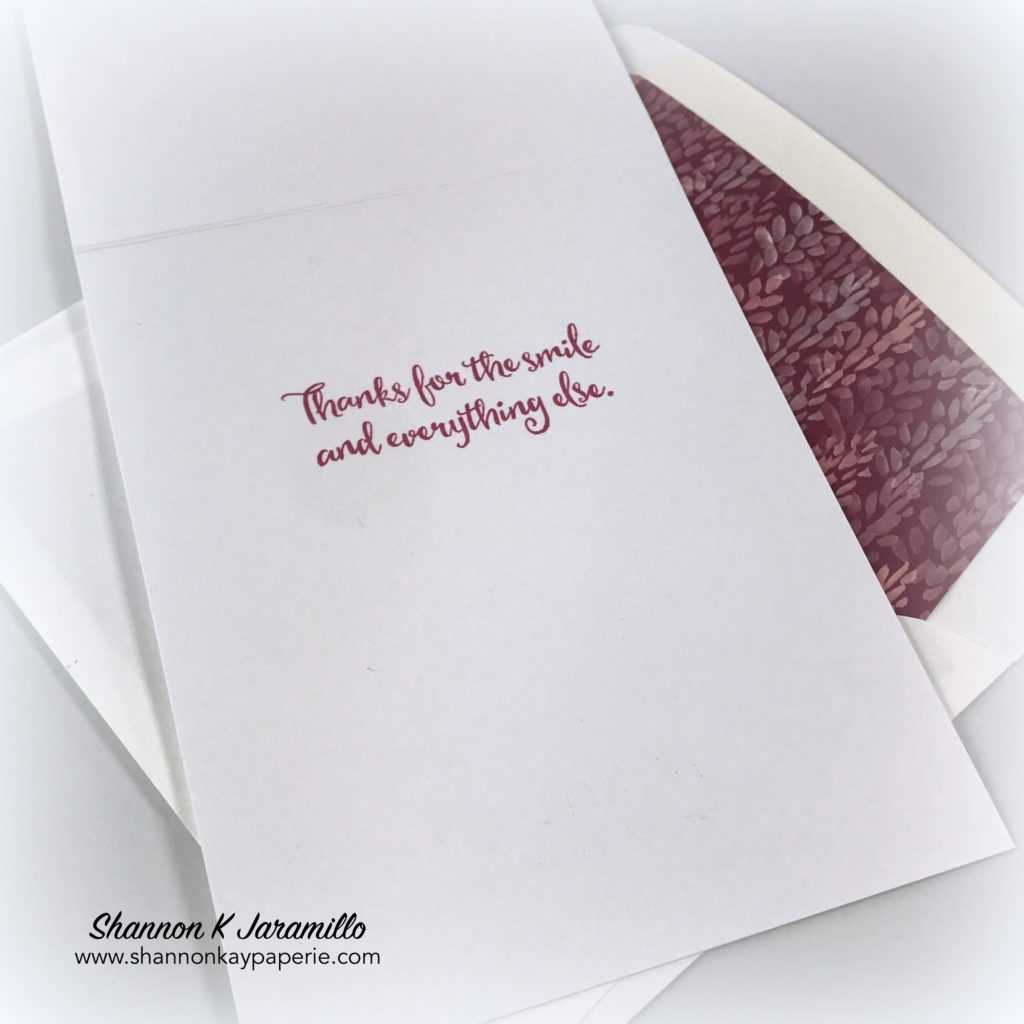
  • I used the stamp set Inspiring Iris today. It’s a layering stamp set so achieving this look could not be any easier. The outline image was stamped in Versafine Onyx Black, for the the flower image stamp I used Highland Heather and then Granny Apple Green for the stem and leaves image. A total of three stamps and no coloring experience required! I added a simple sentiment from the same stamp set in Versafine Onyx Black as well and that was it!

Stampin-Up-Inspiring-Iris-Thank-You-Card-Ideas-Shannon-Jaramillo-shannonkaypaperie

  • I layered the white card stock onto a Granny Apple Green layer. With just a bit peeking out from either side it adds interest without overwhelming the card with color. I added the gingham circle die cut because, well…gingham. Yumminess in every color!
  • And then the card was done but I couldn’t just stop there. I pulled out my little jar of unused bows, actually looking for a twine one to go with the clean and simple concept but found this white beauty instead. I adhered it with a glue dot. Love the sheer organdy, it’s such a clean look!

Stampin-Up-Inspiring-Iris-Thank-You-Cards-Ideas-Shannon-Jaramillo-shannonkaypaperie

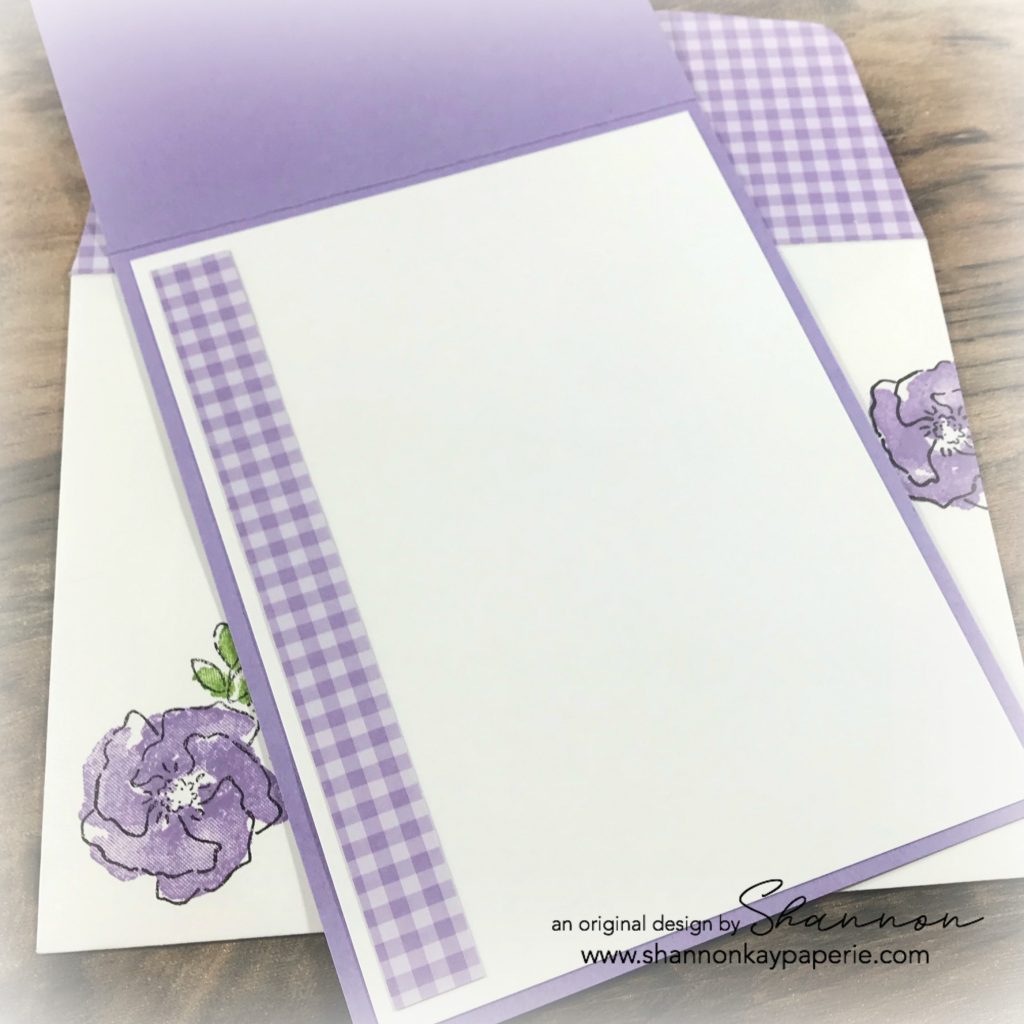
  • My goal with each card is to use up one 6 x 6 sheet of DSP. I used a quarter of a sheet for the die cut circle, and a large strip of it for the envelope flap but had enough to add a thin strip down the side on the card interior. There’s still lots of room for a note and the gingham is so cheery, no one can resist smiling when they see it!
  • I do have a square of DSP left over – rats! I’ll have to leave it out so that it gets used up soon!
  • I used a few different bloom stamps from the same set to decorate the front of the envelope. No naked envelopes please! lol

I hope you enjoyed today’s creation and have a minute to pop on over to the Tic Tac Toe Challenge blog to be inspired by the rest of the design team! Can’t wait to see what you create!

Blessings!

Supplies (all Stampin’ Up! unless otherwise noted):

Card Stock: Highland Heather and Granny Apple Green; Neenah Classic Crest Cover Solar White (80 lb)

DSP: All Occasion DSP Stack

Ink: Highland Heather and Granny Apple Green; Versamark Onyx Black

Stamps: Inspiring Iris

Coloring Tools: none

Dies: Stitched Shapes & SU’s Envelope Die (retired) 

Tools: Big Shot

Embellishments: White Organdy Ribbon & Wink of Stella

Other: Whisper White Envelope


An Open Heart – Freshly Made Sketches 422

Stampin-Up-An-Open Heart-Love-and-Friendship-Card-Idea-Shannon-Jaramillo-stampinup-SU

Hello my stampin’ peeps! I am back in town and was SO happy to be able to perch on my stool in my craft space and MAKE SOMETHING! I’ve been away TOO long! And I have just enough time to squeeze in the latest Freshly Made Sketches challenge! So let’s get to it!

Measurements:

  • Mossy Meadow Card Base 4 1/4″ x 11″ scored at 5 1/2″
  • Pear Pizzazz Card Stock 4″ x 5 1/4″
  • Strip of Garden Lane DSP 2″ x 5 1/4″
  • White Die Cut Card Stock 2 3/8″ x 4 5/16″

Details:

  • In my search for an image that would fit within the layout parameters, I quickly came across the retired stamp set An Open Heart and decided that it would be perfect. It’s a set that I acquired secondhand and have never stamped up. I have FAR too many of those so was very happy to get it inky! I knew I would be coloring with alcohol markers so I stamped the main image with Memento Tuxedo Black ink.
  • Four colors of Stampin’ Blends were used here (you could easily just use one or two): Light & Dark Soft Sea Foam; Light Old Olive and Light Mossy Meadow. I needed a very fine tip pen to color in the branch stem so I pulled out my Mossy Meadow Stampin’ Write Marker for that.
  • I wasn’t sure what type of foliage I was working with and had no idea what the buds and berries really were so I went with the first image that popped into my head and that was – citrus! So I reached for more Stampin’ Blends in Light So Saffron (may I add that this is a FABULOUS addition to the Stampin’ Blends color variety – if you don’t have it, order it!) and Light Mango Melody. I love the brightness of Mango Melody!

Stampin-Up-An-Open Heart-Love-and-Friendship-Card-Idea-Shannon-Jaramillo-stampinup-SU

  • Once the image was colored I searched through my stand alone dies for a rectangle shape narrow and tall enough to use with my stamped image and found the right size in the MFT stamps Pierced Traditional Tags die set. It fit perfectly and I like the added interest the tag shape adds to the card 🙂
  • I layered the tag over a pattern from the gorgeous Garden Lane DSP and then layered them both over a piece of Pear Pizzazz card stock which has been embossed with the Subtle 3D Embossing Folder.
  • I added this darling bird image from the same stamp set, again stamped in Memento Tuxedo Black (always use this ink when using alcohol markers), and wondered what color to color it. I am hopelessly illiterate when it comes to birds, but I found inspiration in the yellows of the buds and berries and then added darker shades as I went. When I was finished I had used a total of SIX colors! Light So Saffron, Light Mango Melody on the face, Light and Dark Crumb Cake on the body and Light and Dark Soft Suede on the wing and tail feathers. I’m pretty impressed with how he turned out. I have no idea if any such bird exists in nature but decided that it really doesn’t matter, and that knowledge is SO liberating! I just like the colors!! I fussy cut this little guy out and popped him up with Stampin’ Dimensionals.
  • I found a perfectly small sentiment to add to my card in the Itty Bitty Greetings stamp set. This set is the replacement for Teeny Tiny Wishes.
  • The layout called for some of ribbon or twine so I reached for (as I often do) my Linen Thread and make a quick bow. I just love (insert audible sigh) these linen bows and add them to projects frequently.
  • Added some Wink of Stella to the the leaves and called it good – at least for the card front!

Stampin-Up-An-Open Heart-Love-and-Friendship-Card-Idea-Shannon-Jaramillo-stampinup-SU

  • I chose a simple white insert for the card and added a darling sentiment from the Forever Lovely stamp set. The sentiment was inked up with Versamark Onyx Black for a vivid stamp and then I added a tiny leaf spring from the same set, colored in Light Soft Sea Foam with just a touch of color from my Mossy Meadow Stampin’ Write Marker. I left it at that for the card interior and proceeded to add matching DSP to the envelope flap and a partial stamp of the main image on the front of the envelope.

It can be sometimes a scary feeling for me when I start a project without a fixed image of the final result in my mind, but I worked through the twists and turns of the creative process and am super happy with how it turned out. Thank you again to the Freshly Made Sketches design team for their inspiration!! Make sure to visit the Freshly Made Sketches website to see all of their beautiful designs!!

Thank you for stopping by today and I hope you have a wonderful week!

Supplies (all Stampin’ Up! unless otherwise noted):

Card Stock: Mossy Meadow and Pear Pizzazz; and Neenah Classic Crest Cover Solar White (80 lb)

DSP: Garden Lane

Ink: Memento Tuxedo Black and Versamark Onyx Black

Stamps: An Open Heart, Itty Bitty Greetings and Forever Lovely

Coloring Tools: Light & Dark Soft Sea Foam, Light Old Olive, Light Mossy Meadow, Light So Saffron, Light Mango Melody, Light & Dark Crumb Cake and Light & Dark Soft Suede Stampin’ Blends; Mossy Meadow Stampin’ Write Marker

Dies: MFT Stamps Pierced Traditional Tags & SU’s Envelope Die (retired) 

Tools: Big Shot; Subtle 3D Embossing Folder

Embellishments: Linen Thread Wink of Stella

Other: Whisper White Envelope


How Sweet It Is – Freshly Made Sketches 368

Stampin-Up-How-Sweet-It-Is-Holiday-Christmas-Card-Idea-Shannon-Jaramillo-stampinup-SU

Hello My Friends! Are you knee deep in holiday preparations and celebrations? Me too but when my Stampin’ Up! preorder of new goodies from the upcoming Occasions and Sale-A-Bration catalogs came in, I MADE time to play!

Measurements:

  • White Card Base 4 1/4″ x 11″ scored at 5 1/2″
  • Everything else is a die cut!!

Details:

  • My jumping off point for today’s card was the latest Freshly Made Sketches challenge. I loved the design and the opportunity to break in my brand new Stampin’ Up! Stitched Rectangle Dies! Yes! January 3, 2019 is the day they will be available for purchase!

  • I thought I would share with you a few process photos today, this one shows how I arrived at my basic layout – all with dies! And can you see how the rectangle on the left is more narrow than the other two? They have given us choices! Love it!
  • It just took a few minutes to decide which patterns to use for my layout – the new ‘How Sweet It Is’ DSP in the Occasions catalog made it very easy – AND provided me with these darling cupcakes to use as a die cut! The two cupcakes below were each hand cut out of one the patterns of the DSP (I used this pattern for the envelope flap as well).

  • I couldn’t decide which cupcake to use! The top cupcake used the color Gorgeous Grape for the cupcake liner but I didn’t have Gorgeous Grape anywhere else on my card so I felt that the color actually took away from my overall design. And the Coastal Cabana cupcake liner with the white frosting in the bottom photo blended too easily with the patterned paper behind it. WHAT TO DO???

Stampin-Up-How-Sweet-It-Is-Holiday-Christmas-Card-Ideas-Shannon-Jaramillo-stampinup-SU

  • I fussy cut the Coastal Cabana cupcake liner and adhered it right on top of the Gorgeous Grape cupcake liner to create my own custom combination! There are four different cupcakes in the patterned paper to create SO many custom options! And I love that the images already come white the white outline…SO simple to cut out!
  • This darling sentiment (love the font!) is from the ‘Hello Cupcake’ photopolymer stamp set that you will be able to get free with your $50 purchase of any product! Super cute stamp set, I’ll be back with more samples soon!
  • The embellishments are all retired. The super sparkly and scrumptious enamel dots retired with the last annual catalog but you could easily use whatever you have on hand. The darling ribbon is VERY retired…like maybe 7 years ago? It also came in Old Olive and Marina Mist and was quite unlike any ribbon I had seen before so I kept it, and I’m thrilled to have the opportunity to use it!!
  • The large white rectangle is popped up using white craft foam and the cupcake and sentiment are both popped up with Stampin’ Dimensionals.

Stampin-Up-How-Sweet-It-Is-Holiday-Christmas-Cards-Ideas-Shannon-Jaramillo-stampinup-SU

  • I die cut another rectangle for the inside the same size as the one on the outside and then trimmed it out with Melon Mambo card stock. These super sweet flowers are from the ‘Hello Cupcake’ stamp set again (they are just the perfect size for an accent!) and the sentiment is from a stamp set that you will be able to purchase from the Occasions catalog called ‘Birthday Cheer’. Super fun fonts in this set!!

Here is the sketch from the Freshly Made Sketches design team that inspired today’s project:

I had such a fun time using this sketch and all of the bright new products available Jan 3rd from the Occasions catalog – it’s always fun to play with brand new stuff!!

Thank you for taking the time to visit me today and I hope that you have a wonderful holiday! I will be back next week with new projects!

Blessing to you!

Supplies (all Stampin’ Up! unless otherwise noted):

Card Stock: Melon Mambo and Stamper’s Select White by Papertrey Ink

DSP: How Sweet It Is

Ink: Melon Mambo and Versafine Onyx Black

Stamps: Hello Cupcake (outside Greeting); Birthday Cheer (inside greeting)

Dies:  Rectangle Stitched and Stitched Shapes Framelits Dies; retired Envelope Liner Die

Tools: Candy Cane Builder Punch; Stampin’ Trimmer

Embellishments: Glitter Enamel Dots and 3/8″ Melon Mambo ribbon, both retired

Other: Whisper White Envelope

Clean and Simple Dragonfly Dreams

Stampin-Up-Dragonfly-Dreams-Love-Friendship-Card-Idea-Shannon-Jaramillo-stampinup

This weekend I wanted to show a friend how the MISTI (Most Incredible Stamping Tool Invented) works. I just grabbed a stamp set and started stamping – NOT how I usually work. That saying “Hold on while I overthink it” fits me to a T!! Somewhere along the way I fell in love with what I had created and realized that it can be fun to just sit down and play!

Details:

  • This is literally the first time I have inked this set up! I stamped the outline of the dragonfly in Tuxedo Black Memento ink and demonstrated how, if the first stamp isn’t sharp enough, you can re-stamp it easily! Then I added the wings detail stamp in Sweet Sugarplum (randomly picked from my inks), demonstrating how easy it is to line layered stamps up and make sure you get it right! Wink of Stella adds a pretty sparkle to the wings and body of the dragonfly.
  • Next came the sentiment. The grid lines on the MISTI make it simple to get the sentiment stamped straight and without the dreaded “shadow” that can happen with a wood stamp or acrylic block.
  • A simple snippet of sparkly (retired) ribbon stapled to the card with the retired Stampin’ Up! stapler and a few layers of card stock and BOOM! done! Super pretty and super fast – I think it took me less than 10 minutes from start to finish!
  • The envelope is lined with retired DSP, the perfect shades for this card!

Stampin-Up-Dragonfly-Dreams-Love-Friendship-Cards-Idea-Shannon-Jaramillo-stampinup

  • I kept the inside simple with no layers this time…just a pretty sentiment!

Thanks for stopping by today! I hope you will check back in soon for more inspiration!

Supplies:

Clean and Classic Birthday Wish – Tic Tac Toe Challenge #1

Hi Friends! It’s Thursday and from now on, Thursdays around here will be all about the Tic Tac Toe Challenge! Our first challenge board was designed by the talented and oh so sweet Peggy Noe. So let’s see what we have!

Tic Tac Toe Challenge Board 1

Lots of sweet goodness to choose from! I chose stripes, free (die-cut), and baker’s twine to create a clean and classic birthday wish:

Happy-Birthday-Thinlits-Die-Fresh-Florals-Birthday-Card-Ideas-Shannon-Jaramillo-stampinup

Dimensions:

  • Thick Whisper White card base cut to 4 1/4″ x 11″, scored at 5 1/2″
  • Multi Color Panel 3 1/2″ x 4 3/4″

Details:

  • I cut multiples of three colors into strips measuring 1/2″ x 4 3/4″. I then adhered them, one at a time, to a panel of Whisper White card stock that measured 3 1/2″ x 4 3/4″. I then adhered the new striped panel to the card base with Stampin’ Dimensionals.
  • Isn’t the die cut darling? It’s the new Happy Birthday Thinlits! I die cut two here and adhered then to each other and then to the striped panel with the Fine-Tip Glue Pen.

Happy-Birthday-Thinlits-Die-Fresh-Florals-Birthday-Cards-Idea-Shannon-Jaramillo-stampinup

  • A few Glitter Enamel Dots add some sparkly fun, and the Whisper White Solid Baker’s Twine provides a bit of whimsy.
  • I ran to the Fresh Florals Designer Series Paper Stack for my envelope liner…simply delightful in Lemon Lime Twist!
  • I took the inside sentiment from the Soft Sayings Card Kit…what a great group of fonts and sayings!

Happy-Birthday-Thinlits-Die-Fresh-Florals-Birthday-Cards-Ideas-Shannon-Jaramillo-stampinup

Thanks so much for stopping by! Please leave a comment, and then head over to visit the rest of the Design Team at the Tic Tac Toe ChallengeWe hope too see you over in the gallery!!

Supplies: