A Clean & Simple Birthday – Freshly Made Sketches 416


Birthday-Card-Idea-Felicity-Jane-Hip-Hip-Hooray-Shannon-Jaramillo-shannonkaypaperie
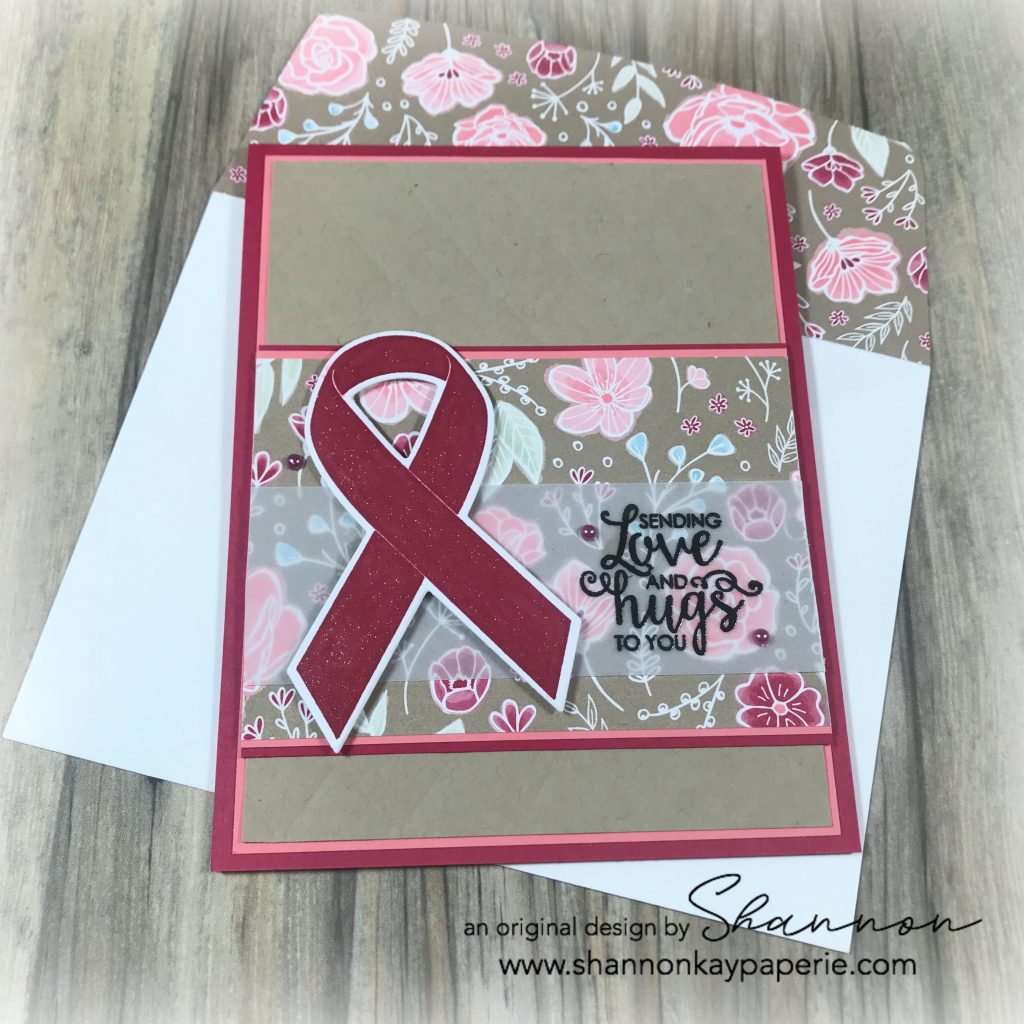
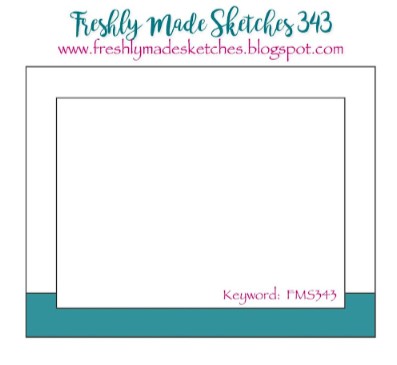
Hello and Happy New Year! It has been awhile since I have posted so I’m feeling a bit terrified to put myself out into the digital world again! 2019 has been a busy year and I am looking forward to (hopefully) spending more time creating and sharing in 2020! I always follow my friends over at Freshly Made Sketches and decided that if I could, I would jump in with the last sketch of 2019, and I’m so happy to spend my New Year’s Eve doing just that!

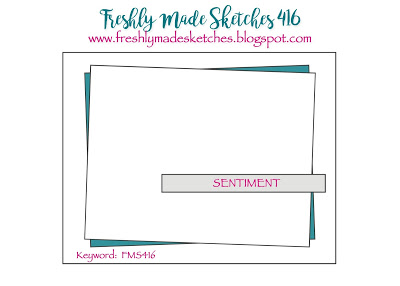
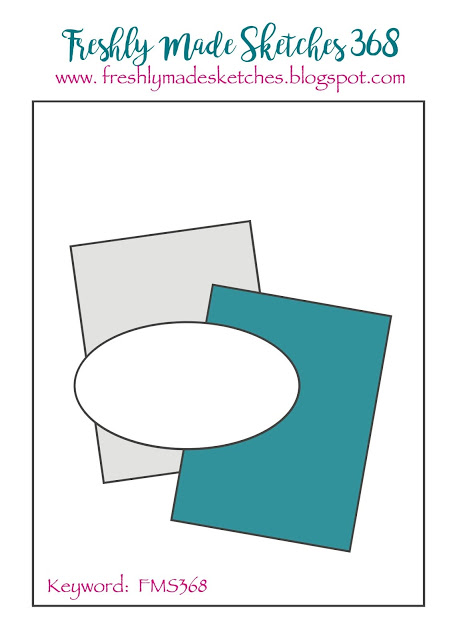
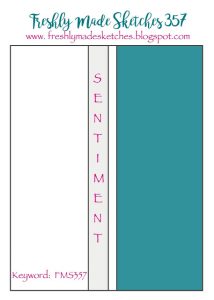
Isn’t it pretty?!? Clean and simple with lots of room for interpretation.

Details:

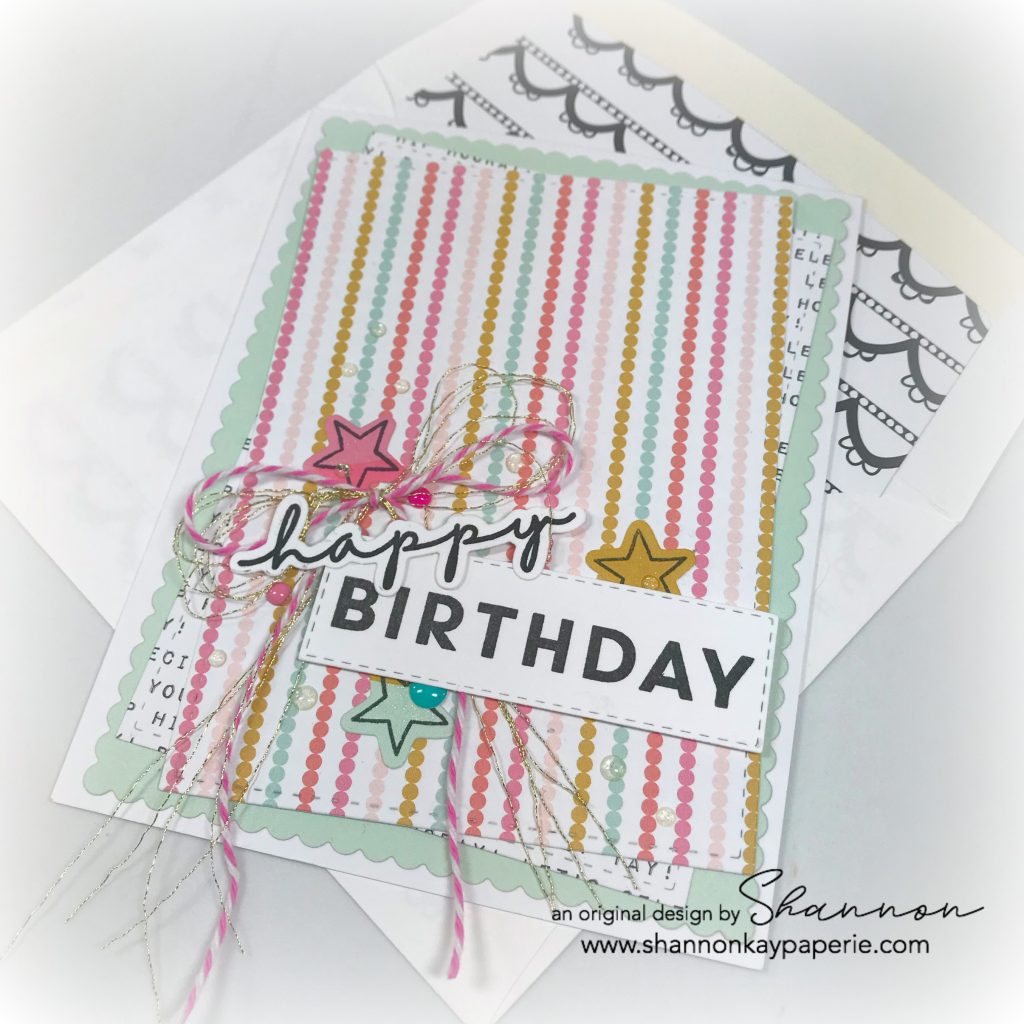
  • This sketch seemed like a great way to show off DSP so that’s where I started. I stood in my craft space facing my drawers of pattern paper collections and randomly pulled a drawer out – it turned out to be a monthly kit from Felicity Jane called “Jenny”. Every time I see their papers, I sigh with delight – GORGEOUS!

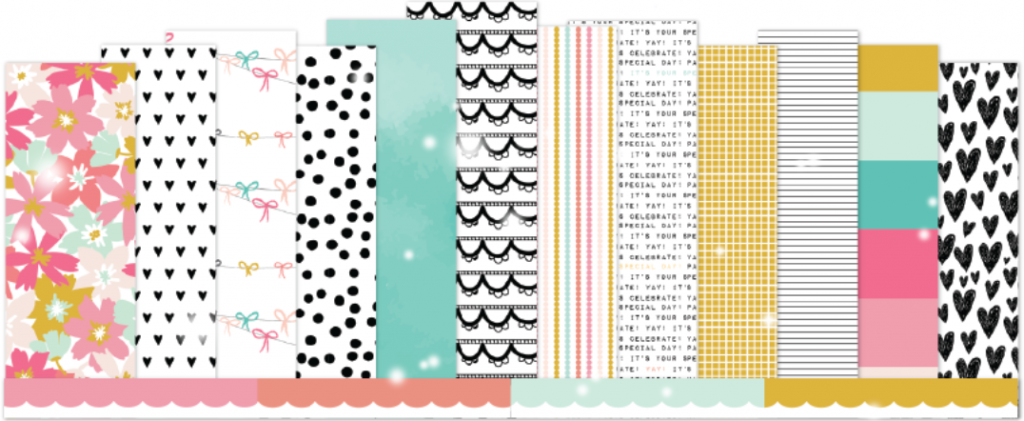
  • Did I lie?? G.O.R.G.E.O.U.S. I pulled one sheet out and used my old stand by, Femme Frame by Mama Elephant, to die cut one rectangle from the front side and one rectangle from the back side. I tilted the rectangles and layered them onto the scalloped rectangle die from the same set, which i die cut from a coordinating piece of heavy DSP. Easy peasy. Now to decorate!!
  • Felicity Jane’s stamp and die set Hip Hip Hooray was my choice for creating my focal point. I stamped and die cut the sentiment and then stamped a star onto a coordinating embellishment from the “Jenny” collection and die cut them out with the coordinating die.

Birthday-Cards-Ideas-Felicity-Jane-Hip-Hip-Hooray-Shannon-Jaramillo-shannonkaypaperie

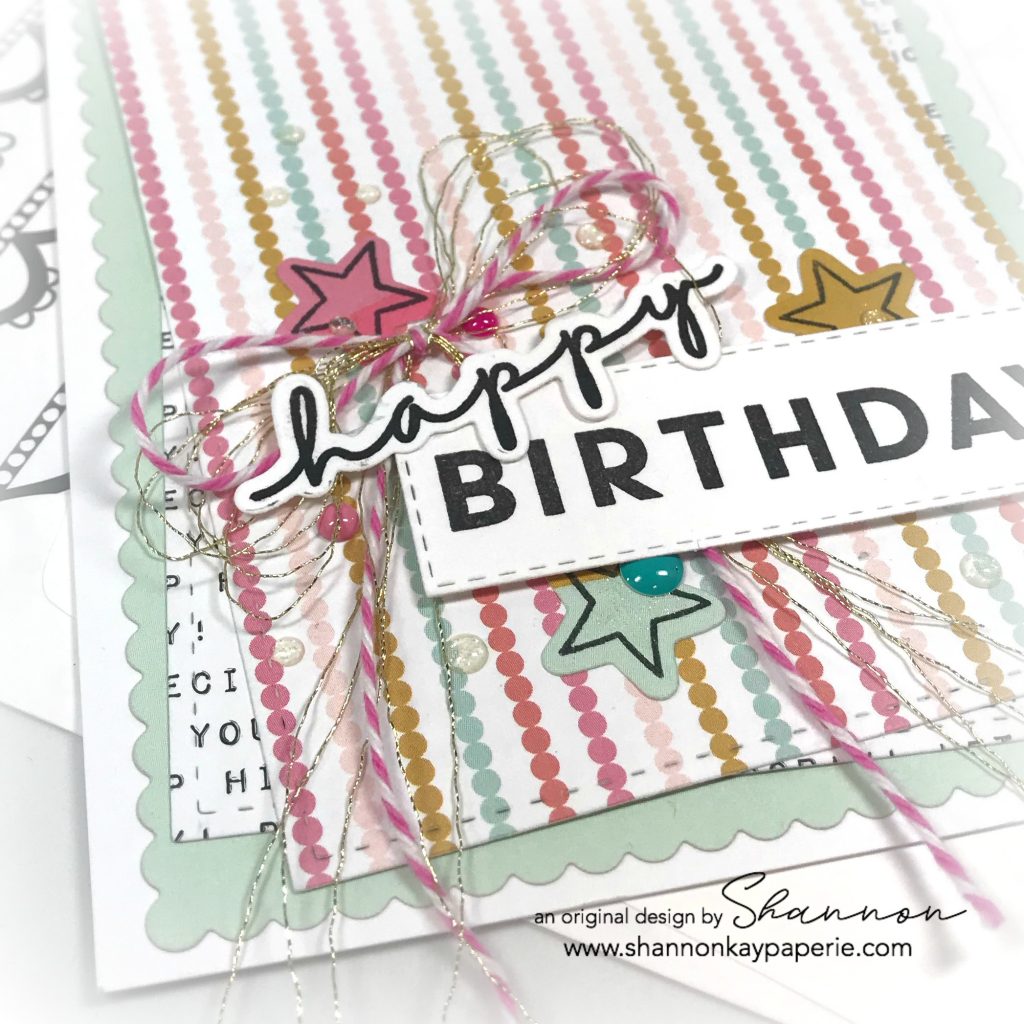
  • I created a sparkly bow with a bit of Stampin’ Up! gold metallic twine and a bit of Doodlebug Designs baker’s twine. I discovered that the gold metallic twine unwound into 6 separate threads so I went with the ‘messy’ look – I love it!! I attached the bow with a glue dot, the sentiment with Stampin’ Dimensionals, and the stars with Tombow adhesive tape.  A variety of colored and sparkly enamel dots add detail and a bit of playfulness to compliment the bow.
  • Using the bold black pattern as the envelope liner both mimics and accentuates the bold birthday sentiment. Such a FUN pattern!

And that’s it! A fun clean and simple card that took me about three hours to make!! lol. I’m rusty!! But it was fun to get my beloved toys out and make a really big mess. I can’t wait to do it again!! Thank you to Amy and the Freshly Made Sketches design team for their continued efforts to inspire us!!

Supplies (all Stampin’ Up! unless otherwise noted):

Card Stock: Stamper’s Select White by Papertrey Ink

DSP: the “Jenny” Collection from Felicity Jane

Specialty Paper: None

Ink: Versamark Onyx Black

Stamps: Hip Hip Hooray by Felicity Jane

Dies: Hip Hip Hooray by Felicity Jane; Femme Frame by Mama Elephant and SU’s Stitched Rectangle Dies & Envelope Die (retired)

Tools: Big Shot, Stampin’ Trimmer (retired)

Embellishments: Enamel Dots & Baker’s Twine by Doodlebug Designs, SU’s Glitter Clear Epoxy Shapes & Gold Metallic Twine (both retired), Wink of Stella 

Other: Whisper White Envelope

Love and Hugs – Freshly Made Sketches 372

Stampin-Up-Ribbon-of-Courage-Love-and-Friendship-Card-Idea-Shannon-Jaramillo-stampinup-SU

Greetings and salutations!! I have been quiet on the blogging front while I reorganize my creative space. There’s just something about the new year that makes me want to clean up and clean out! I took a break from organizing and saw the latest Freshly Made Sketches challenge sketch on Facebook. It inspired to push my project aside for the evening and play along!

Measurements:

  • Lovely Lipstick Card Base 4 1/4″ x 11″ scored at 5 1/2″
  • Flirty Flamingo Card Stock Layer 4″ x 5 1/4″
  • Crumb Cake Card Stock Layer 3 7/8″ x 5 1/8″
  • Lovely Lipstick Card Stock 4″ x 3″
  • Flirty Flamingo Card Stock Layer 4″ x 2 7/8″
  • DSP Layer 4″ x 2 3/4″
  • Vellum Layer 4″ x 1 3/8″

Details:

  • I began my design with the long rectangle element. In looking over my stamps I saw the Ribbon of Courage stamp set and thought that would do nicely. Bonus: I have not inked this set up until now! (Shout out to Patty Bennett who collaborated with Stampin’ Up! on the design of this stamp set and coordinating dies after she reached $1,000,000 in lifetime sales!)
  • The All My Love DSP was at the front of my new DSP bin so I paired this lovely pattern up with Lovely Lipstick, Flirty Flamingo and Crumb Cake card stock.
  • The Crumb Cake piece has been run through the Big Shot with the Tufted Dynamic Embossing Folder. It’s hard to see so I probably should have run it through twice (oops!).

Stampin-Up-Ribbon-of-Courage-Love-and-Friendship-Card-Ideas-Shannon-Jaramillo-stampinup-SU

  • I stamped this darling sentiment onto vellum with Versamark ink, sprinkled on Black Embossing Powder, and then set the powder with my heat gun. (so pretty!) I secured the vellum to the DSP with a big glue dot under the ribbon die and used a bit of Ranger Multi Medium Matte fine tip glue to carefully apply a small amount of glue to the back of the embossed sentiment. It’s kind of a sneaky way to get the vellum stuck down without the glue showing!
  • I popped the ribbon die up with Stampin’ Dimensionals, adhered it to the card front and then went a little crazy with the Wink of Stella 🙂 Note: Use care with Wink of Stella on any shade of red, the color can bleed into the white space!
  • A few artisan pearls to help draw the eye to the sentiment and of course one more off to the left to create a visual triangle.

Stampin-Up-Ribbon-of-Courage-Love-and-Friendship-Cards-Idea-Shannon-Jaramillo-stampinup-SU

  • Lastly, here is the inside of the card. I layered white card stock onto Flirty Flamingo and used Tuxedo Black Memento Ink to add two lovely little flower accents from the Make a Difference stamp set. I used both shades of Flirty Flamingo, Lovely Lipstick and Sea Foam Green Stampin’ Blends to color them in. SO STINKIN’ CUTE!!
  • As always, I’ve covered the envelope flap with the same pretty DSP. My motto is to leave no space unadorned!! 🙂

Thank you for stopping by today!!

Supplies (all Stampin’ Up! unless otherwise noted):

Card Stock: Crumb Cake, Flirty Flamingo, Lovely Lipstick; and Stamper’s Select White by Papertrey Ink

DSP: All My Love

Specialty Paper: Vellum

Ink: Tuxedo Black Memento, Versamark

Stamps: Ribbon of Courage and Make a Difference

Dies: Support Ribbon Framelits

Tools: Big Shot; Embossing Buddy, Black Embossing Powder, Heat Tool, Stampin’ Blends

Embellishments: Artisan Pearls; Wink of Stella

Other: Whisper White Envelope

How Sweet It Is – Freshly Made Sketches 368

Stampin-Up-How-Sweet-It-Is-Holiday-Christmas-Card-Idea-Shannon-Jaramillo-stampinup-SU

Hello My Friends! Are you knee deep in holiday preparations and celebrations? Me too but when my Stampin’ Up! preorder of new goodies from the upcoming Occasions and Sale-A-Bration catalogs came in, I MADE time to play!

Measurements:

  • White Card Base 4 1/4″ x 11″ scored at 5 1/2″
  • Everything else is a die cut!!

Details:

  • My jumping off point for today’s card was the latest Freshly Made Sketches challenge. I loved the design and the opportunity to break in my brand new Stampin’ Up! Stitched Rectangle Dies! Yes! January 3, 2019 is the day they will be available for purchase!

  • I thought I would share with you a few process photos today, this one shows how I arrived at my basic layout – all with dies! And can you see how the rectangle on the left is more narrow than the other two? They have given us choices! Love it!
  • It just took a few minutes to decide which patterns to use for my layout – the new ‘How Sweet It Is’ DSP in the Occasions catalog made it very easy – AND provided me with these darling cupcakes to use as a die cut! The two cupcakes below were each hand cut out of one the patterns of the DSP (I used this pattern for the envelope flap as well).

  • I couldn’t decide which cupcake to use! The top cupcake used the color Gorgeous Grape for the cupcake liner but I didn’t have Gorgeous Grape anywhere else on my card so I felt that the color actually took away from my overall design. And the Coastal Cabana cupcake liner with the white frosting in the bottom photo blended too easily with the patterned paper behind it. WHAT TO DO???

Stampin-Up-How-Sweet-It-Is-Holiday-Christmas-Card-Ideas-Shannon-Jaramillo-stampinup-SU

  • I fussy cut the Coastal Cabana cupcake liner and adhered it right on top of the Gorgeous Grape cupcake liner to create my own custom combination! There are four different cupcakes in the patterned paper to create SO many custom options! And I love that the images already come white the white outline…SO simple to cut out!
  • This darling sentiment (love the font!) is from the ‘Hello Cupcake’ photopolymer stamp set that you will be able to get free with your $50 purchase of any product! Super cute stamp set, I’ll be back with more samples soon!
  • The embellishments are all retired. The super sparkly and scrumptious enamel dots retired with the last annual catalog but you could easily use whatever you have on hand. The darling ribbon is VERY retired…like maybe 7 years ago? It also came in Old Olive and Marina Mist and was quite unlike any ribbon I had seen before so I kept it, and I’m thrilled to have the opportunity to use it!!
  • The large white rectangle is popped up using white craft foam and the cupcake and sentiment are both popped up with Stampin’ Dimensionals.

Stampin-Up-How-Sweet-It-Is-Holiday-Christmas-Cards-Ideas-Shannon-Jaramillo-stampinup-SU

  • I die cut another rectangle for the inside the same size as the one on the outside and then trimmed it out with Melon Mambo card stock. These super sweet flowers are from the ‘Hello Cupcake’ stamp set again (they are just the perfect size for an accent!) and the sentiment is from a stamp set that you will be able to purchase from the Occasions catalog called ‘Birthday Cheer’. Super fun fonts in this set!!

Here is the sketch from the Freshly Made Sketches design team that inspired today’s project:

I had such a fun time using this sketch and all of the bright new products available Jan 3rd from the Occasions catalog – it’s always fun to play with brand new stuff!!

Thank you for taking the time to visit me today and I hope that you have a wonderful holiday! I will be back next week with new projects!

Blessing to you!

Supplies (all Stampin’ Up! unless otherwise noted):

Card Stock: Melon Mambo and Stamper’s Select White by Papertrey Ink

DSP: How Sweet It Is

Ink: Melon Mambo and Versafine Onyx Black

Stamps: Hello Cupcake (outside Greeting); Birthday Cheer (inside greeting)

Dies:  Rectangle Stitched and Stitched Shapes Framelits Dies; retired Envelope Liner Die

Tools: Candy Cane Builder Punch; Stampin’ Trimmer

Embellishments: Glitter Enamel Dots and 3/8″ Melon Mambo ribbon, both retired

Other: Whisper White Envelope

Toil & Trouble – Freshly Made Sketches 357

Stampin-Up-Halloween-Card-Idea-Shannon-Jaramillo-stampinup

Are you a fan of Halloween? I used to love everything scary. Now…not so much. I lean towards cute and cuddly Halloween these days and I thought this super cute DSP fit the bill nicely.

Measurements (bottom to top):

  • Basic Black Card Base 4 1/4″ x 11″ scored at 5 1/2″
  • Highland Heather Card Stock Layer 4″ x 5 1/4″
  • Whisper White Card Stock Layer 3 3/4″ x 5″
  • Pattern Paper Layer 3″ x 5″

Details:

  • This card is really easy to assemble.  I laid the DSP piece onto the 3 3/4″ x 5″ Whisper White layer, aligning it all the way to the right side. Next I stamped the sentiment 3 times onto a scrap piece of white card stock, using my stamping platform to  align the words perfectly. Next, I cut a 2″ x 6″ piece of Highland Heather card stock and used the Decorative Ribbon Border Punch to punch the pretty border. I then layered my sentiment strip onto the punched border and then laid the whole piece next to the edge of the DSP.

Stampin-Up-Halloween-Cards-Ideas-Shannon-Jaramillo-stampinup-su

  • I pulled out SU’s Black 3/8″ Glittered Organdy ribbon and tied a knot around the layers, popped the whole panel up onto Stampin’ Dimensionals and adhered it to the card base. That’s it! This would be a fun card to mass produce!
  • While we are on this picture I wanted to point out a boo boo. Normally I wouldn’t but I have a reason. Look at white card stock that the sentiment strip is stamped on. It’s a scrap of Papertrey Ink’s Stamper’s Select White card stock. Then look at the white cardstock to the left of that. That is Stampin’ Up’s Whisper White card stock. Can you see how crisp the PTI white is? It makes the SU white look yellow. Once I discovered that I have always used PTI Stamper’s Select White. It’s truly the brightest white I’ve ever come across.
  • Now I said I like cute and cuddly Halloween but I purchased a “share” of SU’s DSP and embellishments from the Holiday Catalog and included in that were some little tiny charms. That totally creeped me out. Really. But when I looked at the knot in this gorgeous ribbon, I knew the charm would be PERFECT there. Are you ready???

Stampin-Up-Halloween-Cards-Ideas-Shannon-Jaramillo-stampinup

  • Seriously! Eek!!!! Have you ever seen something so cute but also so creepy at the same time??? I only have one more charm left so I’ll have to use it up. Don’t want to go digging through embellishments and see that! I might pee my pants!!
  • I added some retired Black Rhinestone Jewels in between the repetition on the sentiment and I also randomly colored the purple ghosts with Wink of Stella – you can just make it out on the one above my water mark 🙂

So there you go. My super easy and mass producible Halloween card. Look through your stash and use up what you have to CASE this card! I’d love to see what you make!!

I apologize for the second blog post in one day but my Sunday post was done after the 8am deadline so it won’t hit until Monday and this one will hit on Monday as well, but I wanted to make the Freshly Made Sketches deadline and I’m sneaking in just under the wire 🙂

Thank you so much for visiting me and allowing me to share my art with you! XX

Supplies:

Card Stock: Basic Black, Highland Heather and Whisper White by Stampin’ Up!

DSP: Toil & Trouble by Stampin’ Up!

Ink: Versafine Onyx Black

Stamps: Best of Halloween by Stampin’ Up! (retired) and Happy Pumpkin by FSJ Stamps

Dies:  None

Tools: Decorative Ribbon Border Punch

Embellishments: Black 3/8 Glittered Organdy Ribbon; Spider Trinkets and Black Rhinestone Basic Jewels – All by Stampin’ Up!

Other: Whisper White Envelope by Stampin’ Up!

Cows Are Beautiful Too!

Fun-Stampers-Journey-Cows-Are-Beautiful-Too-Thank-You-Card-Idea-Shannon-Jaramillo-FSJ-funstampersjourney

I never thought I would say that a cow was beautiful but this gal sure is! This is another stamp featured in the Life is Beautiful stamp set…available TODAY!! Yay!! I am also featuring another pattern from the Good Life Prints pattern paper pack, a delightful Rustic Rose gingham, yum!!

I’m going to be brief with the details of my card so you can get to the catalog faster! (But no peeking until you suitably admire my card. #kiddingnotkidding

  • Today I am featuring two new colors, one of which you saw a bit of yesterday, Tin Pail (I’m going to give you a closer look at it in a minute), and the second color is Rustic Rose…say it with me Rustic Rose…it just sounds farmhouse-y and garden-y and picket fence-y doesn’t it??
  • The adorable Matilde, yes, I named her, looks so pretty with just her bonnet of flowers colored, I can imagine all sorts of coloring possibilities for her!
  • The sentiment is from the Humble and Kind stamp set, also part of the Good Life collection. Clean and simple and sweet.

Fun-Stampers-Journey-Cows-Are-Beautiful-Too-Thank-You-Cards-Ideas-Shannon-Jaramillo-FSJ-funstampersjourney

  • I tried several different color combinations to get the best shade of rose that I could and settled with a color a mid-tone gray (#46) followed up with several layers of pink (#04) in deepening tones. I used the same gray on the leaves, followed up by Fresh Forest green (#23) and then used a lighter gray (#29) with the same green for the sprigs of leaves around her mouth.
  • I wanted to give you a comparison for the new Tin Pail color so I stamped Miss Matilde in both Whip Cream and Tin Pail. I am pretty sure Tin Pail is going to become one of my staple neutral colors:

Fun-Stampers-Journey-Cows-Are-Beautiful-Too!-Thank-You-Card-Idea-Shannon-Jaramillo-FSJ-funstampersjourney

  • I love the scallop detail that the Border Basics die provides! It’s such a fun detail! I added a few sequins and then a strip of Tin Pail card stock down the left side to give my card that little somthin’ extra to balance everything out.
  • Oh!! And please notice that I included Matilde’s actual stamp so you could see the ‘indexing’ (image on the cling foam). No stickers! No issues with cling! And you know exactly where and how your image is going to stamp! What a concept. I love, love, love the indexed stamps, it makes stamping so much easier. And easy is ALWAYS good, right?

Fun-Stampers-Journey-Cows-Are-Beautiful-Too-Thank-You-Card-Ideas-Shannon-Jaramillo-FSJ-funstampersjourney

  • A special shout out the the Freshly Made Sketches design team for their fabulous (as always) for their layout sketch! I am always inspired by their talents!

Okay folks, the catalog is live! Please feel free to view it here in flip-book format while you wait for the actual catalog to arrive. Oh wait…did you not ask me for one?? Oh dear. Well, the good news is I will totally send you a catalog free, I am just asking that you cover the shipping charge of $7. A steal for a 335 page catalog with fabulous sample and TONS of inspiration! Email me today and we will get you all set up! Enjoy!