Taking Flight for Your Birthday – Retro Sketches #157

SKP Watermarked Photos3-023
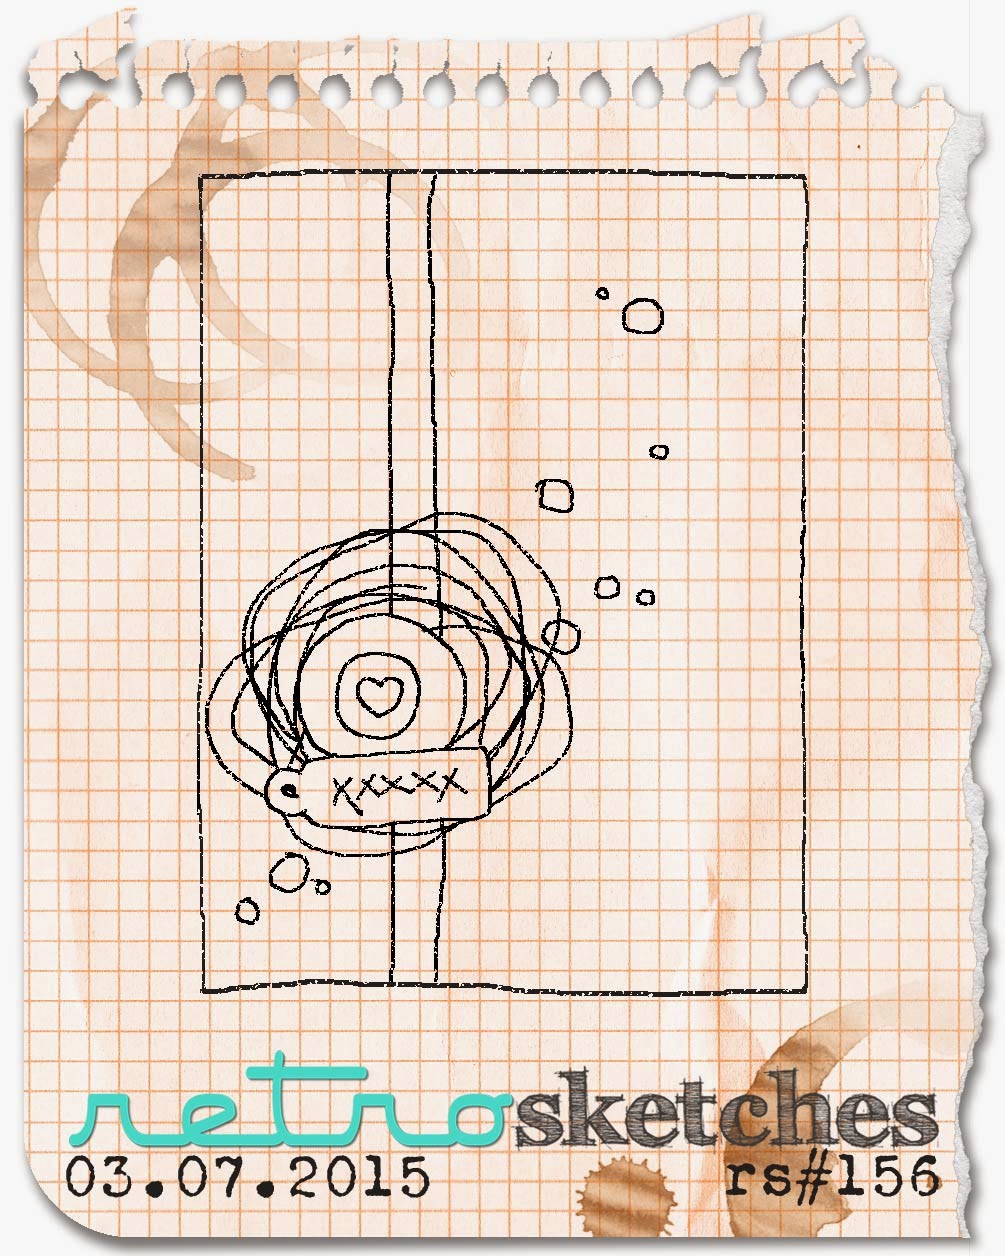
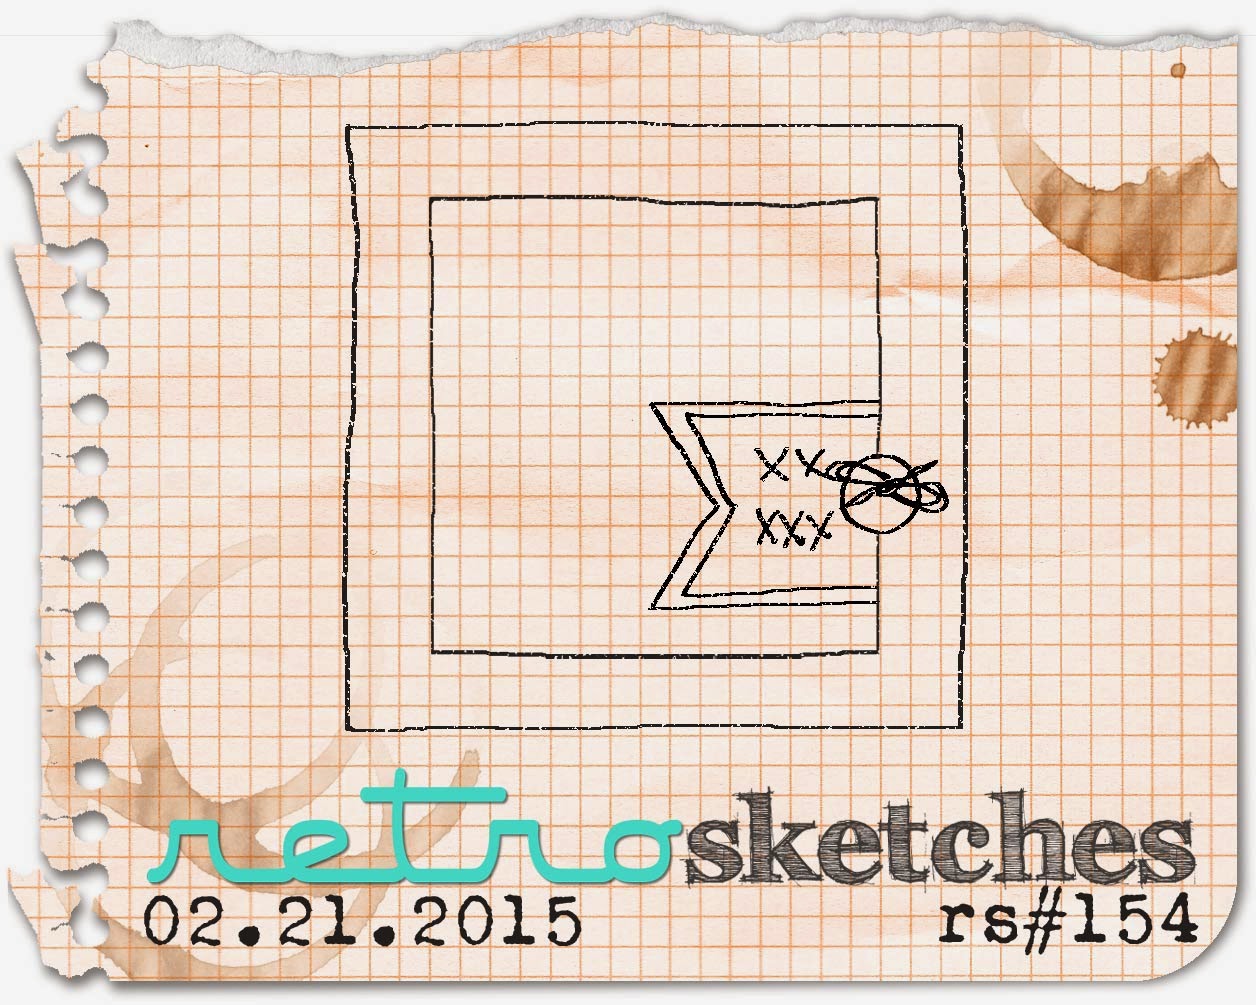
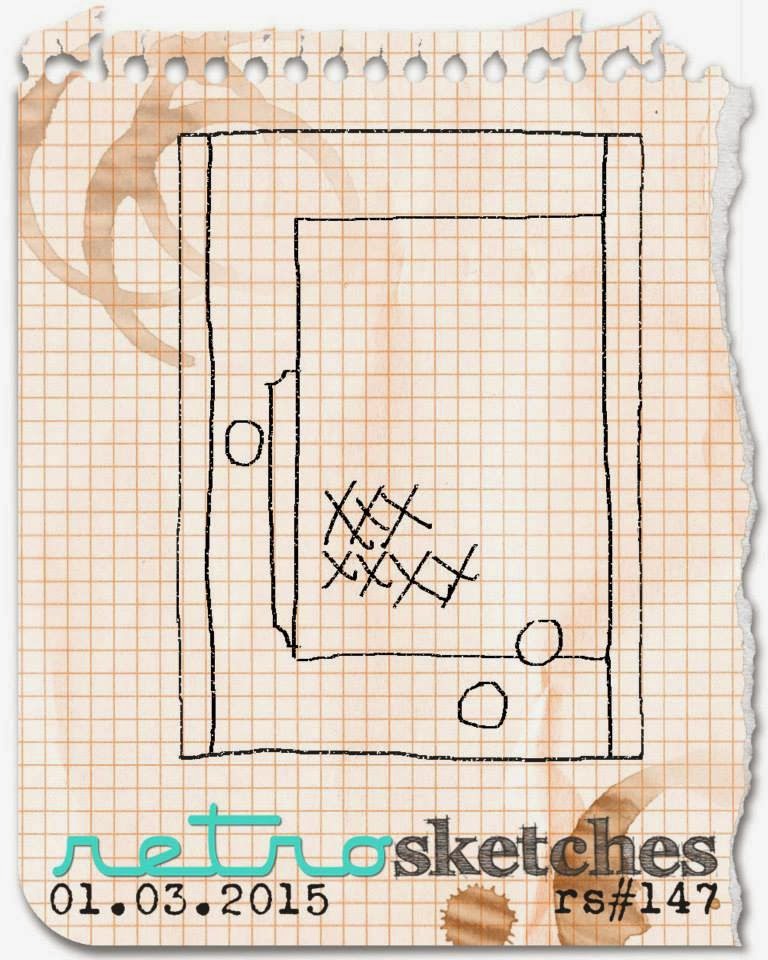
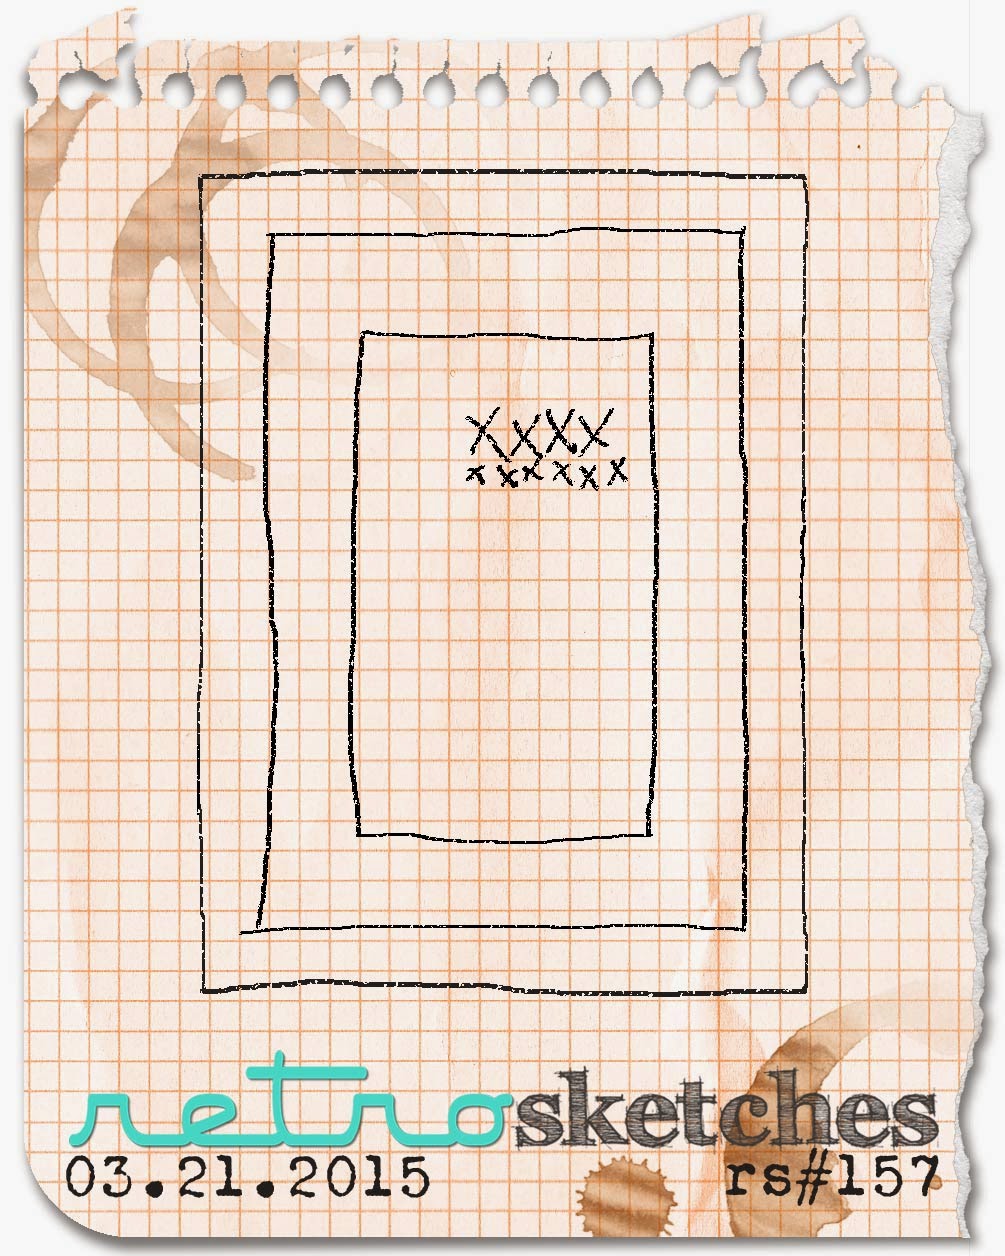
Was this ever a fun card to make!! I was inspired by the sketch this week over at Retro Sketches:

rs157
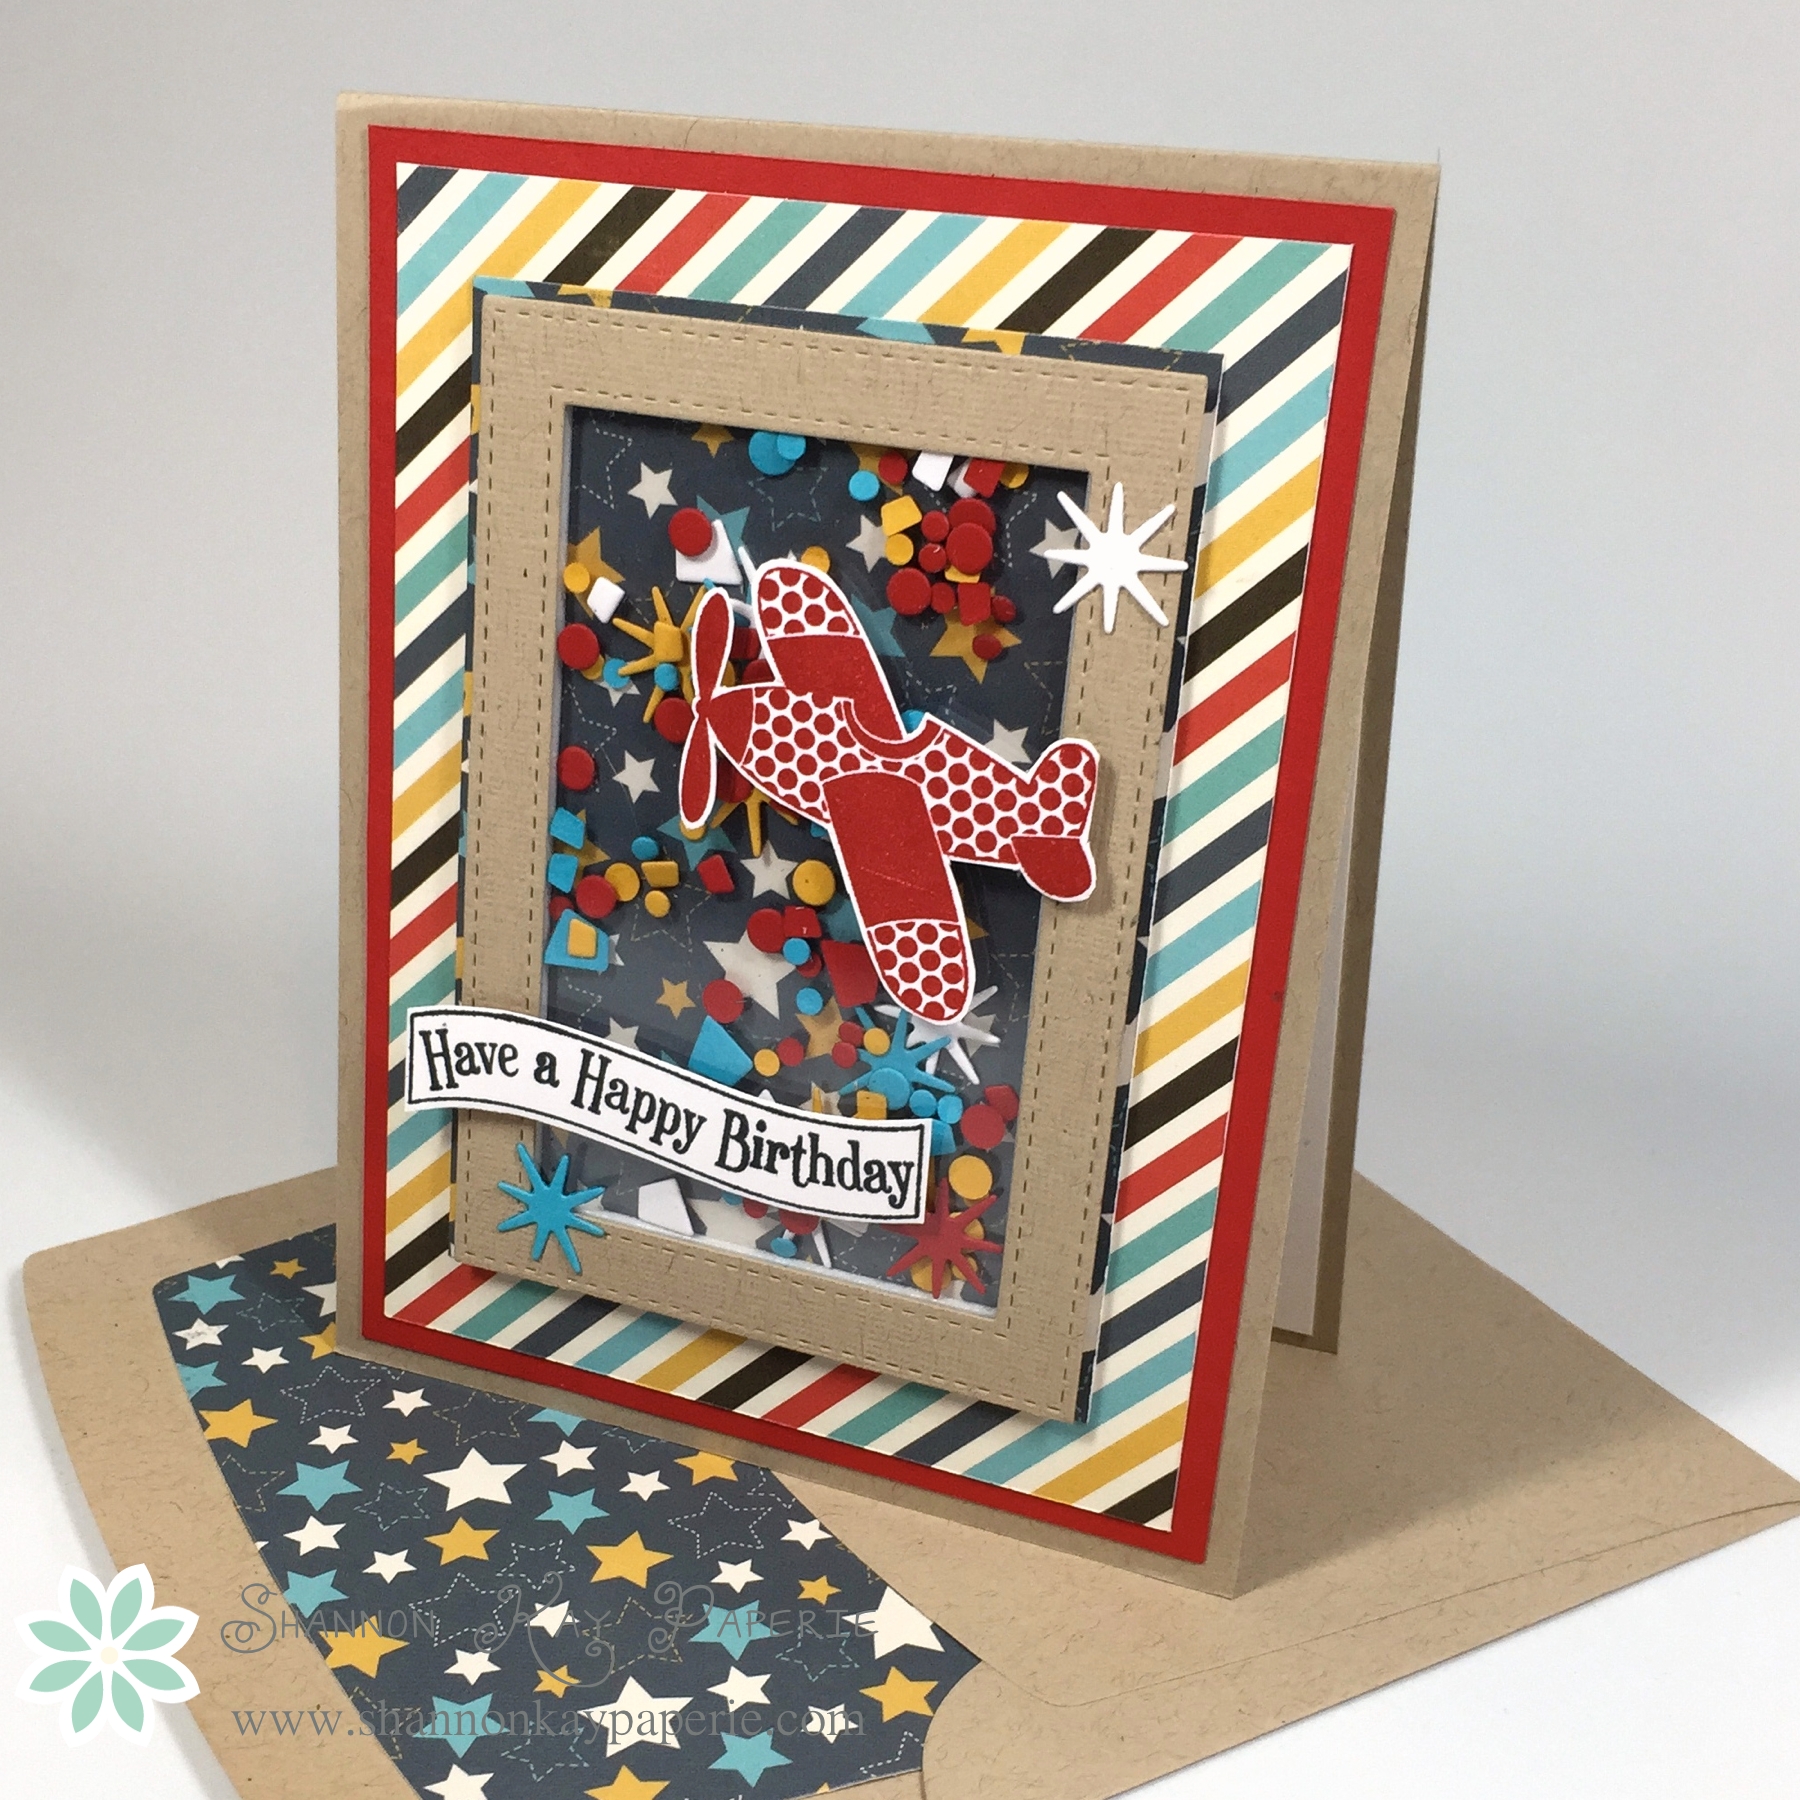
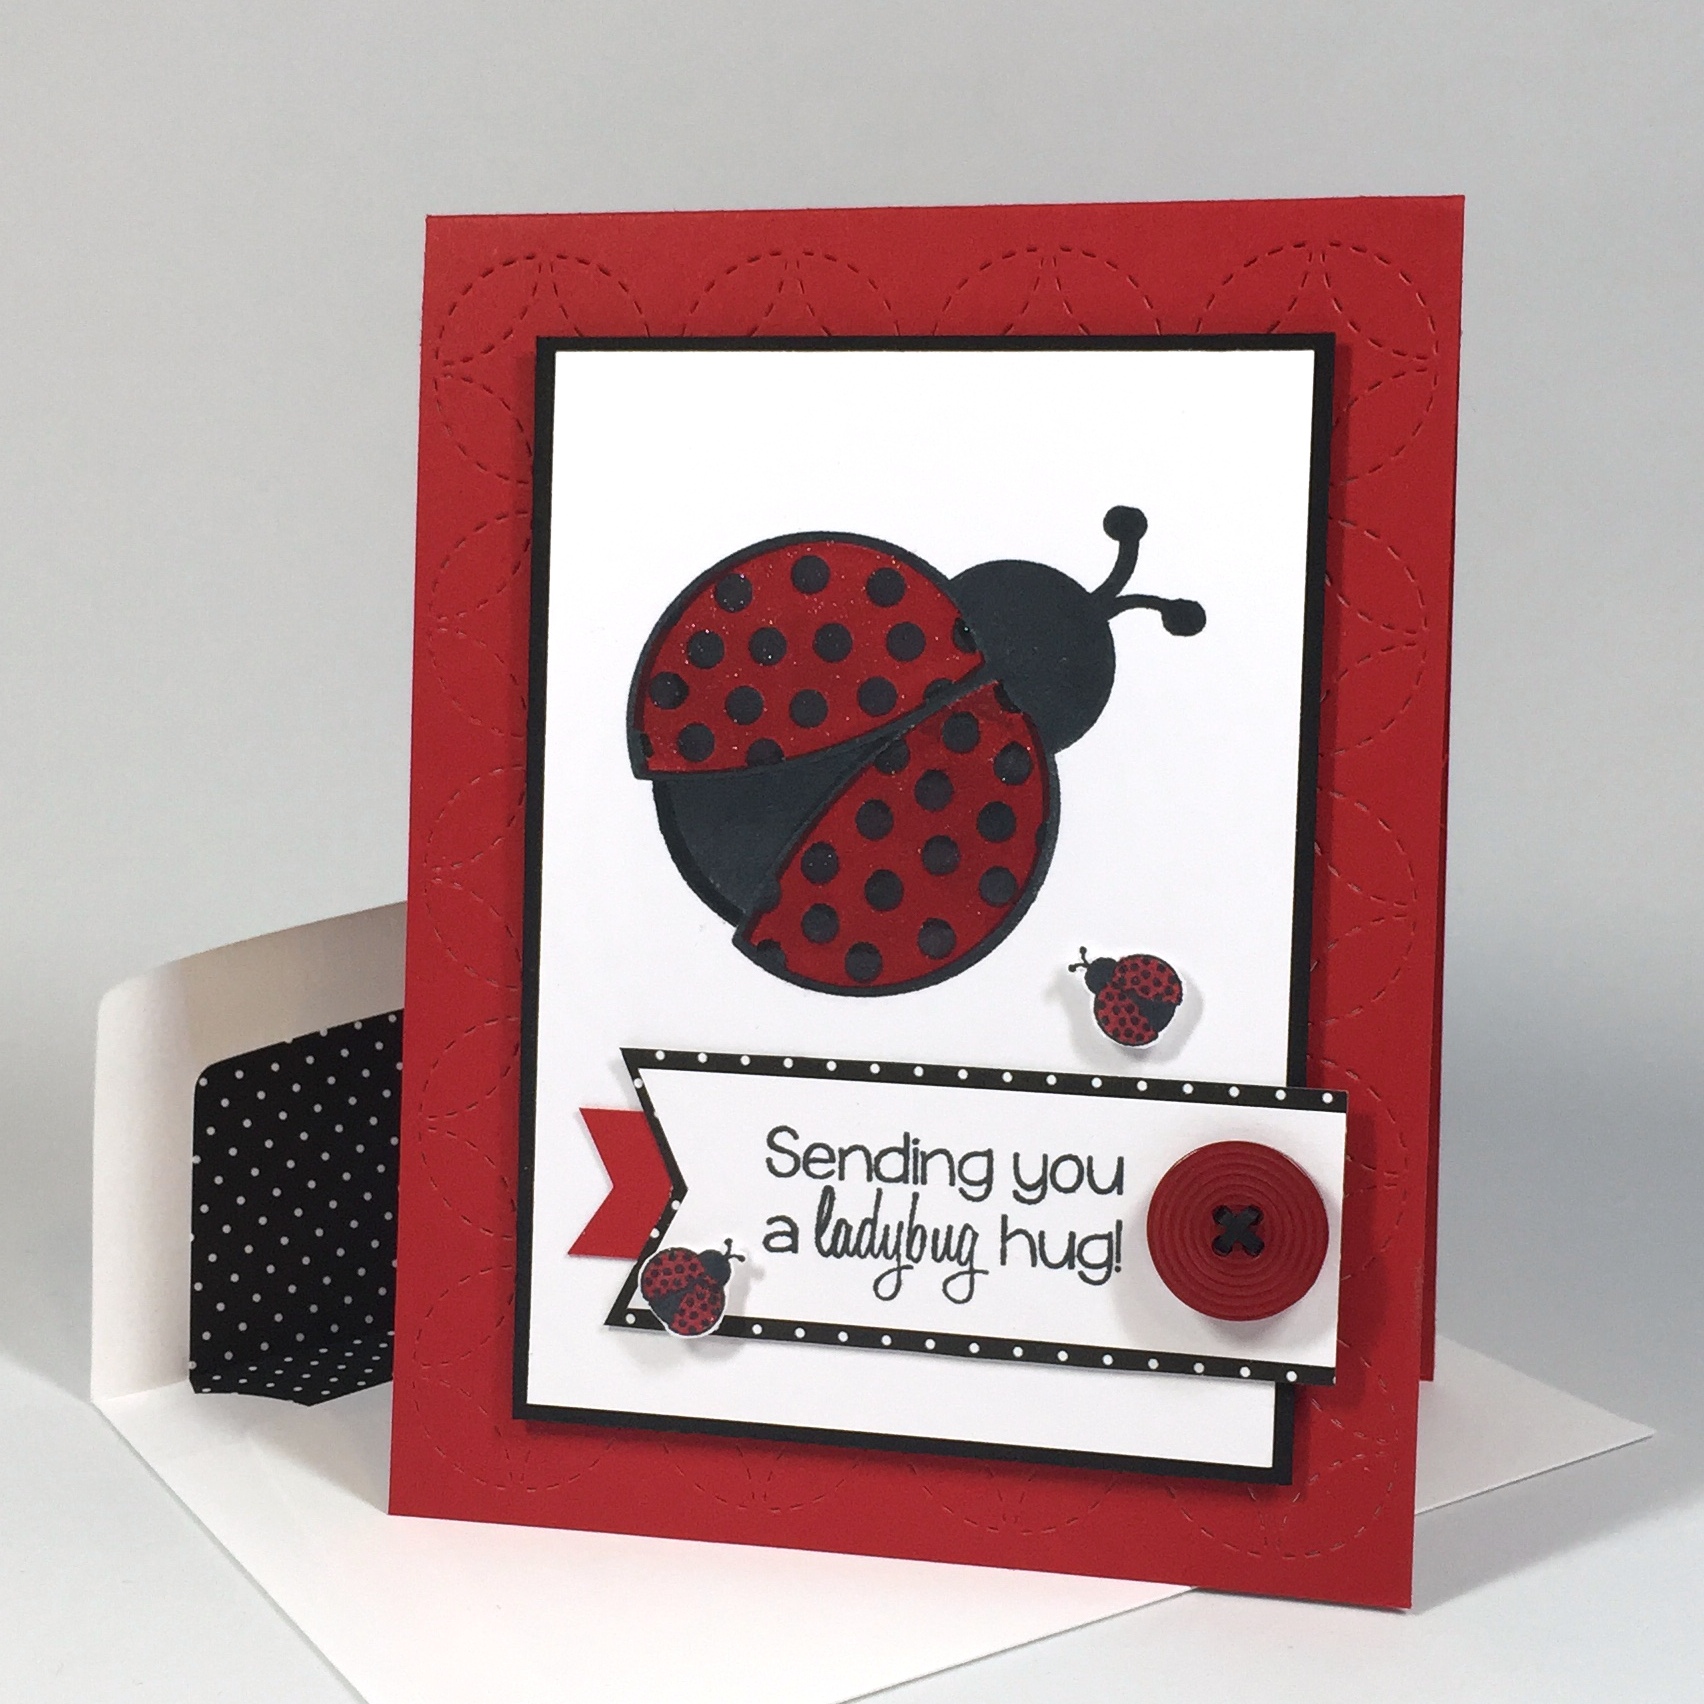
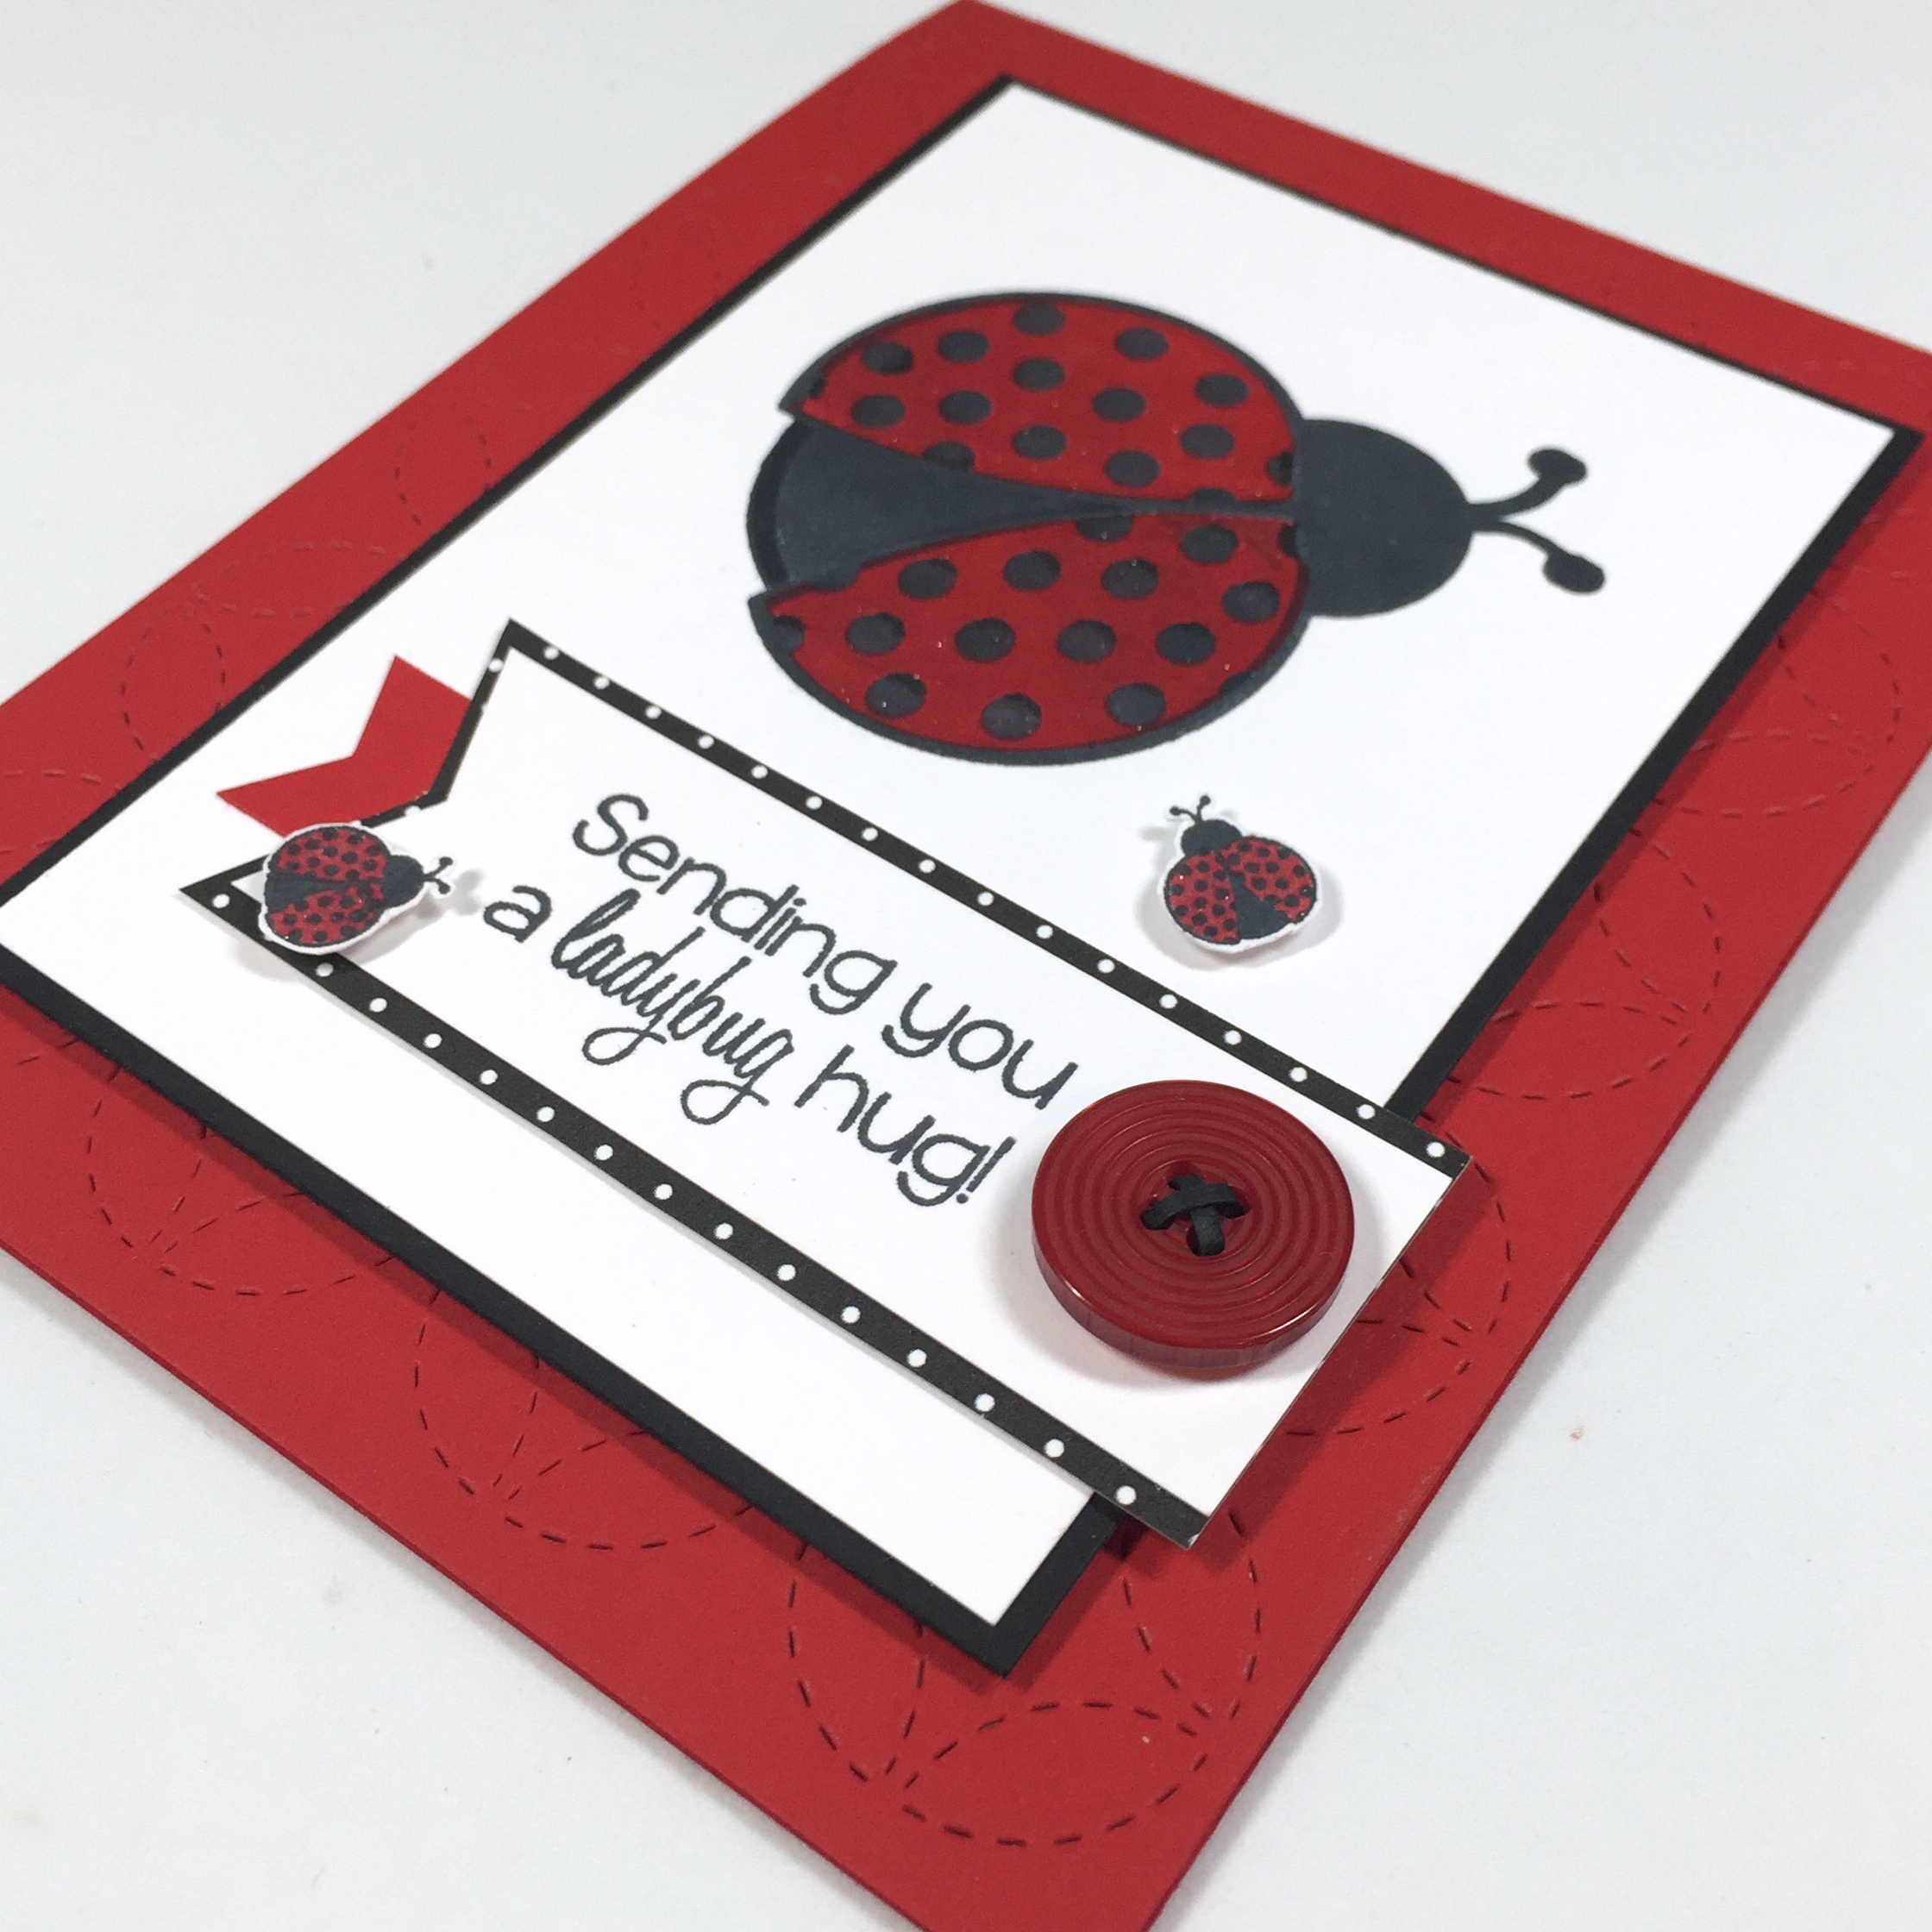
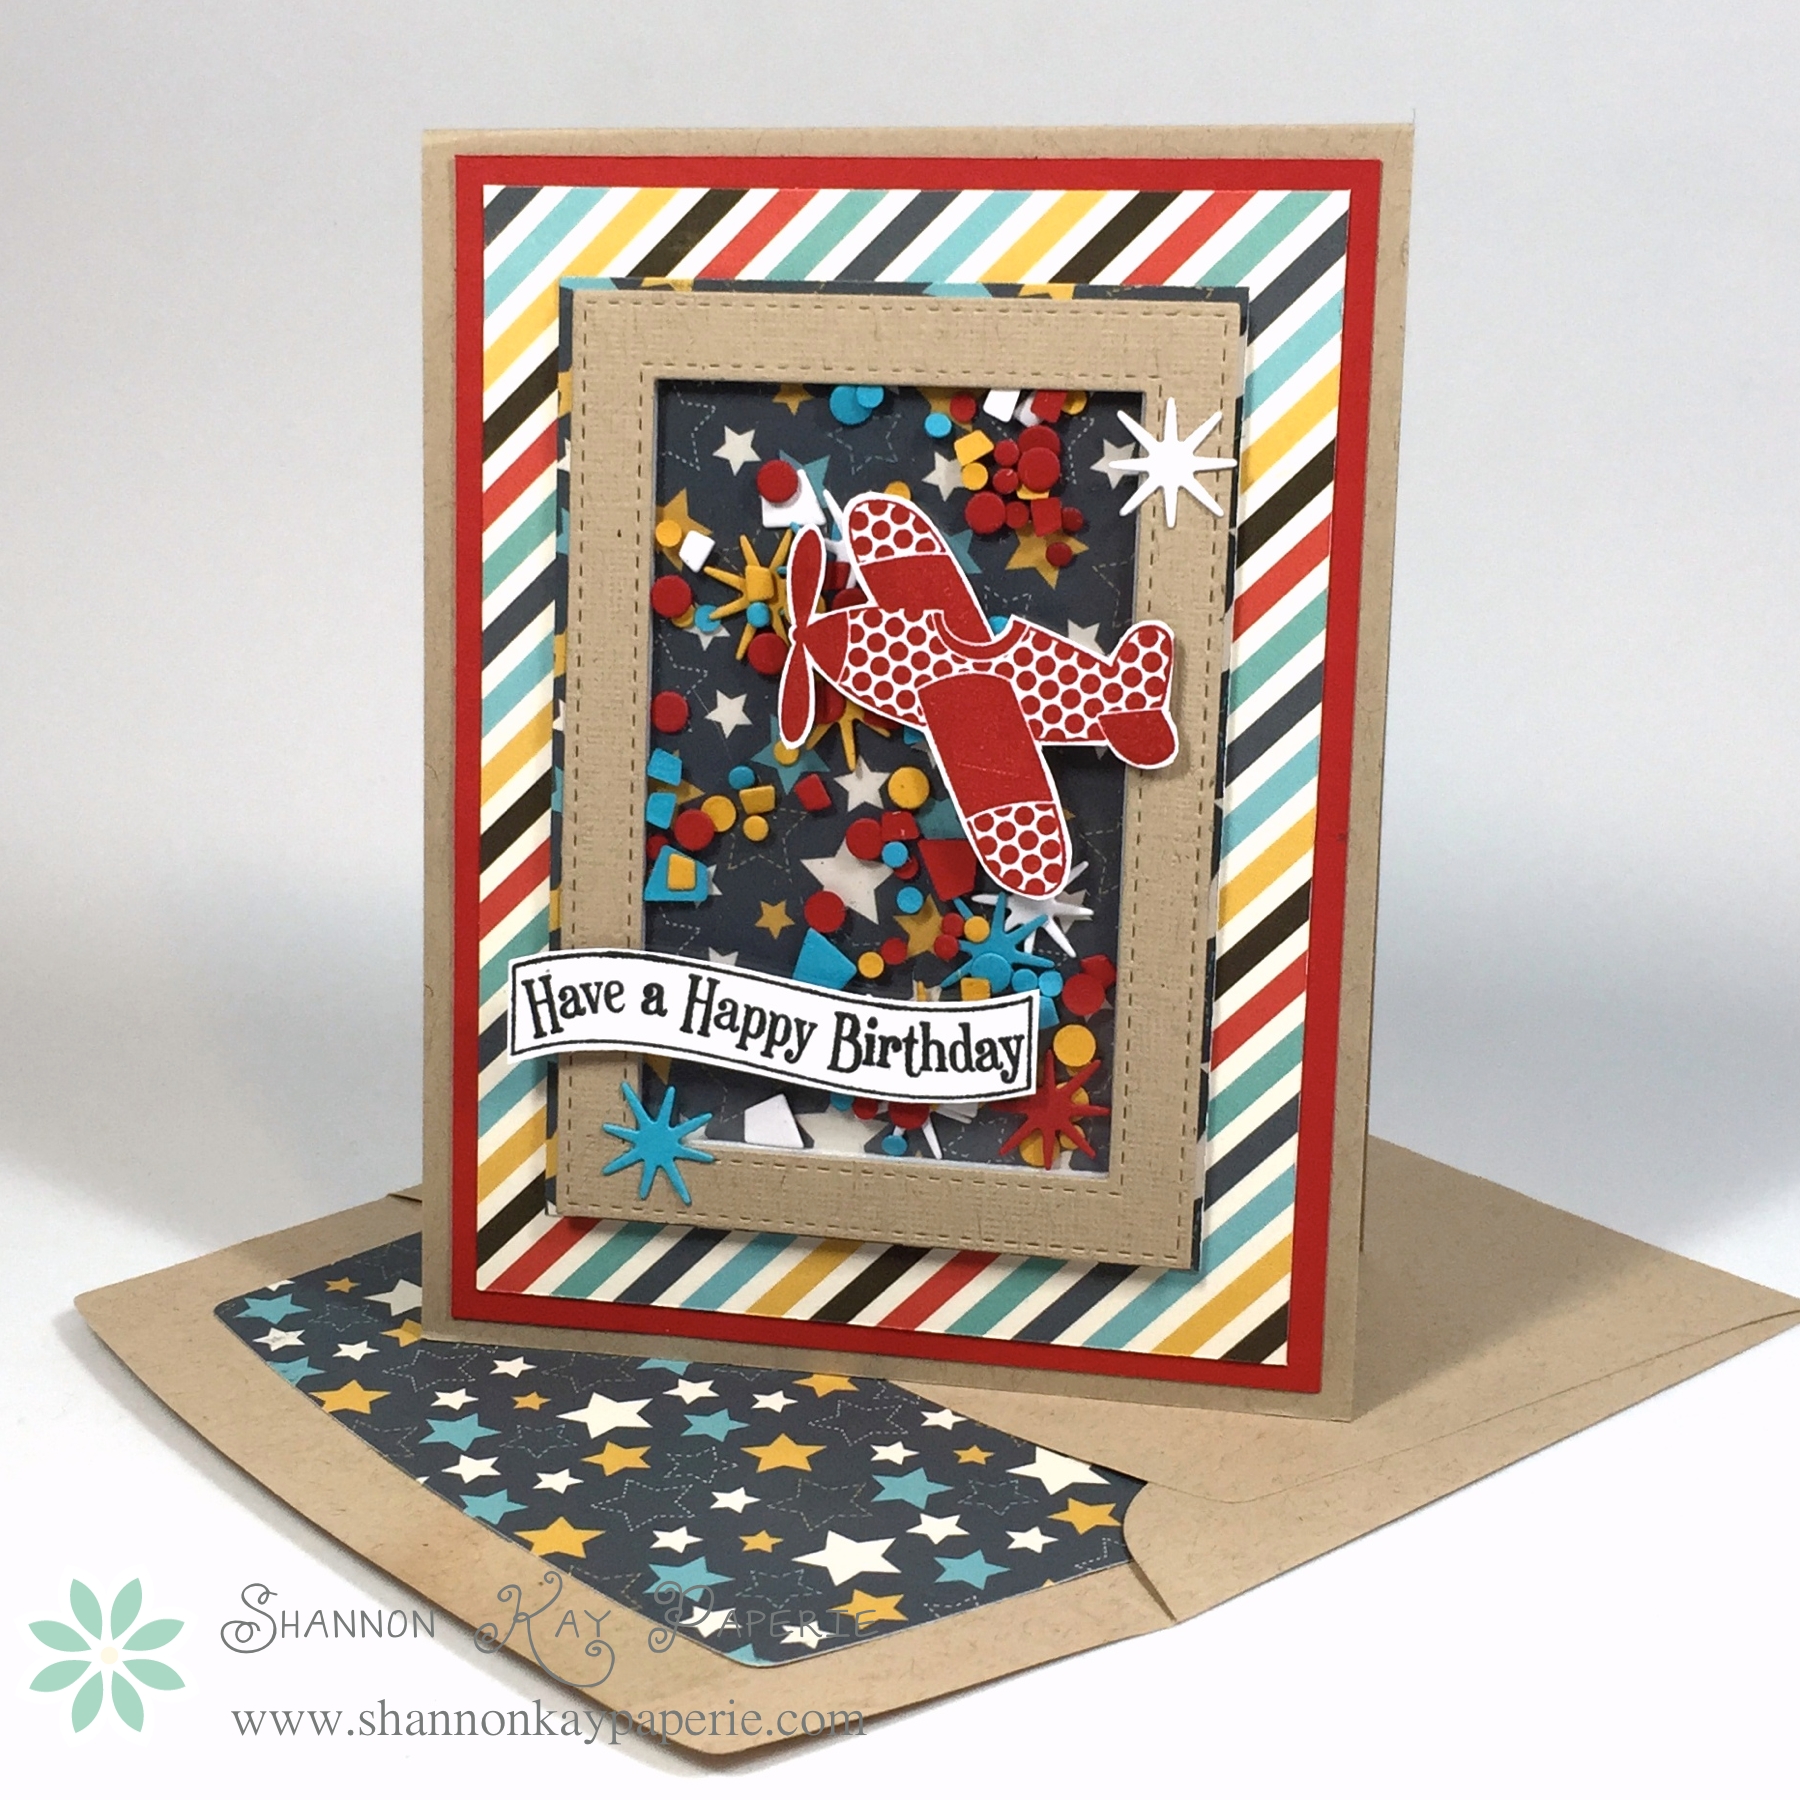
I pulled out some fun paper from Carta Bella and finally inked up a stamp set by Clearly Besotted Stamps called Take Flight.

SKP Watermarked Photos3-026
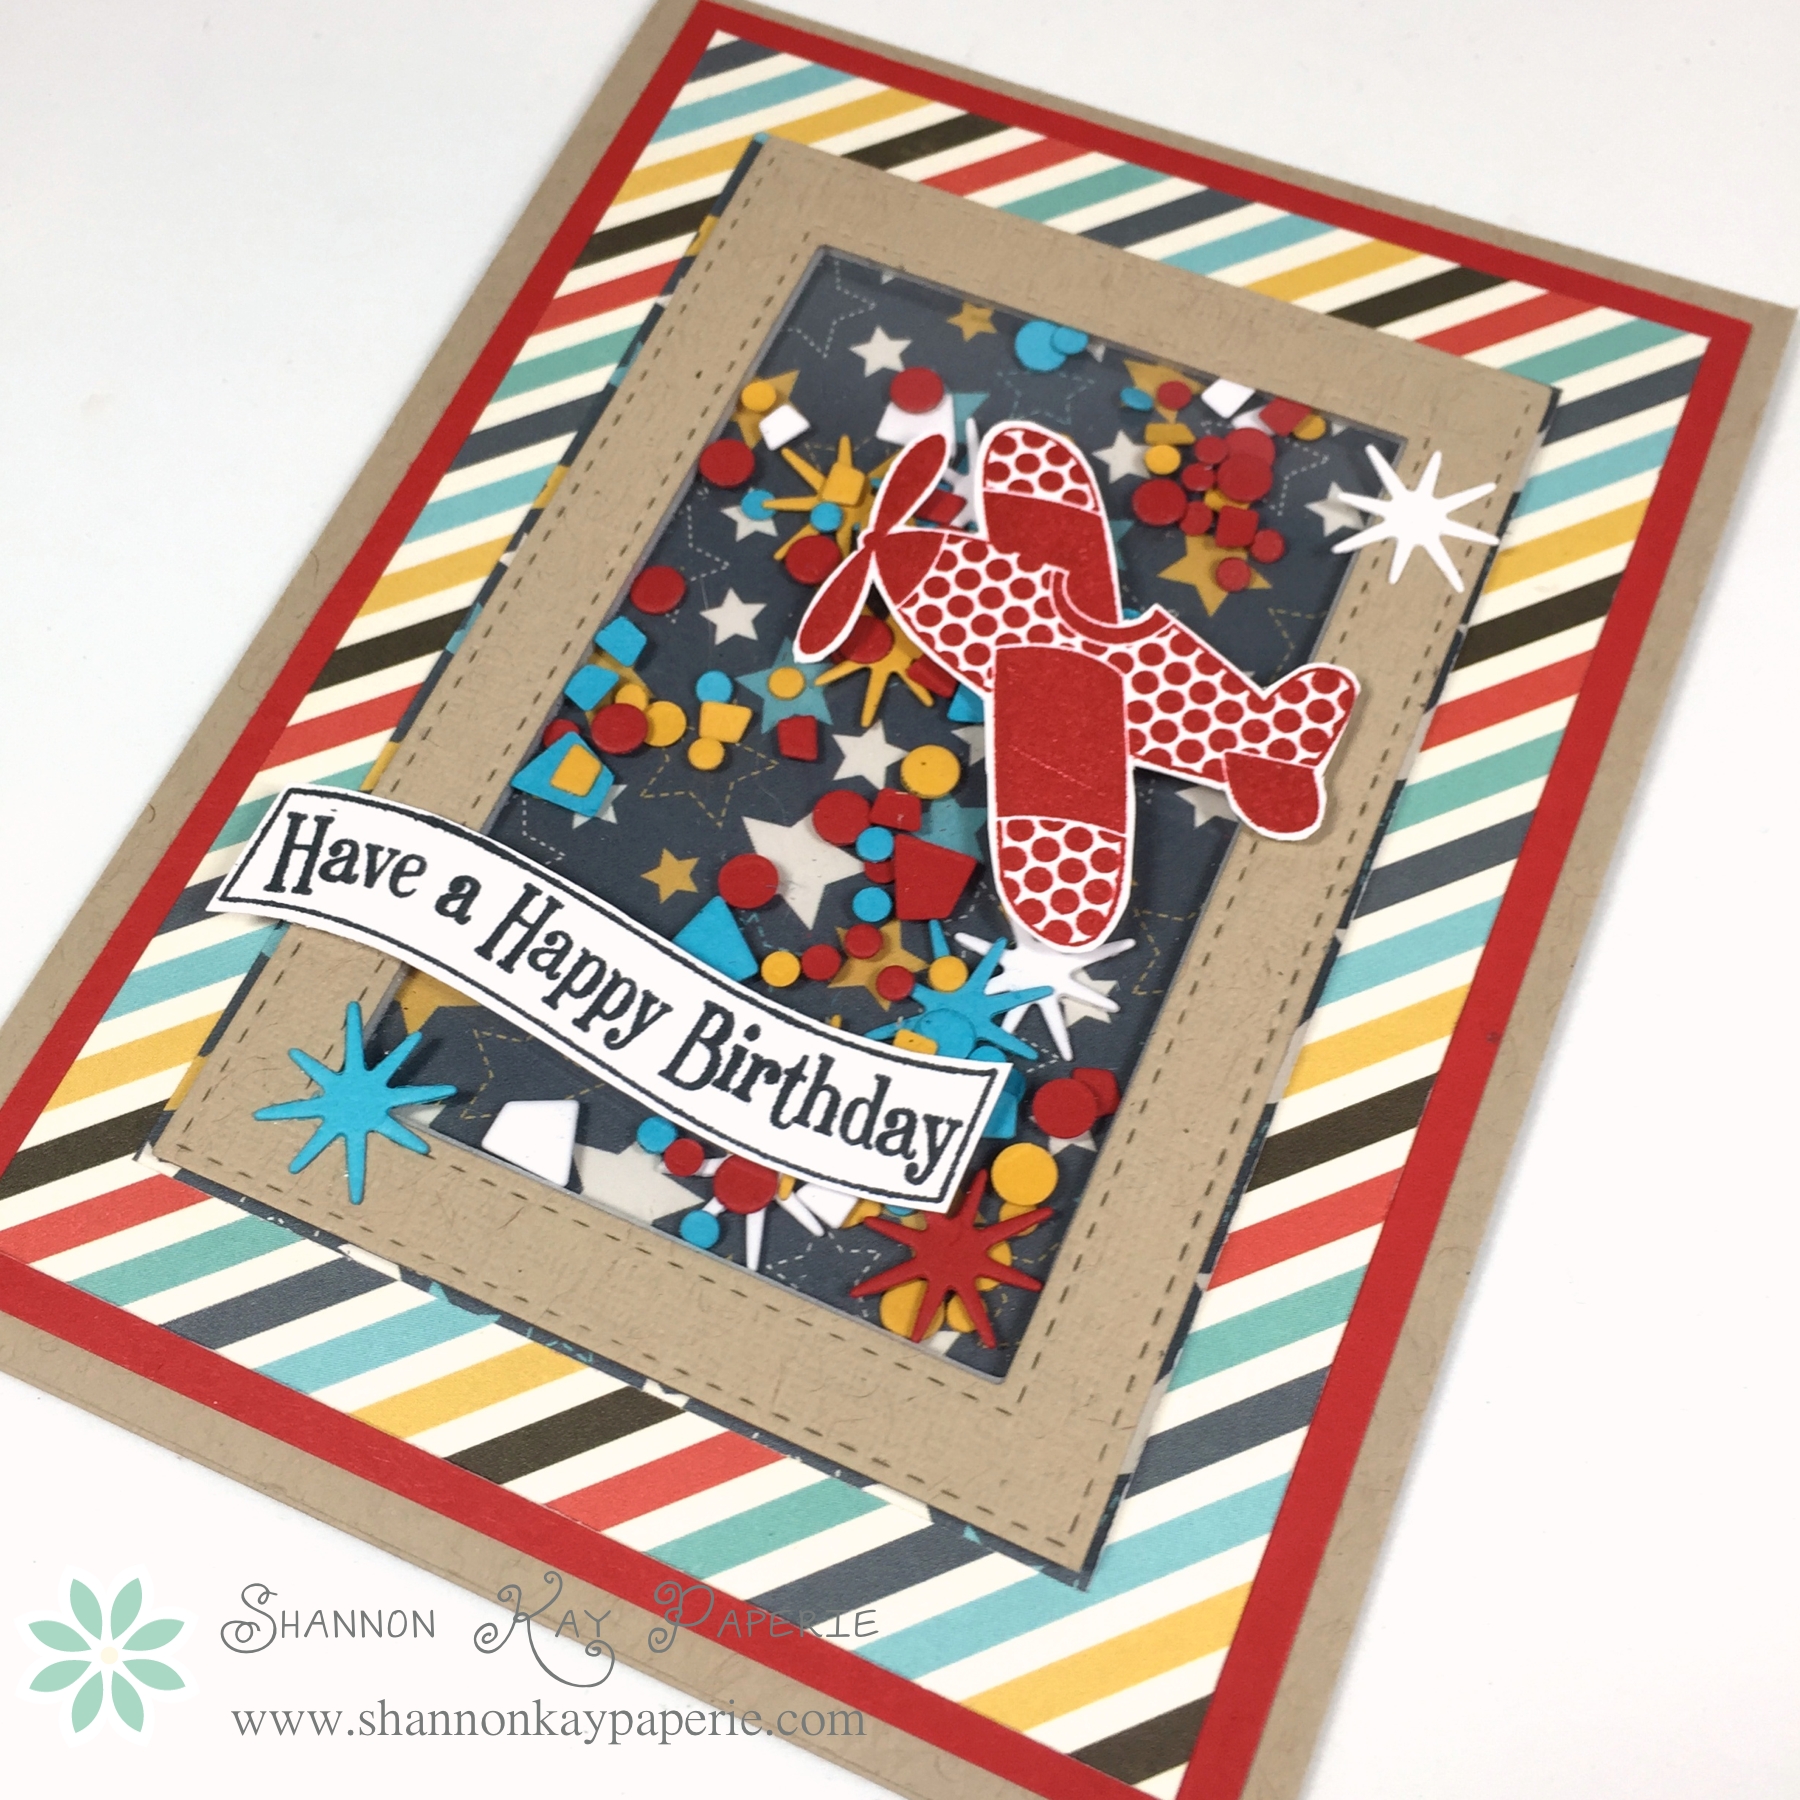
I used a star pattern paper for the backing to my shaker and then filled it with confetti and circles from my Shakers & Sprinkles Collection from Papertrey Ink. Not a sequin or a bit of sparkle anywhere for THIS card!

SKP Watermarked Photos3-027
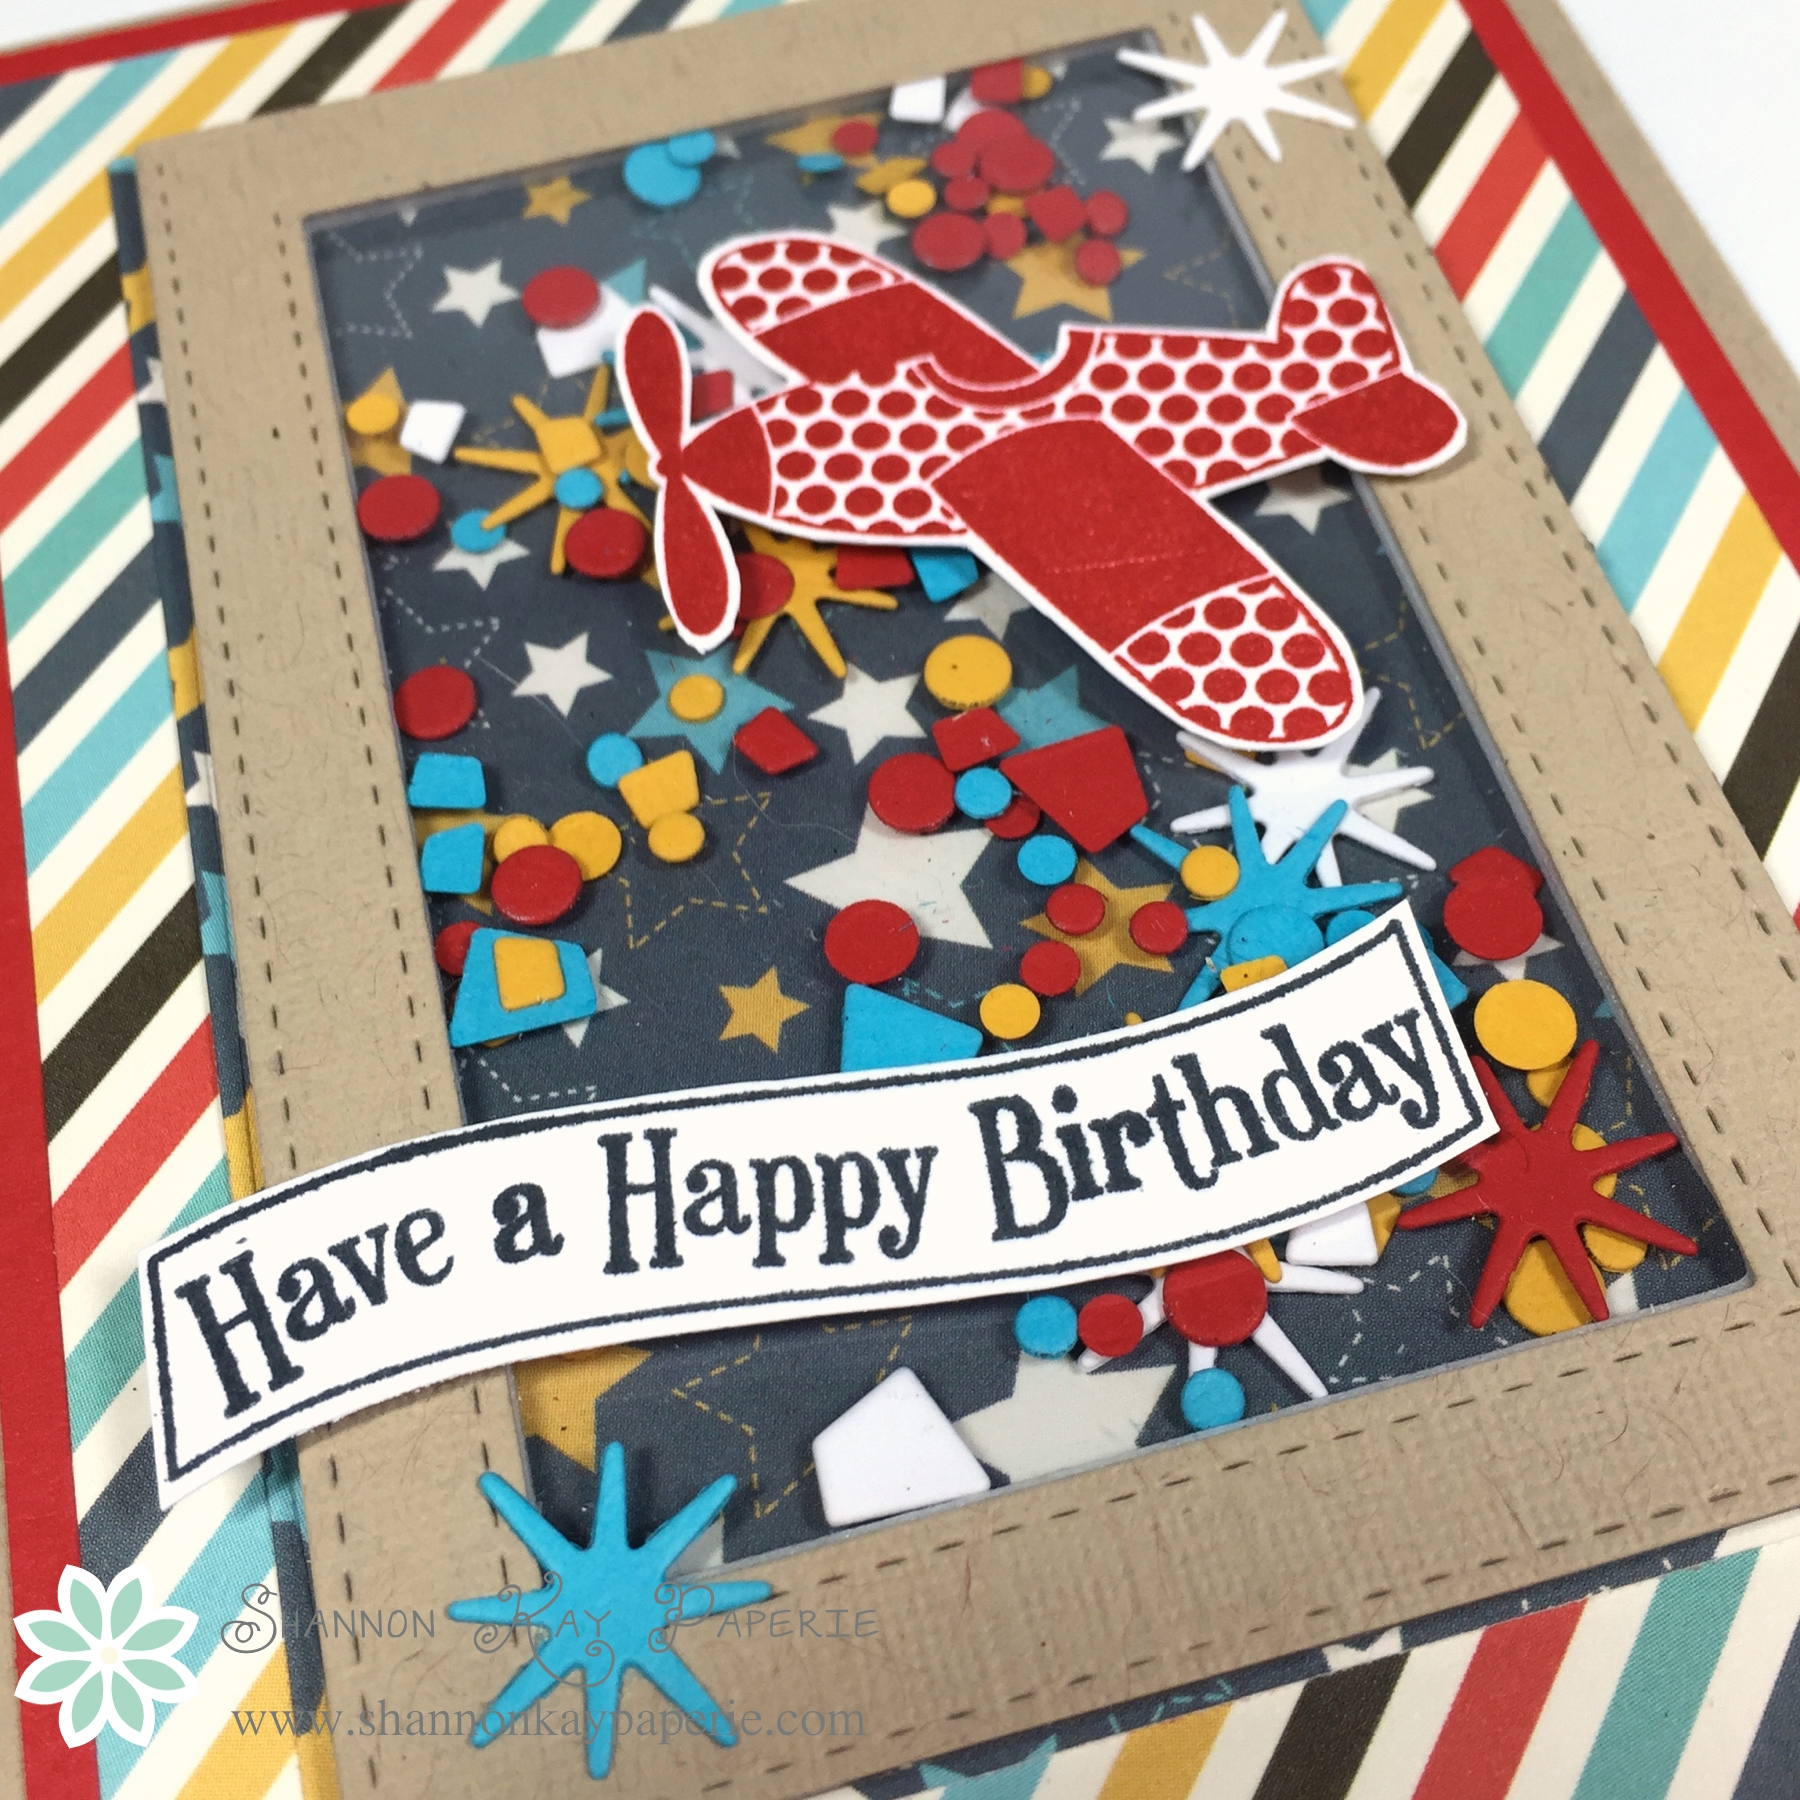
I popped the sentiment and airplane up on Stampin’ Dimensionals and added two pieces of confetti on the outside of the shaker frame for a bit more pop. I was a bit unhappy when I had stamped my airplane and reached for the packet to grab the dies and there were none. Oops! I seem to do that ALL the time with my Clearly Besotted Stamps…I have NO idea why!! So I was reduced to fussy cutting the airplane and banner out. It took a bit longer but was definitely worth it!

If you have a chance, please pop over to Retro Sketches, they have lots of inspiration there with this awesome sketch!

Thank you so much for stopping by. I appreciate your visit so much!!

Wishing you joy and blessings!

Products Used:

Cardstock: Crumb Cake and Real Red by Stampin’ Up!; Stamper’s Select White by Papertrey Ink

Pattern Paper: Boy Oh Boy by Carta Bella

Ink:  Real Red by Stampin’ Up! and Tuxedo Black by Memento Ink

Stamps:  Take Flight by Clearly Besotted Stamps

Dies: Stitched Rectangle Frames by MFT Stamps; Shakers and Sprinkles by Papertrey Ink and Envelope Liner Die by Stampin’ Up!

Tools:  MISTI by My Sweet Petunia

Embellishments: None

SKP Watermarked Photos3-024

Up, Up & Away – Retro Sketches 156

Hello there, friends!! Today I’d like to share my take on the awesome sketch over at Retro Sketches:

rs156Isn’t it fun?? I pondered it just for a few minutes before deciding that a stamp set that just arrived this week would be really fun with this sketch!! So, with that in mind I hopped on over to my pattern paper collection and pulled a set of papers together fairly quickly. I knew I wanted a soft and whimsical feel and this is how it turned out!

SKP Watermarked Photos2-118What do you think?!?!? I just adore this card!!!! I used two pattern papers as the base for my card, dividing the two with a darker pattern, as per the sketch. The paper is called Paris & Co, which is perfect because it is so soft and yummy! And the hot air balloons?? Combined with the papers I think they are soft as a gentle spring breeze…

SKP Watermarked Photos2-120I used a new-to-me stamp and die set from Papertrey Ink called Up, Up and Away. It’s a huge stamp set with an optional add-on set to give you SO many options and combinations!! I die cut my clouds and then stamped them in Sahara Sand ink. The ink was the lightest I could find, but the coverage was still darker than I wanted so I used a microfiber cloth to dab away some of the ink after I inked the stamp up. The impromptu technique worked very well, AND had the added benefit of providing an interesting texture!

SKP Watermarked Photos2-121After stamping and die-cutting my balloons I arranged everything on a random bed of cream colored linen thread. There was no rhyme or reason to the thread placement other than a circular pattern. Since so much of the thread was exposed, I used a product called Aleen’s Tack-It Over & Over to adhere the thread. I squeezed out a small dab of the product onto my work surface (it looks like Elmer’s Glue) and the gently dabbed various areas of the thread into it, to pick up just a bit here and there, and then laid the whole thing onto my card base. I have a love-hate relationship with this product. I love it because it is so tacky, but I HATE it for the same reason! You have to be careful with it because it CAN create a mess. The reason I chose it is as the name says, you can tack it over and over. It never really dries, just stays tacky, so once I have something adhered, I can still (gently) move it to re-position it if necessary. And it is SO darn tacky, it never lets go of anything! I also used it to adhere the sequins for the same reasons.

SKP Watermarked Photos2-123I thought the interior of the card should be decorated as well, and decided to use the pattern paper again. I think it’s light enough to write over and it sure does dress up the inside of the card!! Isn’t the paper I used for the envelope liner lovely?? It was also the inspiration for my balloon ink color choices.

Well, there you have it! A fun, albeit girly, card that can be used for many occasions! I’m so grateful to the design team over at Retro Sketches for such an awesome sketch this week!

I spent a wonderfully lazy Sunday at home, working in my office and napping with all the windows open so we could all enjoy the out of season but thoroughly enjoyably warm day today! I hope your day was lovely as well!

Wishing you joy and blessings!

Products Used:

Cardstock: Rustic White by Papertrey Ink

Pattern Paper: Paris & Co by My Mind’s Eye

Ink:  Sahara Sand by Stampin’ Up!; Ocean Tides, Ripe Avocado, and Spring Moss by Papertrey Ink and Cobblestone by Simon Says Stamp (for the sentiment)

Stamps:  Up, Up & Away by Papertrey Ink

Dies:  Up, Up & Away by Papertrey Ink and Envelope Liner Die by Stampin’ Up!

Tools:  MISTI by My Sweet Petunia

Embellishments: Cream Linen Thread by Papertrey Ink (no longer Available) and misc gold sequins

SKP Watermarked Photos2-122

Ladybug Hugs – Retro Sketches #154

01-IMG_7694Happy Monday Friends!! Since it’s Monday, I decided to send you all a ladybug hug, guaranteed to bring a smile 🙂

This fun little card was inspired by the sketch over at Retro Sketches this week:

rs154I wanted to use some more stamps from The Stamps of Life and thought this little bug from the stamp set ladybugs2love would be perfect for the sketch.

05-IMG_7699I had a lot of fun with this one, starting with trying out a this stitched pattern die from from Lil ‘Inker called Circles & Diamonds. It is really beautiful! The ladybug was fun to stamp as it is a builder set. I stamped the bug, then the red on her wings, then the black spots, and finally her behind. I realized when I was done I could have skipped the red stamping on her wings and just colored them with my Blendabilities…next time!

06-IMG_7700After I had the ladybug, sentiment, banner and button all in place I thought she just needed a bit more. I found a teeny tiny ladybug stamp so I stamped, colored and fussy it cut two of them out to add to the card. Love!! But then I decided that if I were a lady bug, I would like to be sparkly so I used Wink of Stella to color all of their wings. Ca-yoot!!

04-IMG_7698I decided that since it’s such a fun card, sure to get a smile, that it should be a get well card. With some more lady bugs of course!!

My card also fits within the challenge of “Anything Goes” over at Can You Case It, so I think I’ll link up with them as well!

CYCI58-232x300

Thanks to the design team at Retro Sketches for inspiring me today!!

Wishing you joy and blessings!

Products Used:

Cardstock: Pure Poppy, True Black and Stamper’s Select White by Papertrey

Pattern Paper: The Story of Us by Simple Stories

Ink:  Tuxedo Back by Memento; Cherry Cobbler by Stampin’ Up!

Stamps:  ladybugs2love by The Stamps of Life; Inside & Out: Healing Touch by Papertrey Ink

Dies: Stitched Pattern Die – Circles & Diamonds by Lil ‘Inker and Envelope Liner Die by Stampin’ Up!

Tools:  MISTI by My Sweet Petunia

Embellishments: Regal Collection Buttons by Stampin’ Up!

Butterfly Wishes…

Watermarked Blog Posts_2-033

I know, I know…this is a huge departure from my usual style…please tell me you like it!

It all started with this sketch from Retro Sketches:

rs147

So I then sat down at my paper bin and started going through it, pulling out this, and then that, then another…this is my favorite part of designing, just letting it flow and going with it. I came across this 6×6 pad from My Mind’s Eye called Lost and Found: Sunshine and just fell in love with all the beautiful patterns and colors.

Watermarked Blog Posts_2-034

Next came stamps. I still had my order from Stampin’ Up! scattered all over my work top so I browsed them and found this totally amazing and awesome stamp set called Butterfly Basics. In my humble opinion, whoever designed this stamp set should be given a raise and a corner office so they can make lots more in this style!

I chose a pattern paper to stamp over because I wanted to keep with that aged, vintage-y feel. I stamped in Crumb Cake, Sahara Sand, and Soft Suede with the sentiment stamped in Early Expresso. I tried it first in Tuxedo Black but it was toooo harsh.

Watermarked Blog Posts_2-036

Next came le papillon, or the butterfly (sorry I was feeling French!) die. Isn’t this die A-M-A-Z-I-N-G?? I know, right?!? Love. I have seen some pointers out there in cyber space to use a dryer sheet to help ease the die out of the metal, so I tried it and loved it! The layer goes: cutting pad, paper, dryer sheet, wax paper, die, cutting pad. I cut two dies and then layered them to give a shadow and help my blue butterfly stand out. I loved the blue paper and the contrast it provided with the others colors on the card, but felt it was just a bit harsh. So I pulled out my Tim Holtz Antique Linen Distress Ink and distressed the butterfly a bit. Then of course I had to add some to the rest of the card…

All of the paper you see, except for the card base, is pattern paper. I hope you don’t think it’s too much, I couldn’t seem to stop layering!! Please, please, stop and let me know if you like it! I’m nervous about stepping outside of my box, lol!

Thank you so much for stopping by and if you would like to have more information regarding any of these Stampin’ Up! products, please visit Stampin’ Pretty. Mary Fish is my upline, a hugely successful demonstrator, and a very kind and talented lady! I know she would be happy to answer any questions and help you order.

Wishing you joy and blessings!

Watermarked Blog Posts_2-035

Products Used:

Cardstock: Vintage Cream by Papertrey

Pattern Paper: Lost and Found: Sunshine by My Mind’s Eye

Ink: Soft Suede, Early Expresso, Crumb Cake, and Sahara Sand by Stampin’ Up!

Stamps:  Butterfly Basics by Stampin’ Up!

Dies: Butterfly Thinlits Dies and Envelope Liner Die by Stampin’ Up!

Tools:  MISTI by My Sweet Petunia

Embellishments: generic gold sequins

Bright & Merry Christmas

Watermarked Blog Posts-047

Have a Bright & Cheery Christmas…sometimes a simple sentiment is perfect! This card was inspired by a fun new sketch over at Retro Sketches…their sketches always keep me on my toes!

rs143

I had lots of fun deciding which pattern papers to use. I love the contrast of the peppermint stripes with the black background and print. A little barrier of red helps keep the patterns from overwhelming each other.

Watermarked Blog Posts-048

Simple and fun! I love that the embellishment is also the sentiment, it’s a twofer! Candy Dots and a big floppy bow finish the card off with just the right amount of fun:)

Have a great day and thanks so much for stopping by!

Products Used:

Cardstock: White Stampers Select by Papertrey; Real Red by Stampin’ Up!

Pattern Paper: Peace Joy Love by Lawn Fawn

Ink: Gumball Green (retired) by Stampin’ Up!

Stamps:  Bright & Merry Trees by Simon Says Stamp

Dies:  None

Embellishments: Candy Dots by Stampin’ Up!; Baker’s Twine (unknown)

Other: Envelope and Envelope Liner Die by Stampin’ Up!

Watermarked Blog Posts-049