Spring Shake Up for The Paper Players #234

Wow! There were SO many beautiful cards last week with Sandy’s sketch! I have no idea HOW you are going to top those, but I can’t wait to see your creations this week with a delightful theme from Laurie:

pp234

With snow across so much of the country currently, won’t it be fun to pull out spring colors and themes??

SKP Watermarked Photos2-102
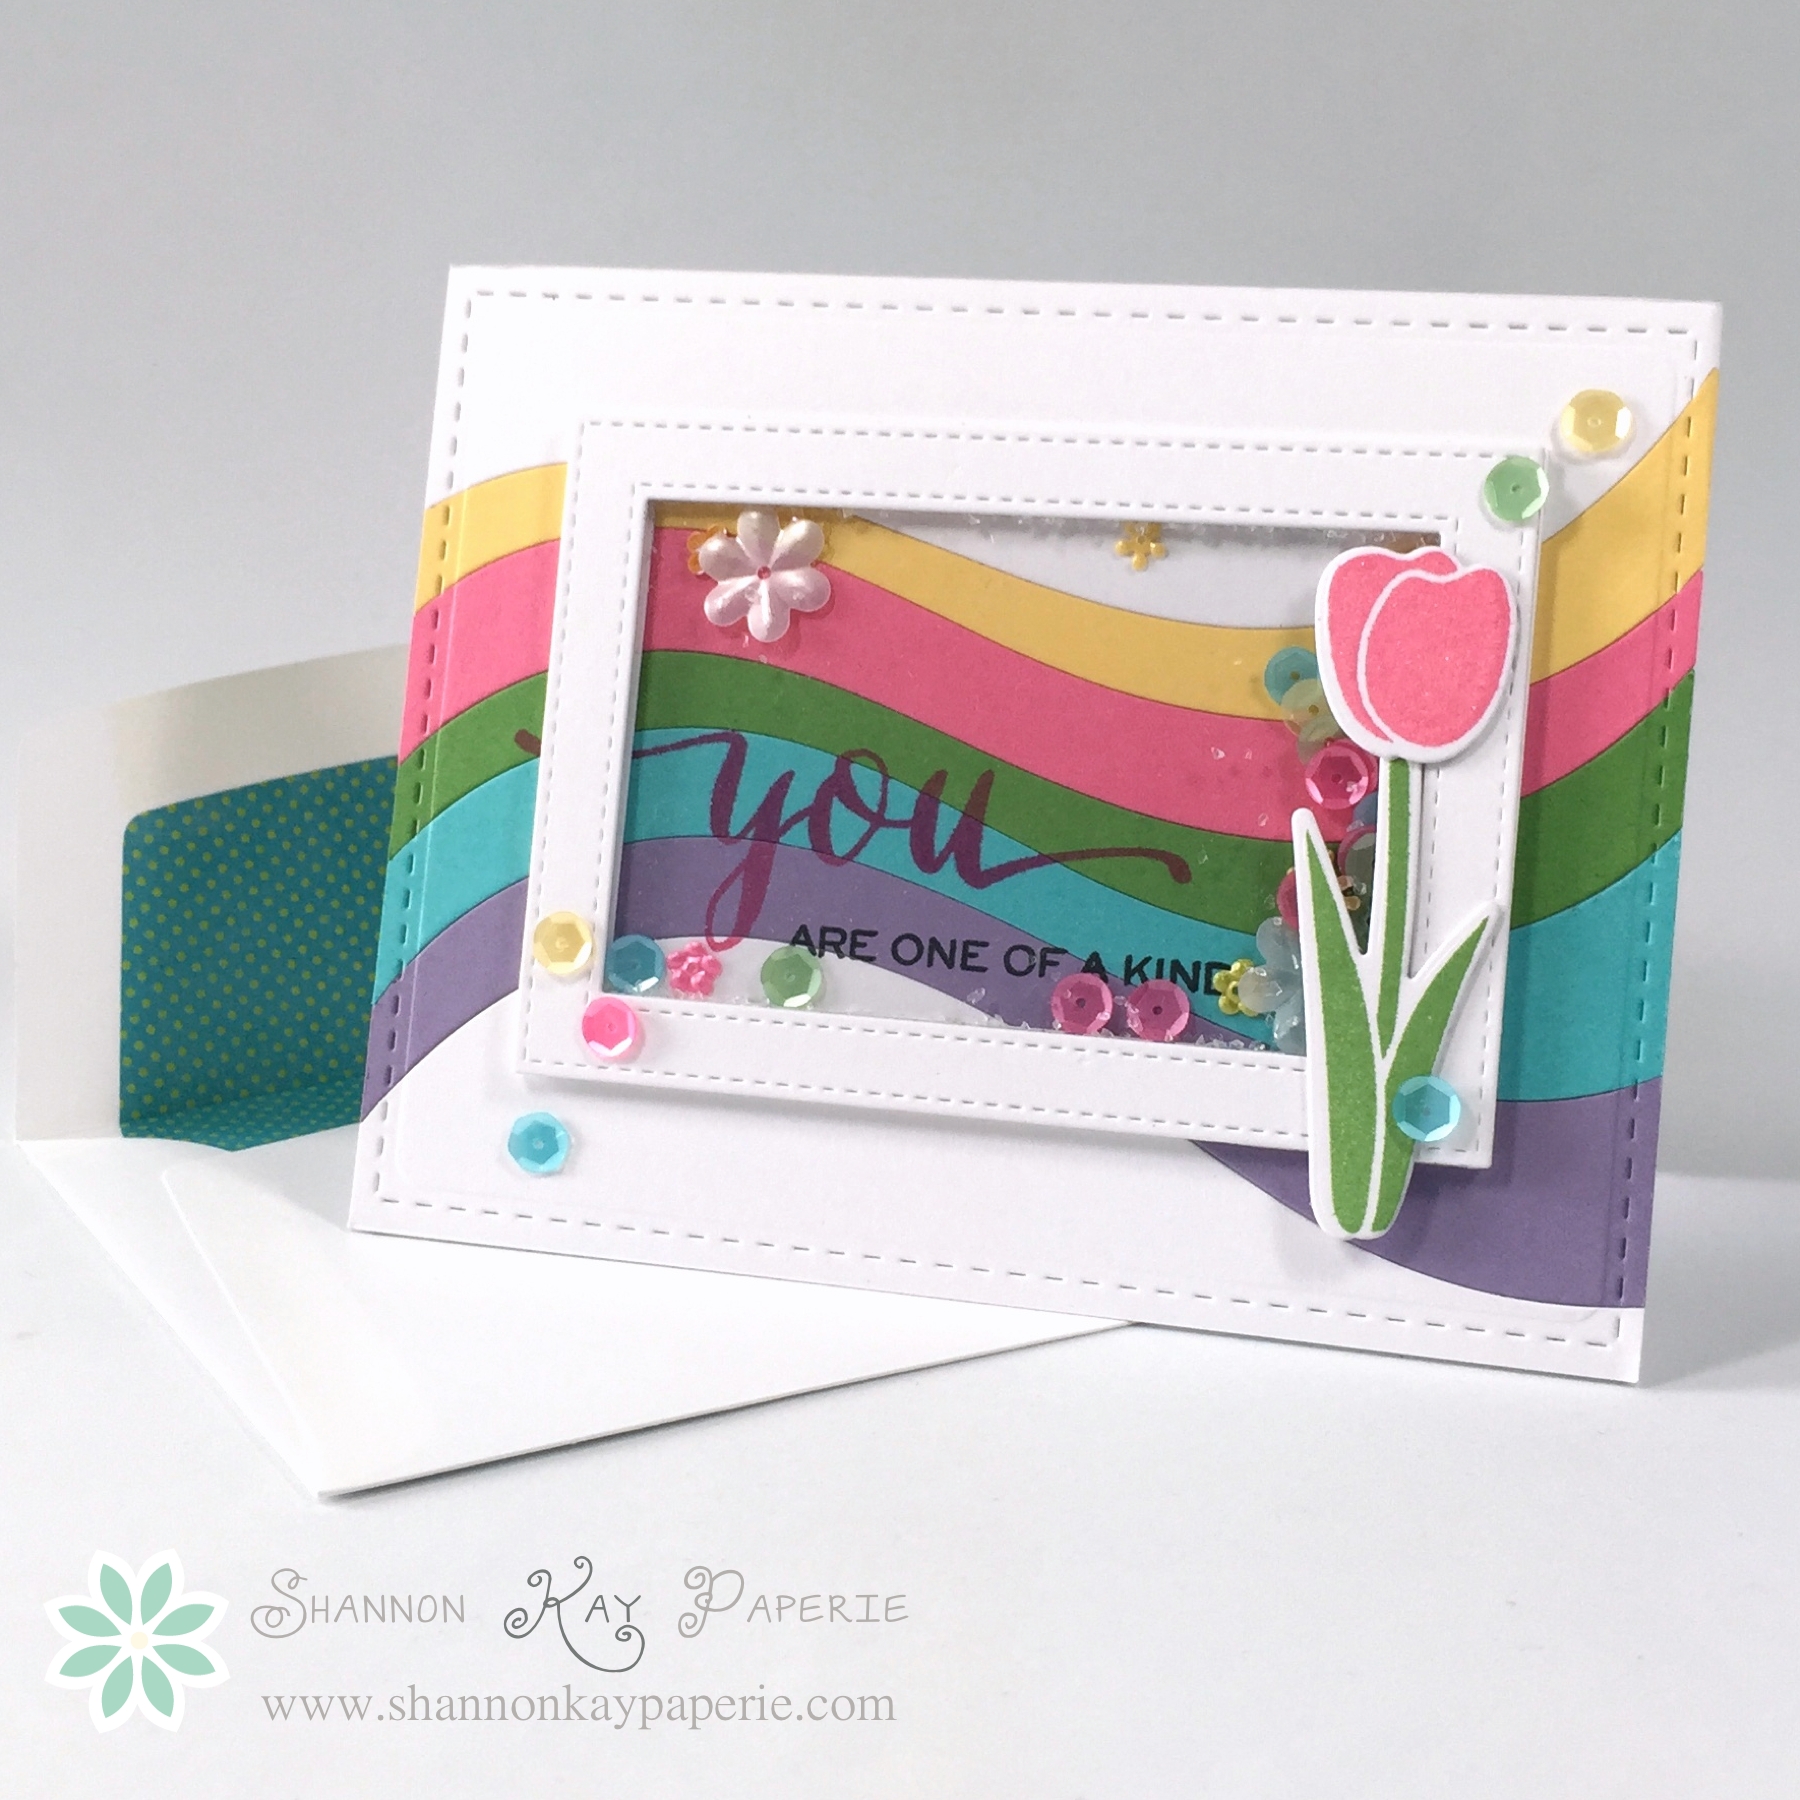
I just received an order with the fun new coordinating die and stamp set called Ride the Wave by MFT and HAD to try them out. The stamp set is really fun, but for today I just focused on the dies. I paired them up with this fun color combination from Papertrey Ink:

6a00d8341c64e753ef01b8d0bfd828970c-450wi
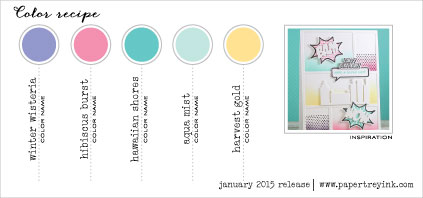
Aren’t the colors AMAZING?? As I was lining my dies up, I realized that my rainbow needed a green so I substituted New Leaf for Aqua Mist. I think they are so pretty together!

I die cut all my waves and then die cut the top and bottom waves from white card stock for the top and bottom of the card base. I then layered all of the pieces over top of my card base and adhered. Next, I ran my card base through the Big Shot with the largest die in the Stitched Mats: Rectangles die set from Lil ‘Inker. The largest one simply adds stitching without any cutting. I love how it frames the card.

SKP Watermarked Photos2-103
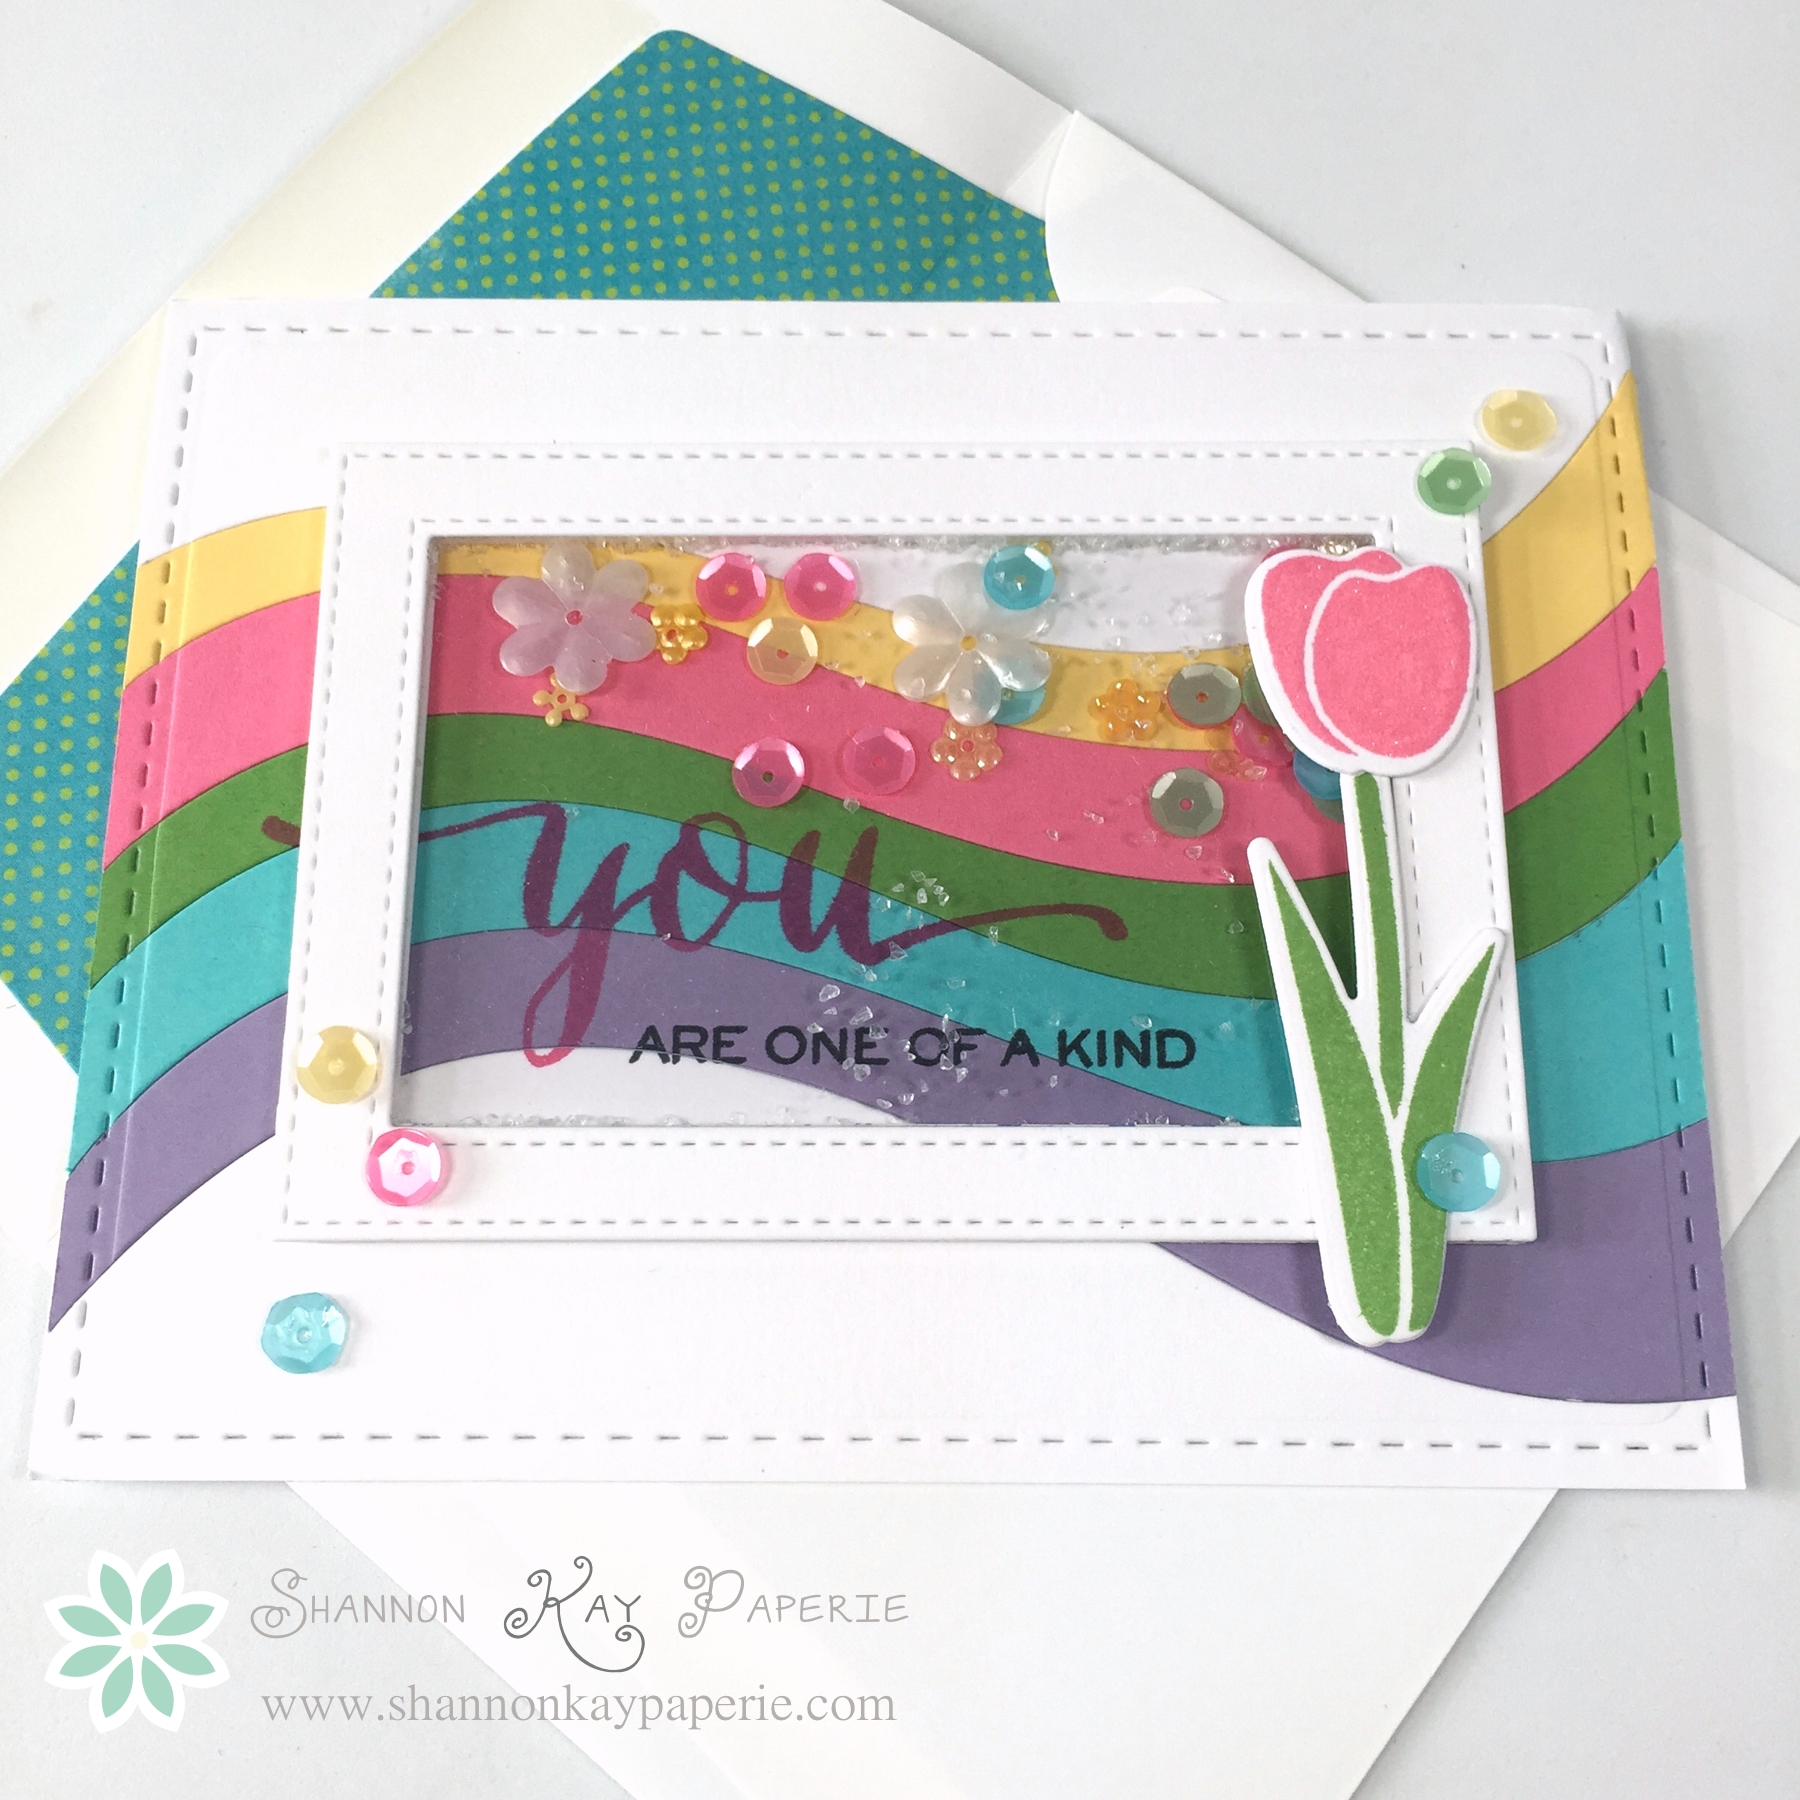
Next, I created a shaker from with another new set of dies in my order, Stitched Rectangle Frames, also from MFT. I used clear acetate for the shaker and die cut foam to pop the shaker up off of the card base. I stamped directly onto my rainbow with a beautiful sentiment from Wplus9, Hand Lettered Thanks. Originally I was gong to die cut the ‘you’, but I wanted to keep the flourish so I stamped it instead in Raspberry Fizz. I love how the flourish peeks out from the left side of the shaker!

SKP Watermarked Photos2-104
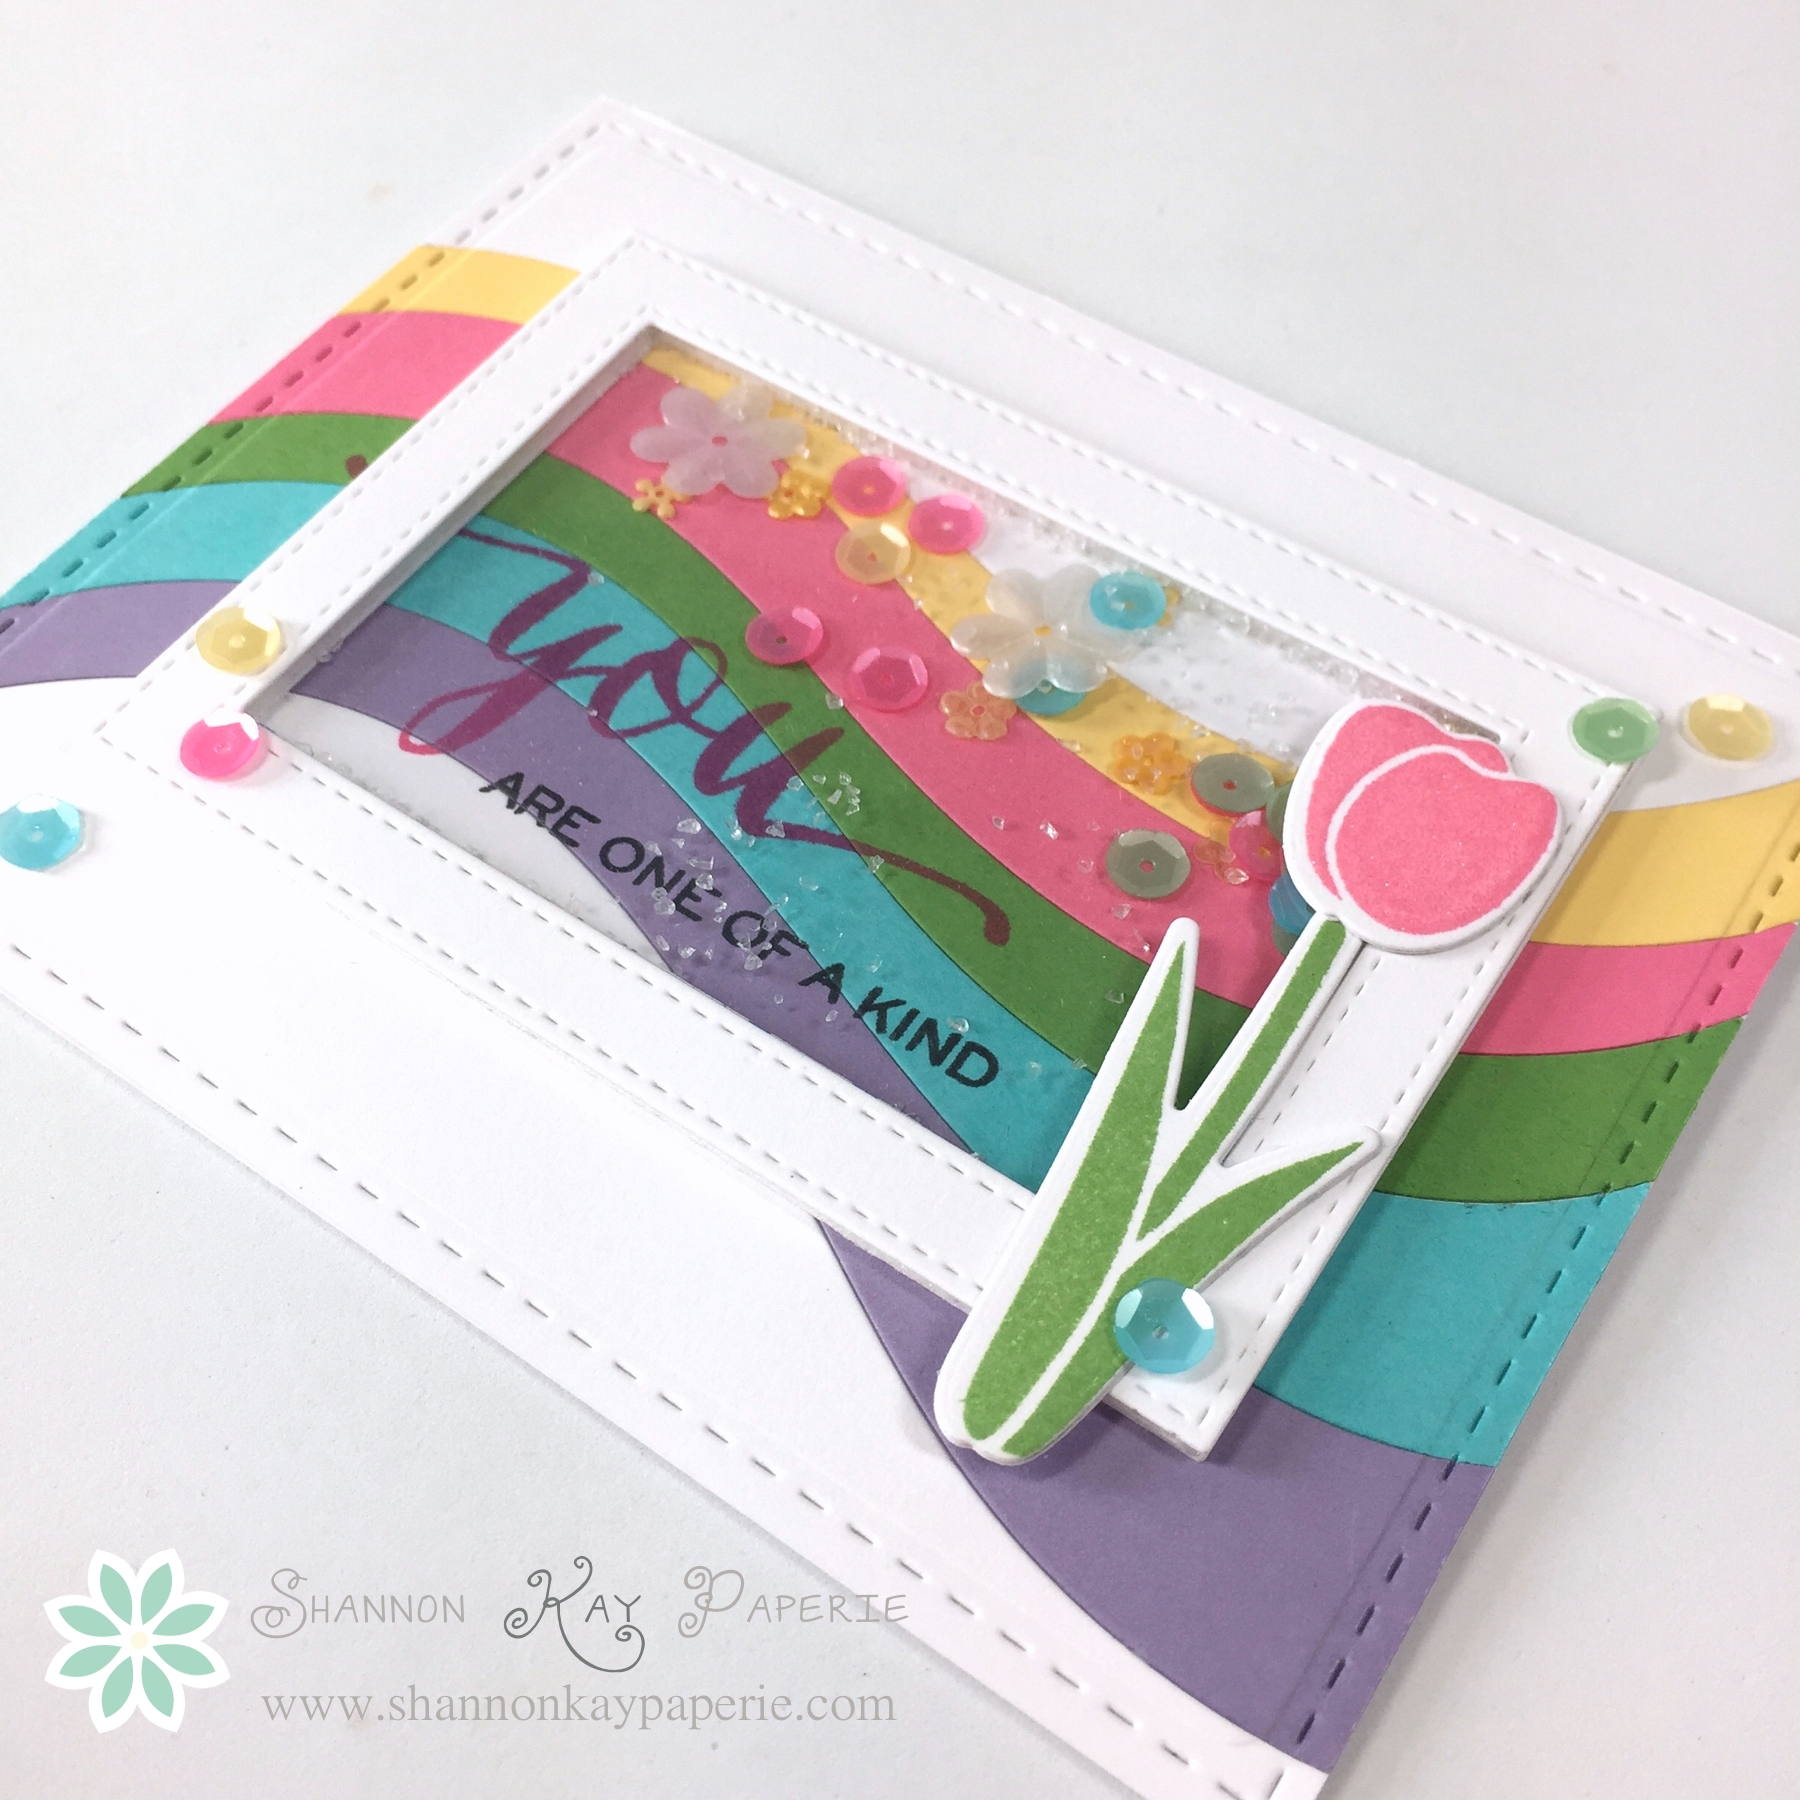
I love the tulip from Simon Says Stamp Floral Bookmarking stamp and die set. I stamped with New Leaf and Hibiscus Burst onto my dies and then adhered to the top of my shaker.

SKP Watermarked Photos2-105

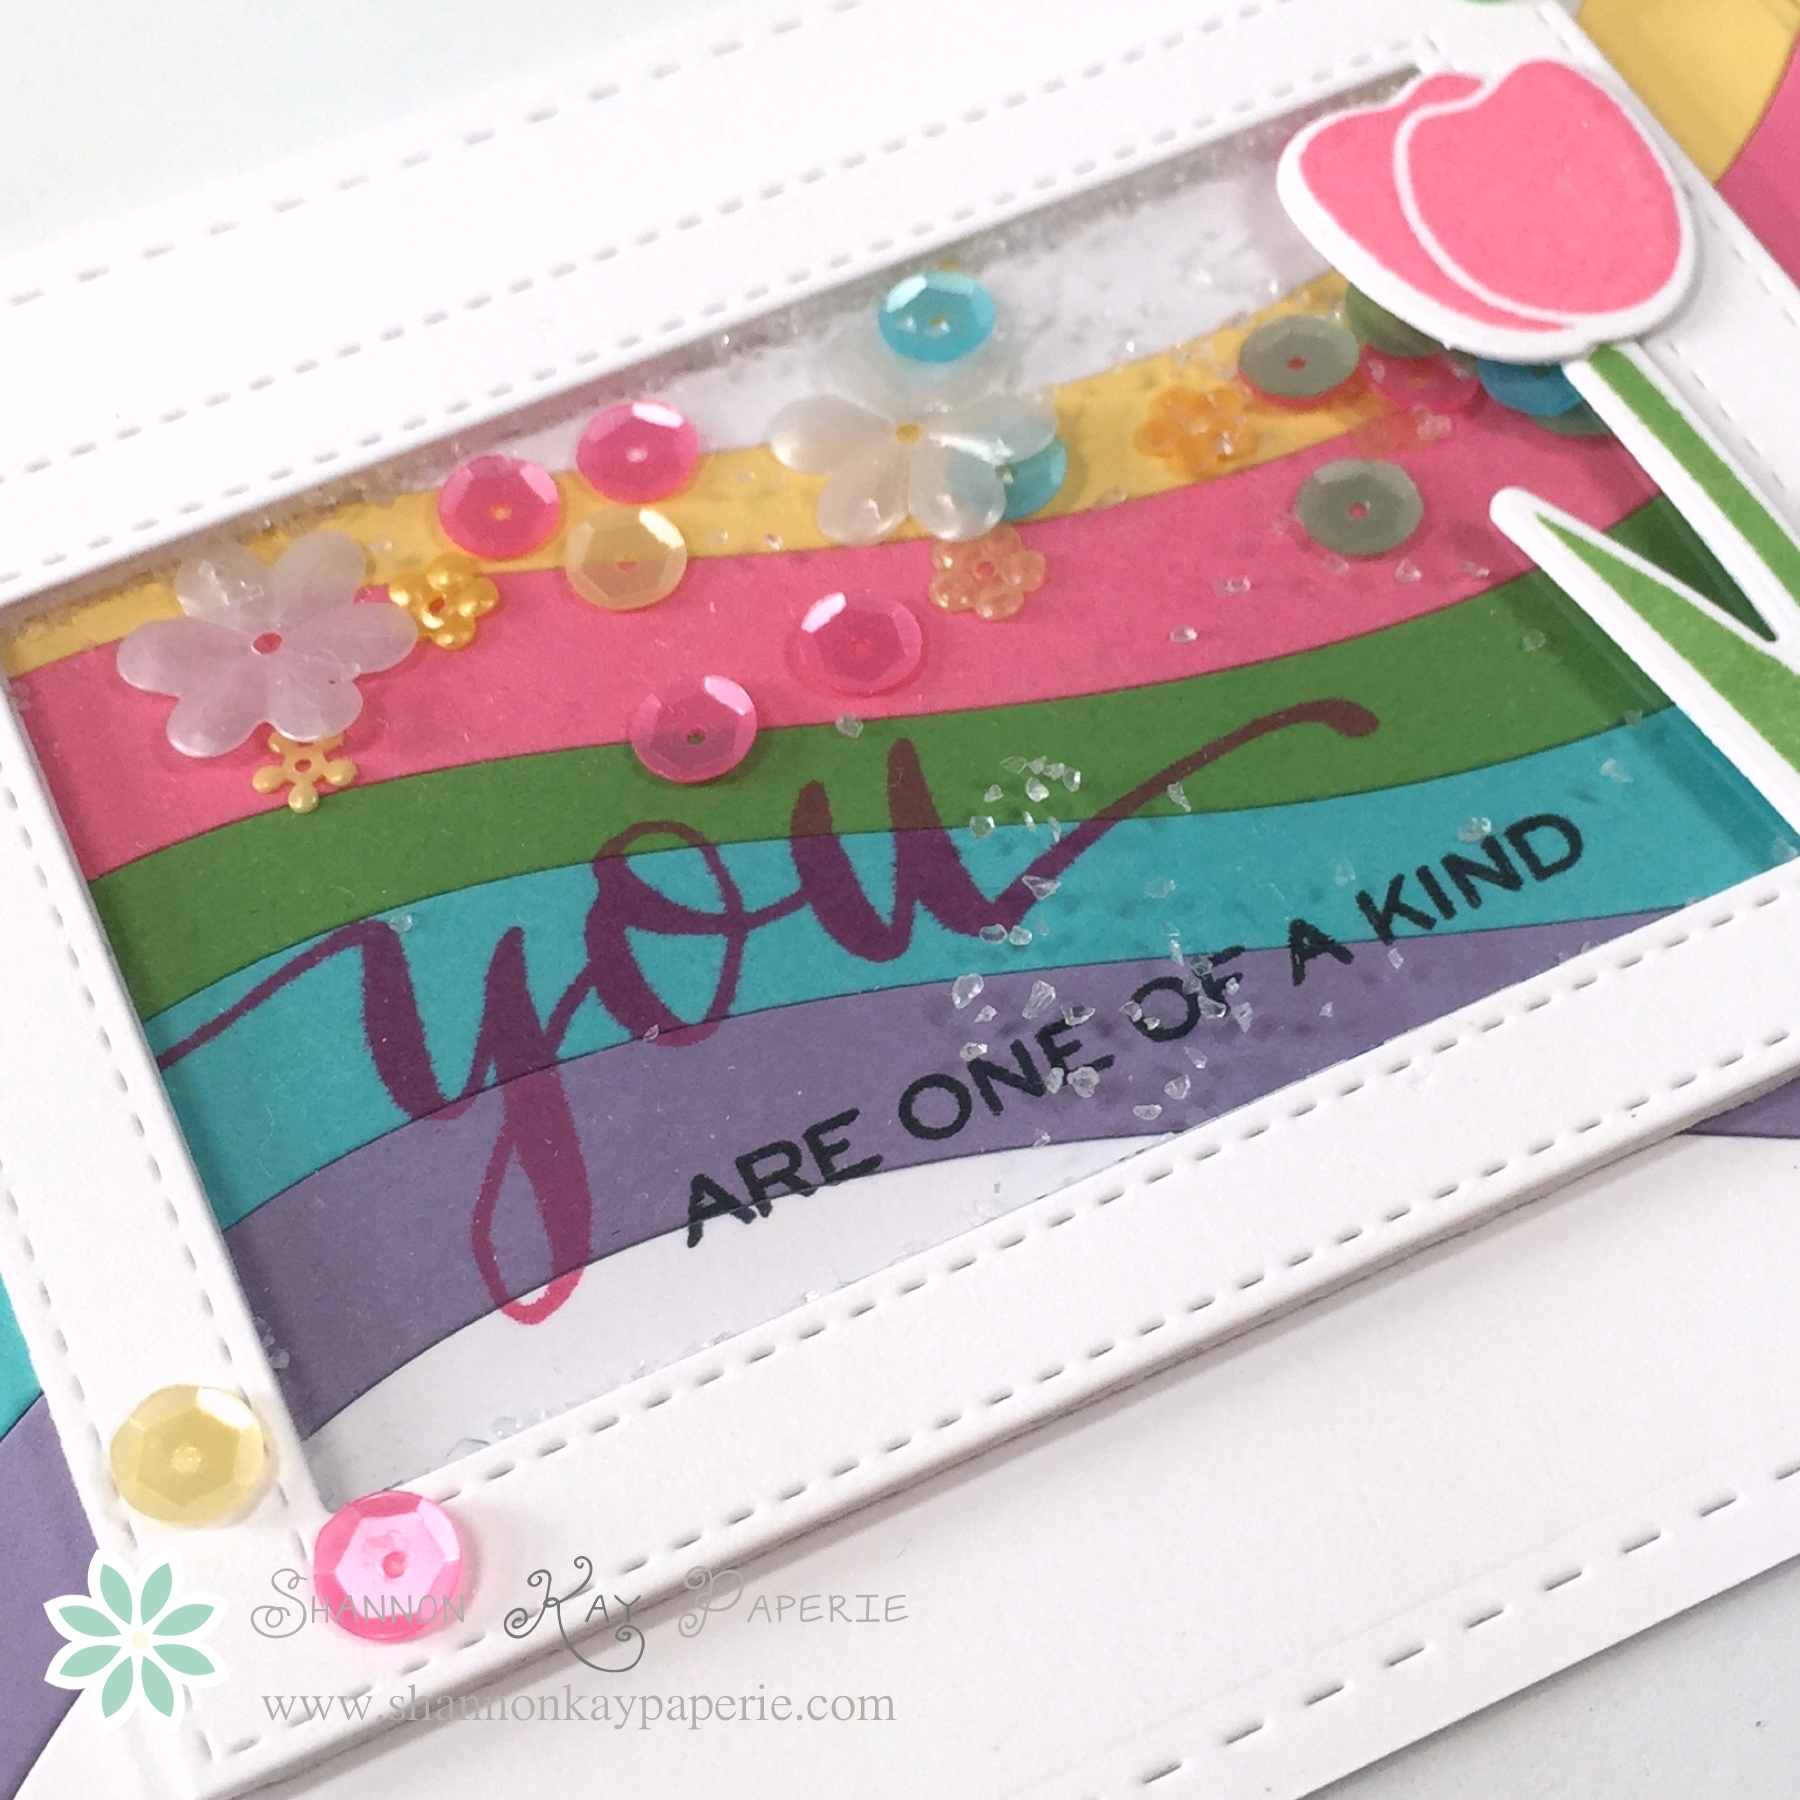
I filled my shaker with a mixture of sequins and sparkles from Pretty Posh Pink, and tubes from Papertrey Ink’s Make It Market Shakers and Sprinkles Kit. I love the little bits of sparkle! They look like little diamonds 🙂 I then added some sequins to the outside of my shaker, just to keep the theme going. It’s hard to see, but my pink tulip sparkles as well with help from Wink of Stella!

If you have a moment, I would love to hear what you think about my card this week!

I’ve peeked and the spring inspiration from the rest of the design team will knock you socks off so please make sure to pop on over and check them out!

The Paper Players Design Team
Wishing you joy and blessings!

Products Used:

Cardstock: Harvest Gold, Hawaiian Shores, Hibiscus Burst, New Leaf, Winter Wisteria and Stamper’s Select White by Papertrey

Pattern Paper: Happier by My Mind’s Eye

Ink:  Hibiscus Burst, New Leaf, Raspberry Fizz by Papertrey Ink and Tuxedo Back by Memento

Stamps:  Floral Bookmarking by Simon Says Stamp and Hand Lettered Thanks by Wplus9

Dies:  Stitched Mats: Rectangles by Lil ‘Inker; Stitched Rectangle Frames and Ride the Wave by My Favorite Things and Envelope Liner Die by Stampin’ Up!

Tools:  MISTI by My Sweet Petunia

Embellishments: Spring Collection Sequins from Pretty Posh Pink; Yellow Flower Sequin Mix and Sugar Shaker shaker filler from Papertrey Ink


Sharing What We Love, Part II

Happy Monday Friends! I’m back today with a promised follow up on last week’s Pals Blog Hop post. I so enjoyed working with these products!

Here are some close-ups of all of the cards in this set:

SKP Watermarked Photos2-053SKP Watermarked Photos2-054 SKP Watermarked Photos2-056 SKP Watermarked Photos2-059 SKP Watermarked Photos2-057 SKP Watermarked Photos2-058 SKP Watermarked Photos2-055What do you think? All the work was done for us with great design and coordinating product in beautiful spring colors! Here in Southern California my tree is blooming already but I know for a lot of you it has been a long winter and you could probably use a bit of spring colors!

Card Details:

  • Card Base 4.25″ x 11′, scored at 5.5′
  • DSP 5″ x 2.25″
  • Tag 4.5″ x 2″, punched with Stampin’ Up!’s Angled Tag Topper Punch
  • Stampin’ Up!’s Lotus Blossom Stamp Set, free with $50 purchase
  • Ribbons & Buttons from the Best Day Ever Accessory Pack, free with $50 purchase


The box was created from a tutorial by Sam Donald.

She made it easy to adapt her box to a card box. Using the same concept in the video, here are the box base details:

  • One 8″ x 9 1/2″ piece of card stock, scored at 1 3/4″ on all four sides.
  • Cut the flaps as shown in the video and adhere sides.

And the box lid details:

  • 7 5/8″ x 6 1/8″, scored at 3/4″ on all four sides
  • One 6″ x 4 1/2″ piece of DSP
  • Two 5/8″ x 4 1/2″ pieces of DSP
  • Two 5/8″ x 6″ pieces of DSP

That’s it! Since we are using card stock rather than DSP for the box lid, we don’t need the extra 1/2″ of paper to fold under, the lid is strong enough as is. Please note that if you are using a DSP with a pattern that you take care when cutting your pieces to make sure the pattern is all pointing the same direction!

You can easily adjust the depth of the box, I have made 1″ inch and 2″ boxes, but for this particular set, a box of 1 3/4″ depth was perfect. If you don’t have lined envelopes and/or buttons and ribbon or other thick embellishments, a 1″ deep box would be perfect.

I hope all of this is clear enough, sorry I don’t do videos! If you have questions, please contact me and I will be very happy to chat with you!

Thank you so much for stopping back for this information!

Wishing you joy and blessings!

February Pals Blog Hop – Sharing What We Love

February Blog Hop Badge


Welcome to the February Pals Blog Hop. This month we are sharing what we love – our favorite Stampin’ Up! products and our favorite crafting techniques.

You may just be starting the blog hop or may have come from Michelle Gleason at Stampin Mojo. Use the full lineup below to move along from blog to blog so you see all of the new projects.

Sharing what we love is the Stampin’ Up!’s motto as well as a beautiful theme for a February blog hop. I decided to share what I love most about Stampin’ Up! products, and have from the first moment I laid my eyes on a catalog over four years ago: Coordination.

You don’t even have to think about it, it’s so simple to do. Just use one suite of products and be assured that all your projects will turn out beautifully coordinated. Today I wanted to showcase products from Sale-A-Bration. You can’t buy these products, you earn one of them with every $50 purchase. I plan my yearly budget so I can stock up on basic supplies during Sale-A-Bration to ensure I get every one of the extra goodies!!

Today’s project is a box of thank you cards for someone who has really stepped up and helped me out these past two weeks while I was sick. Aren’t the colors delightful? Paper, stamps, ink colors, ribbon and buttons, all beautifully coordinated thanks to Stampin’ Up!’s design team!

I kept the design of the cards simple, using the same format for every card and just changing up the inks and accessory colors. These cards would be fun to make in a class setting or at a Stamp-a-Stack as well.

SKP Watermarked Photos2-051Six cards and six lined envelopes all housed in their own custom box! The box is very easy to make, I just followed Sam Donald’s tutorial. If you aren’t familiar with her work, she is AMAZING at creating boxes of all shapes and sizes, she’s so very talented!

I did modify the dimensions of my box for two reasons. One, I needed it to be taller and two, I didn’t have enough tulip DSP left to make my lid from DSP so I made it from card stock instead and then covered it with DSP. (I should have planned better!) Please let me know if you are interested in my alterations and I will be happy to work up a short tutorial when I am feeling a bit better.

I don’t want to overwhelm you with photos, but would like to show each card up close so I’ll show one close up here and post another post tomorrow with more individual photos:

SKP Watermarked Photos2-061This is my favorite paper of Sale-A-Bration! The tulips are SO beautiful!! I would love to have seen a stamp for the tulip, in two different sizes…sigh…maybe in the new Annual Catalog 🙂

And one more of the completed project:

SKP Watermarked Photos2-064I hope you have enjoyed my post, please let me know what you think!!

The next stop is the very talented Peggy Noe at Pretty Paper Cards on the Pals Blog Hop!

Thanks for visiting and I’ll see you next month!
2015febhop_back2015febhop_next

  1. Wendy Klein at Doggone Delightful Stampin’
  2. Jackie Diediker at Stampin’ Jackie
  3. Natalie Bradley at Natalie Bradley Events
  4. Lisa Ann Bernard at Queen B Creations
  5. Sue Becker at RnR Stamping
  6. Amy Hoptay at Inking of you
  7. Beth Beard at My little craft blog
  8. Susan Lankford at Stamp and Create With Susan
  9. Susan Itell at Simple Stampin
  10. Rae Harper at WildWestPaperArts.com
  11. September Gray at www.septembergray.com
  12. Pamela Sadler at Stampin Pink Rose
  13. Becky Volpp at inkblossomwithbecky.com
  14. Beth McCullough at Stamping Mom
  15. Sherrie Gross at Stampin’ Sunshine
  16. Brian King at Stamp with Brian
  17. Martie Pollard at The Crafty Bandit
  18. Maggie Mata at Maggie Made Cards
  19. Lynn Kolcun at Avery’s Owlery
  20. Kalyn Shubnell at The Stamping Chronicles
  21. Dawn Tidd at Tiddbits from Dawn
  22. Amy Whelan at Amy’s Inklings
  23. Karen Hallam at Karen’s Blog
  24. Michelle Gleeson at StampinMojo
  25. Shannon K Jaramillo at Shannon Kay Paperie
  26. Peggy Noe at prettypapercards.com
  27. Candy Ford at Stamp Candy
  28. Jane Knudsen at see jane stamp
  29. Nicole Watt at Pixel Maven’s Retreat
  30. Mary Fish at Stampin’ Pretty
  31. Angela Curry at Kindred Stampers

January Pals Blog Hop – Hello Occasions!

untitled

Welcome to the first Pals Blog Hop of 2015. We hope your new year is off to a great creative start. To celebrate the start of a new Stampin’ Up! year, we are showcasing products from our newest catalog this month – the Occasions catalog. You may also see new Sale-a-bration products too. If you don’t know how to earn free Sale-a-bration products – contact your Stampin’ Up! demonstrator to learn more.

You may just be starting the blog hop or may have come from Lynn Kolcun at Stamping with Avery’s Owlery.

Use the full lineup below to move along from blog to blog so you see all of the new projects.

I wanted to start a new tradition and create some simple seasonal decor for my office at work so I pulled out a frame I had picked up at IKEA some months ago and started stamping:

What do you think?!? Today’s project features the new stamp set Sheltering Tree from Stampin’ Up!. It’s a fantastic set with lots of different elements that can be added to the tree for different occasions.

I wanted something Valentine-y so I chose a background of Blushing Bride cardstock. I stamped the tree in Crumb Cake and then stamped all the other images with Versamark. I then heat embossed all the different elements (separately) with white embossing powder and finished it all off with a pop of Real Red.

3-IMG_3535

The frame is so clean and simple that I decided not to add any more elements. I love the soft effect!

I’m keeping it short and sweet today because I know you lots more blogs to hop off to…

The next stop is Liz Gautreaux at Kind Deeds Stampin on the Pals Blog Hop!

Thanks for visiting and I’ll see you next month.

Wishing you joy and blessings!

Products Used:

Cardstock: Blushing bride by Stampin’ Up!

Pattern Paper: None

Ink:  Crumb Cake, Real Red by Stampin’ Up! and Versamark Ink

Stamps:  Sheltering Tree and And Many More by Stampin’ Up!

Dies: None

Tools:  None

Embellishments: None


2015janhop_back

2015janhop_next

  1. Amy Whelan at Amy’s Inklings
  2. Maggie Mata at Maggie Made Cards
  3. Becky Gifford at The Social Stamper
  4. Kerry Willard Bray at Peonies and Paper Chains
  5. Debbie Crowley at expressivelydeb…
  6. Amy Williams at Stamps and Spice
  7. Rae Harper at WildWestPaperArts.com
  8. Sherrie Gross at Stampin’ Sunshine
  9. Wendy Klein at Doggone Delightful Stampin’
  10. Becky Volpp at InkBlossomwithBecky
  11. Nancy Gleason at My Stampin Space
  12. Jane Knudsen at www.seejanestamp.com
  13. Debbie Mageed at Secret Stamper
  14. Michelle Quinno at Shell’s Life
  15. Susan Lankford at Stamp and Create With Susan
  16. Karen Hallam at Karen’s Blog
  17. Kelly DeTommaso at Kelly’s Creative Corner
  18. Mary Fish at Stampin’ Pretty
  19. Laurie Chilton at Stampin’ Ink
  20. Brian King at Stamp with Brian
  21. Peggy Noe at prettypapercards.com
  22. Martie Pollard at The Crafty Bandit
  23. Kim Jolley at Stampin’ Artfully
  24. Beth Beard at My little craft blog
  25. Michelle Gleeson at StampinMojo
  26. Sue Becker at RnR Stamping
  27. Jackie Diediker at Stampin’ Jackie
  28. Natalie Bradley at Natalie Bradley Events
  29. Lisa Ann Bernard at Queen B Creations
  30. Candy Ford at Stamp Candy
  31. Dawn Tidd at Tiddbits From Dawn
  32. Angie Valle-Peters at Paperluxuries
  33. Amy Hoptay at Inking of You!
  34. Lynn Kolcun at Stamping with Avery’s Owlery
  35. Shannon K Jaramillo at Shannon Kay Paperie
  36. Liz Gautreaux at Kind Deeds Stampin
  37. Beth McCullough at Stamping Mom
  38. Nicole Watt at Pixel Maven’s Retreat
  39. Pamela Sadller at Stampin Pink Rose
  40. Jennifer Michalski at Stamping Serenity
  41. Shannon Hokanson at Paper Works by Shannon

Christmas Joy

Watermarked Blog Posts-082

I made this Christmas decoration last year but never shared it. When I pulled it out this year, I fell in love with it all over again!

This is not my idea, I completely and totally CASEd (Copy And Share Everything) from the very talented Wendy Wexler.  The unfinished letters were purchased from The Wood Connection and then painted black with inexpensive craft paint from Michael’s. I traced the letters onto the Designer Series Paper and simply cut them out and adhered them to the wood with Mod Podge.

It’s a fun project for a rainy night!

Thank you so much for stopping by!

Wishing you joy and blessings…