Flowers & Flourishes – The Paper Players #236

Welcome to another new challenge from The Paper Players! Last week was a fun week with a delightfully spring-y color combination, the week before that was Spring Theme and this week it’s….(drum roll please)…

pp236Yup!! Definitely a trend going on here…seems like everyone is looking forward to spring!! And I am no exception, though I may be just a tad less enthusiastic than my friends in the east. As I write this post it is 88 degrees with a projected high tomorrow of 91 degrees. I had to break down and turn the air on!! I’m a bit afraid that this heat so early in the season is a harbinger of a long, very HOT summer to come! So…enough of that gloom and doom…spring is here and I can’t wait to see your clean and simple floral creations!!

SKP Watermarked Photos2-083
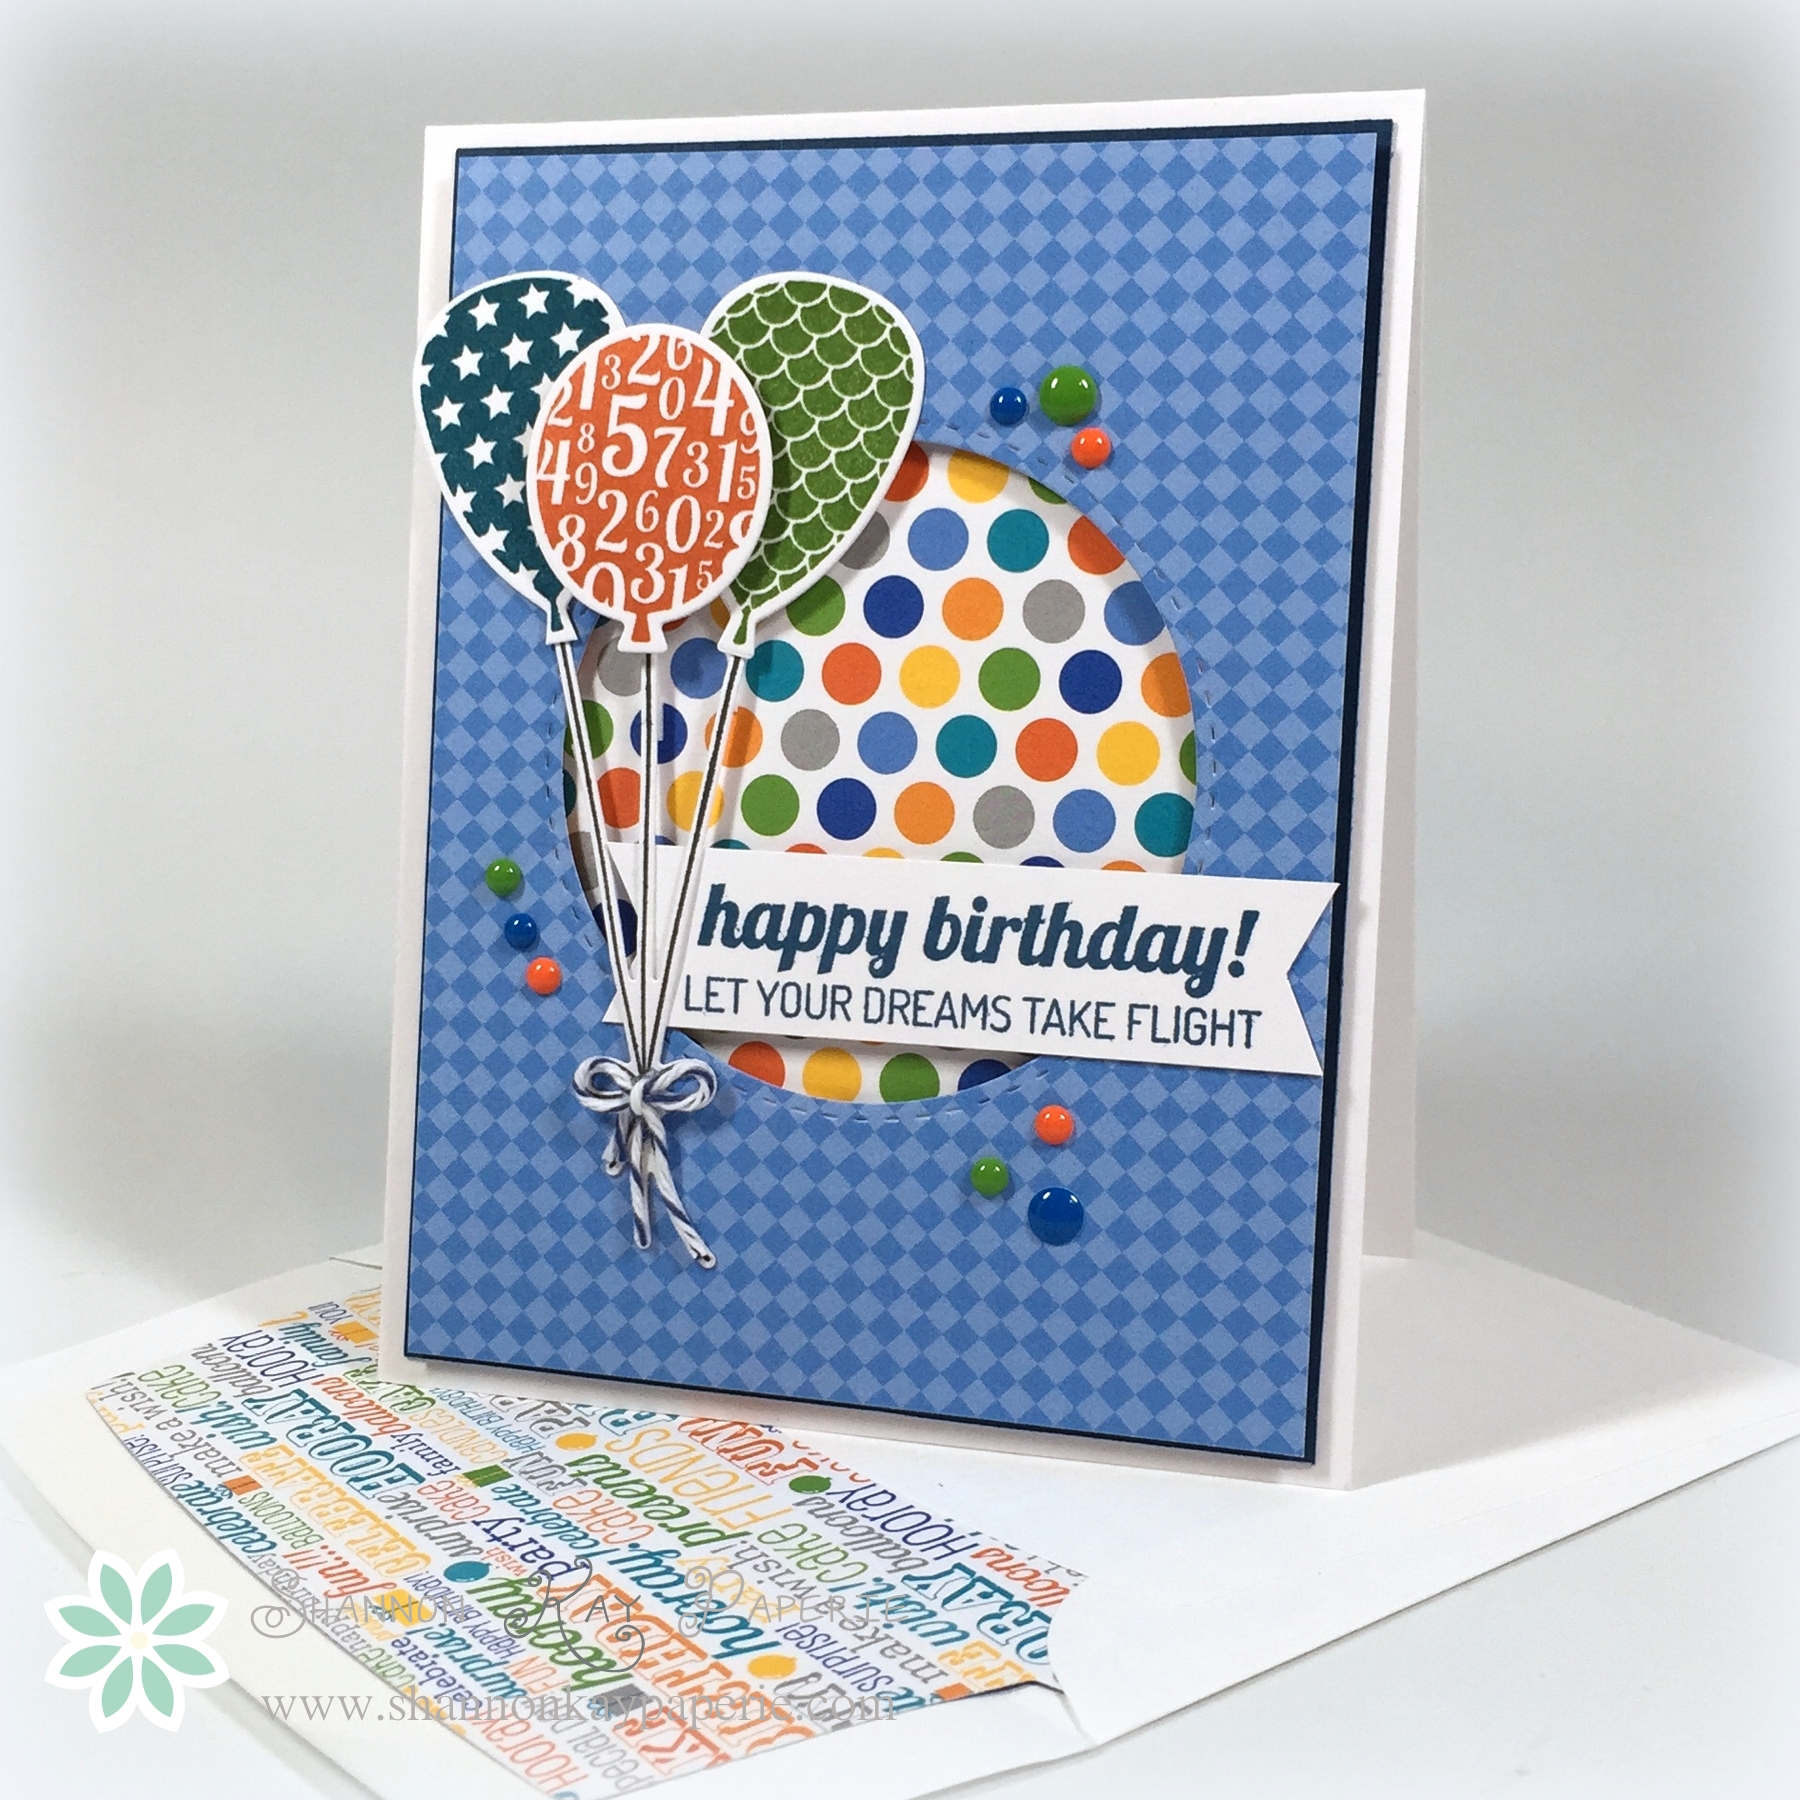
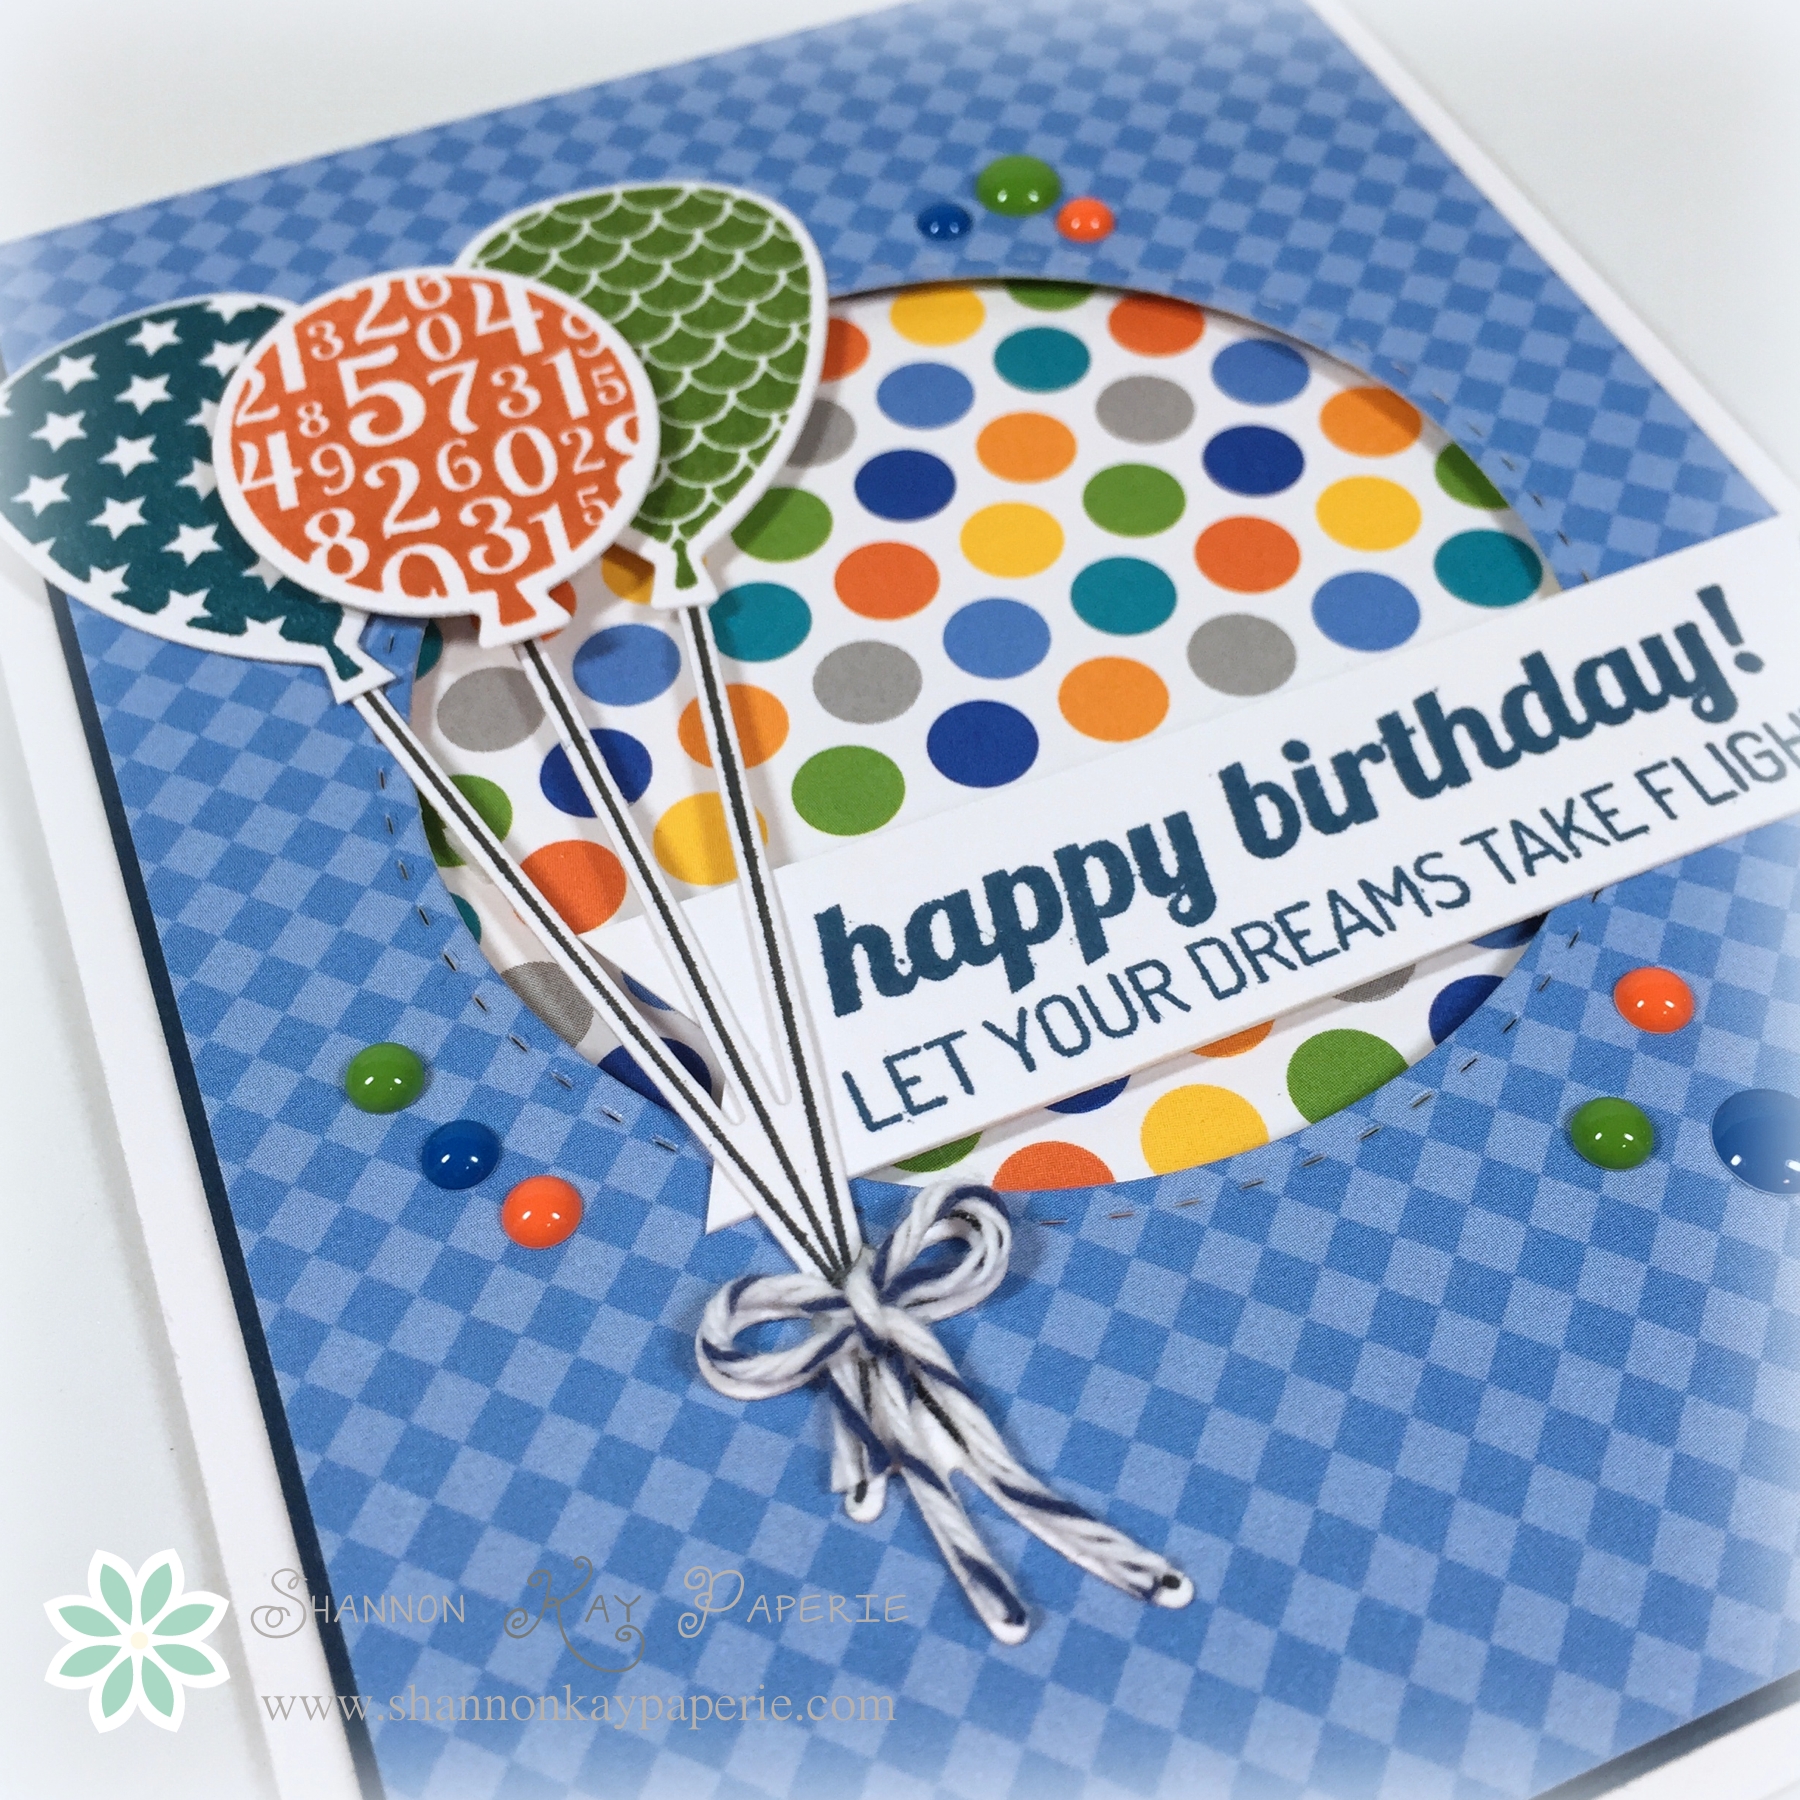
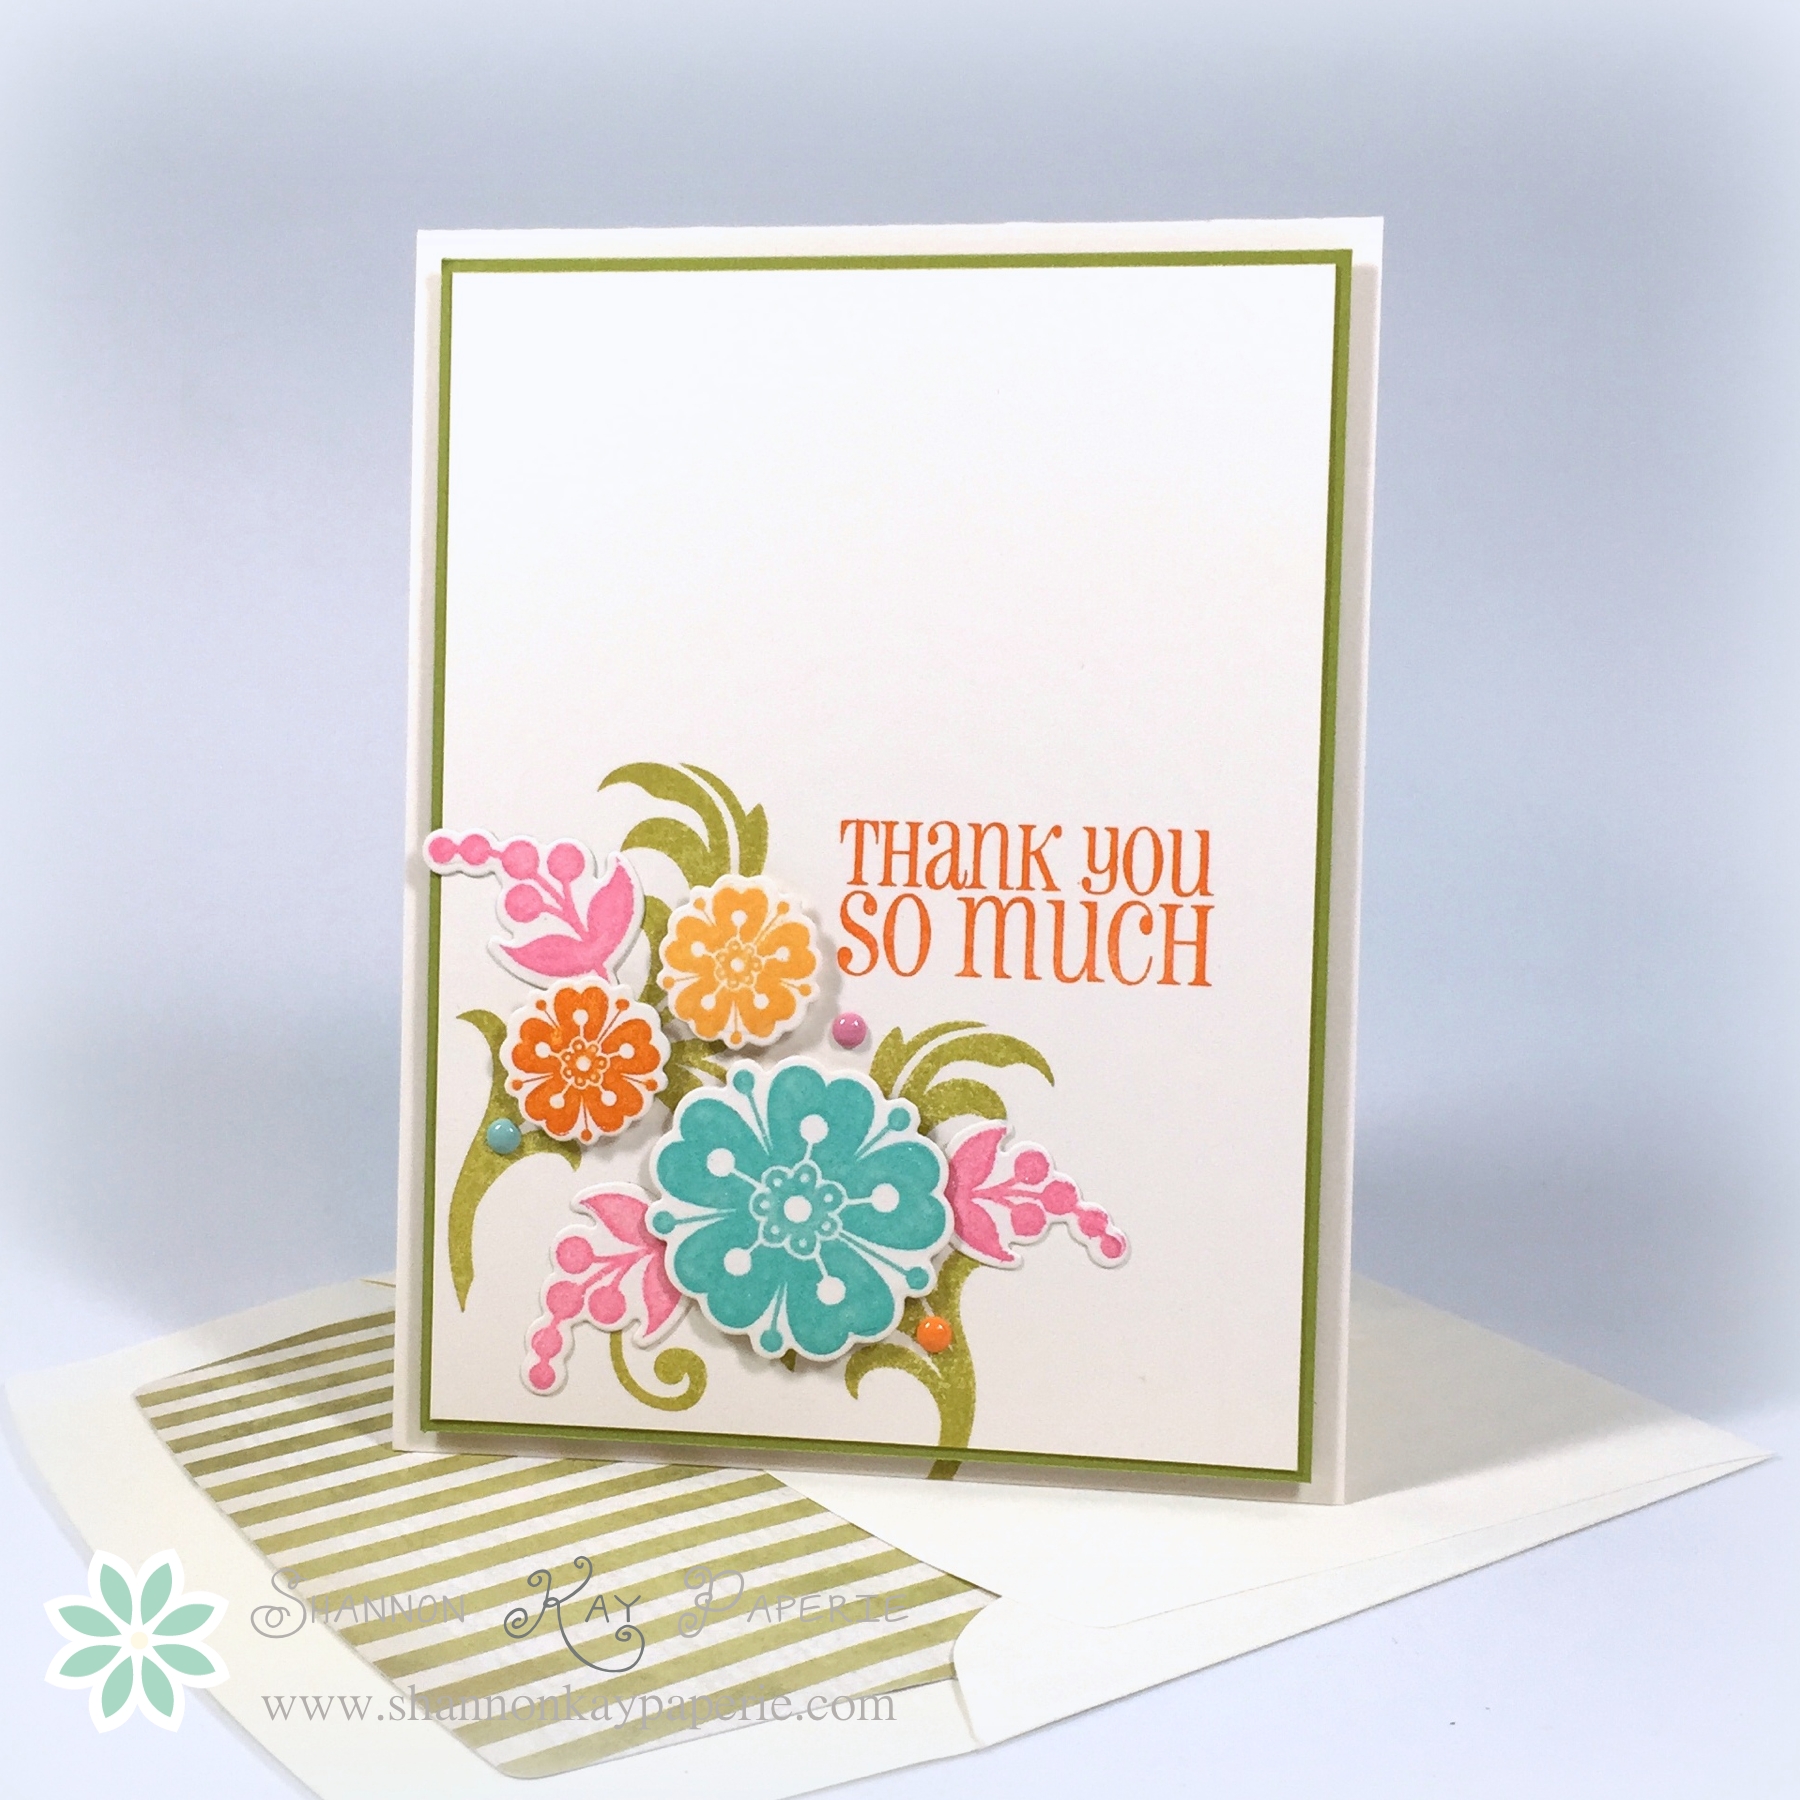
I had the most fun picking this color combination out! I chose my envelope liner paper and then built from there. The colors are Simply Chartreuse, Hibiscus Burst, Hawaiian Shores, Orange Zest, and Summer Sunrise from Papertrey Inks…L-O-V-E!! I think that Simply Chartreuse might be my favorite color ever!!

SKP Watermarked Photos2-085
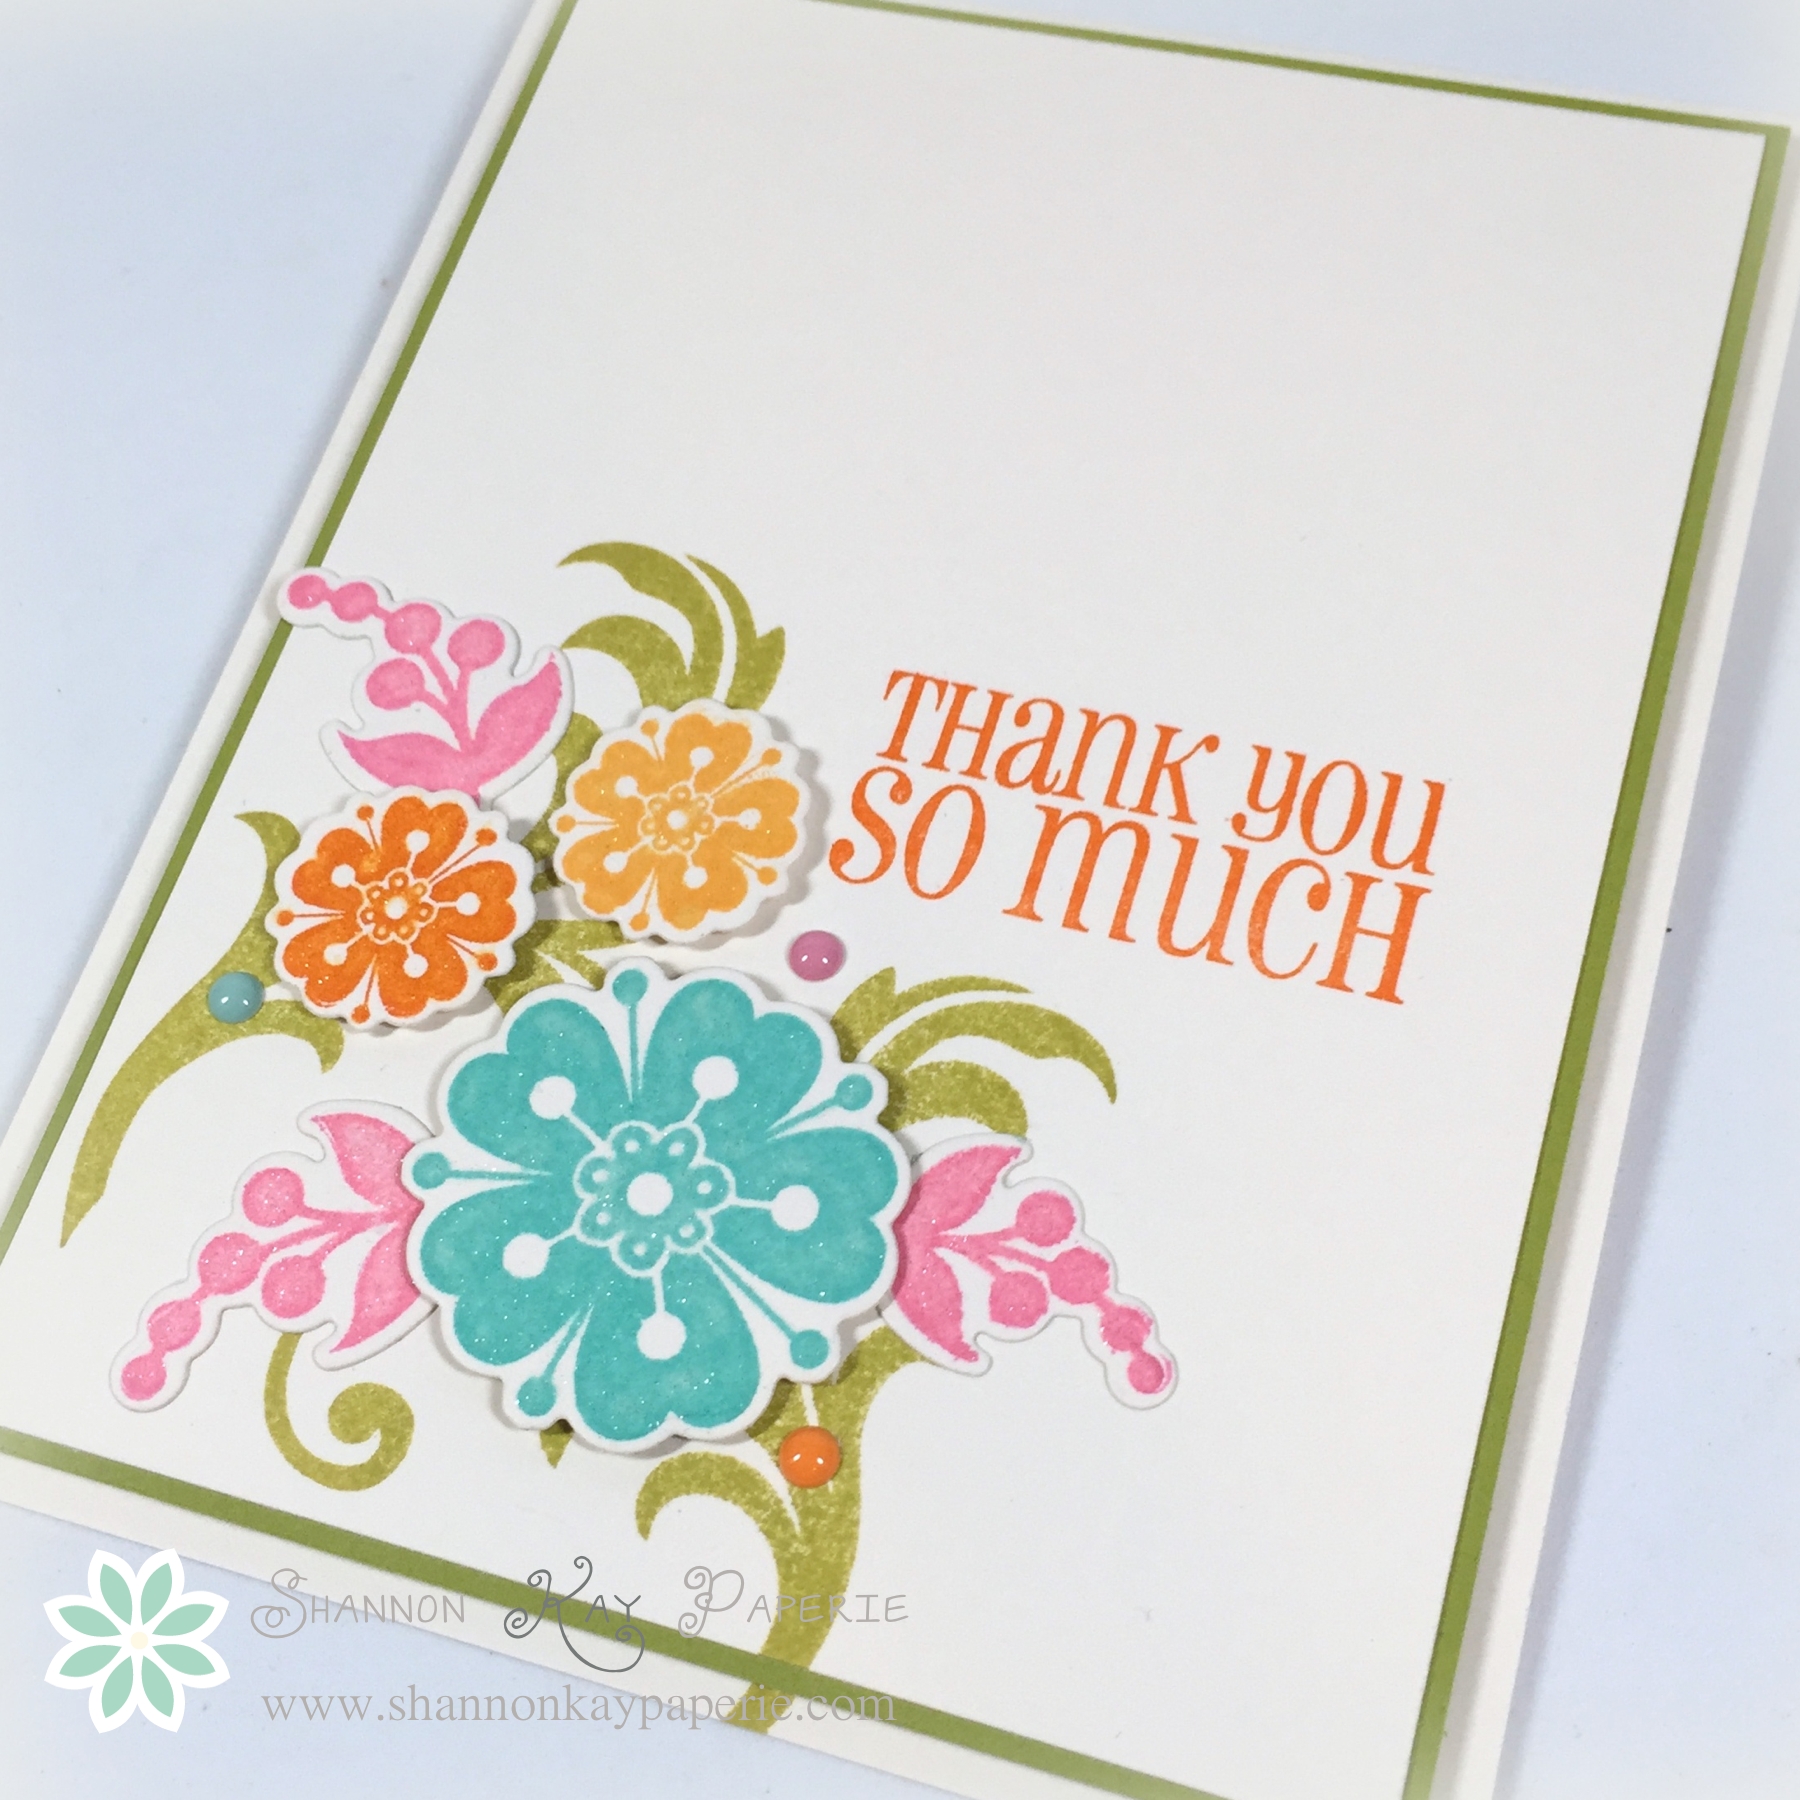
The stamp and die set is called Flowers & Flourishes by Clearly Besotted Stamps. Because I don’t have enough flowers already, lol. I had the most fun arranging these. Do you see how I carried the stem of the flourish down onto the card base? And then, to balance it out, I let my pink die cut blooms burst over the edge of the top layer on the left hand side.

SKP Watermarked Photos2-086
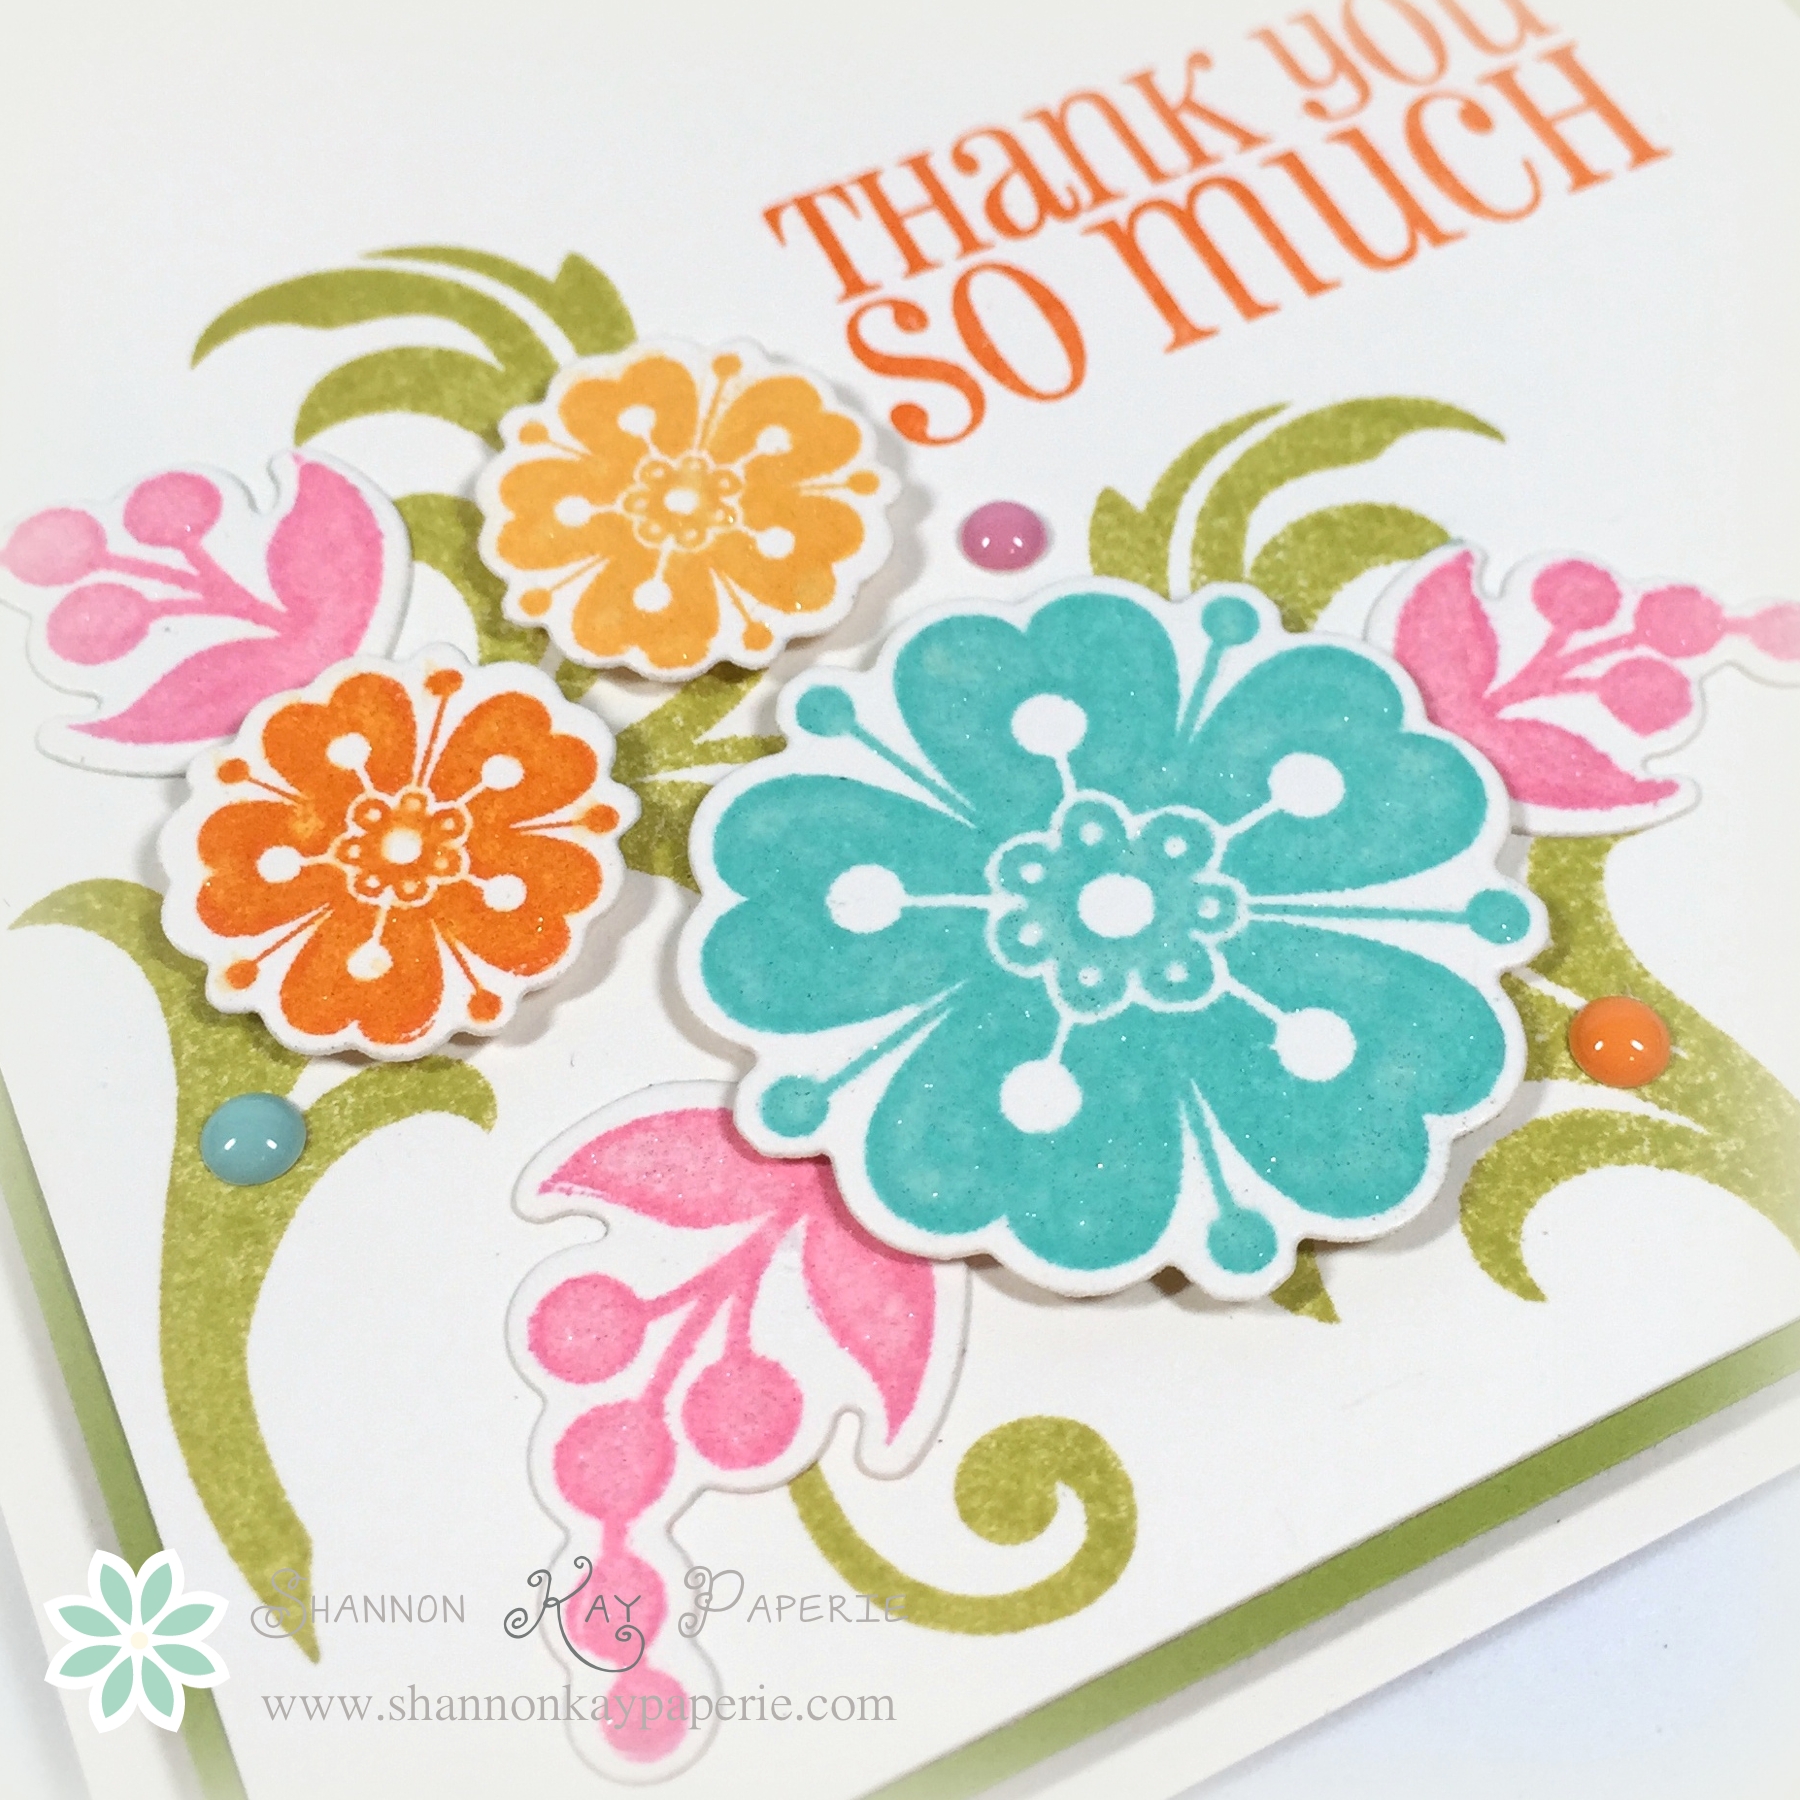
I played with my enamel dots for a long time, trying out colors and positions on my card, but I think I finally found a winning combination! And of course, I have applied liberal amounts of Wink of Stella to my flowers!!

Won’t you pop on over to see what the design team has cooked up for you today? I hope you will be inspired to play along with us…I can’t wait to see what you create!!

The Paper Players Design Team
Wishing you joy and blessings!

Products Used:

Cardstock: Vintage Cream and Simply Chartreuse by Papertrey Ink

Pattern Paper: Lost and Found: Breeze by My Mind’s Eye

Ink:  Hawaiian Shores, Hibiscus Burst, Orange Zest, Simply Chartreuse, and Summer Sunrise by Papertrey Ink

Stamps:  Flowers & Flourishes by Clearly Besotted Stamps

Dies: Flowers & Flourishes by Clearly Besotted Stamps and Envelope Liner Die by Stampin’ Up!

Tools:  MISTI by My Sweet Petunia

Embellishments: Blue Jean, Cupcake and Tangerine Sprinkles by Doodlebug Designs and Wink of Stella

Shakers & Sprinkles Birthday Wishes

11-IMG_7712

Last year Papertrey Ink came out with a special line of products that were only available in limited quantities. This particular set of products was a MakeIt Market Kit called Shakers & Sprinkles. It turned out that this kit was so popular that it is still available for purchase. It’s a BEAUTIFUL collection of coordinated products that is sure to churn out lots and lots of beautiful cards. I LOVED the kit and snapped it up at once, and then let it sit. I think the idea of a shaker was intimidating to me. Well, it’s sat for quite a long time and one of my goals this year is to use up kits so I pulled up my big girl panties and got to it!! It turns out (as is usually the case) that it wasn’t nearly the monumental task that I had turned it into, lol!

15-IMG_7720The kit comes with all of the stamps, dies, pattern papers and embellishments, all I had to do was choose some card stock and start creating!! I am SO in love with the colors I used here. Limeade Ice for the card base and shaker frame, Hawaiian Shores for two different layers and Hibiscus Burst for the die-cut word. L-O-V-E!!!

16-IMG_7722I due-cut the word three times and adhered them together and then coated liberally with Wink of Stella for LOTS of sparkle! I randomly chose from the collection of shaker filler in the kit and dumped a bit of this and a bit of that inside the frame. It’s so fun and playful!!

And let’s not forget to decorate the inside as well!

14-IMG_7719The kit comes with a collection of ready to go card fronts. I simply trimmed one of them down and added a sentiment from Papertrey’s Inside & Out Birthday Sentiments stamp set and voila!! A beautifully decorated interior without a bit of effort!!

I wish I had tried this much sooner, it was really fun and I’m sure you will see more cards from me using this collection of goodies! I hope you are inspired to try something new too!!

Wishing you joy and blessings,

Products Used:

Cardstock: Hawaiian Shores, Hibiscus Burst and Limeade Ice by Papertrey Ink

Pattern Paper: Shakers & Sprinkles Paper Pad by Papertrey Ink

Ink:  Tuxedo Back by Memento and Hibiscus Burst by Papertrey Ink

Stamps:  Shakers & Sprinkles Stamp Set by Papertrey Ink

Dies: Shakers & Sprinkles Rectangle Dies Collection by Papertrey Ink and Envelope Liner Die by Stampin’ Up!

Tools:  MISTI by My Sweet Petunia

Embellishments: Shakers & Sprinkles Shaker Filler by Papertrey Ink and Wink of Stella

Up, Up & Away – Retro Sketches 156

Hello there, friends!! Today I’d like to share my take on the awesome sketch over at Retro Sketches:

rs156Isn’t it fun?? I pondered it just for a few minutes before deciding that a stamp set that just arrived this week would be really fun with this sketch!! So, with that in mind I hopped on over to my pattern paper collection and pulled a set of papers together fairly quickly. I knew I wanted a soft and whimsical feel and this is how it turned out!

SKP Watermarked Photos2-118What do you think?!?!? I just adore this card!!!! I used two pattern papers as the base for my card, dividing the two with a darker pattern, as per the sketch. The paper is called Paris & Co, which is perfect because it is so soft and yummy! And the hot air balloons?? Combined with the papers I think they are soft as a gentle spring breeze…

SKP Watermarked Photos2-120I used a new-to-me stamp and die set from Papertrey Ink called Up, Up and Away. It’s a huge stamp set with an optional add-on set to give you SO many options and combinations!! I die cut my clouds and then stamped them in Sahara Sand ink. The ink was the lightest I could find, but the coverage was still darker than I wanted so I used a microfiber cloth to dab away some of the ink after I inked the stamp up. The impromptu technique worked very well, AND had the added benefit of providing an interesting texture!

SKP Watermarked Photos2-121After stamping and die-cutting my balloons I arranged everything on a random bed of cream colored linen thread. There was no rhyme or reason to the thread placement other than a circular pattern. Since so much of the thread was exposed, I used a product called Aleen’s Tack-It Over & Over to adhere the thread. I squeezed out a small dab of the product onto my work surface (it looks like Elmer’s Glue) and the gently dabbed various areas of the thread into it, to pick up just a bit here and there, and then laid the whole thing onto my card base. I have a love-hate relationship with this product. I love it because it is so tacky, but I HATE it for the same reason! You have to be careful with it because it CAN create a mess. The reason I chose it is as the name says, you can tack it over and over. It never really dries, just stays tacky, so once I have something adhered, I can still (gently) move it to re-position it if necessary. And it is SO darn tacky, it never lets go of anything! I also used it to adhere the sequins for the same reasons.

SKP Watermarked Photos2-123I thought the interior of the card should be decorated as well, and decided to use the pattern paper again. I think it’s light enough to write over and it sure does dress up the inside of the card!! Isn’t the paper I used for the envelope liner lovely?? It was also the inspiration for my balloon ink color choices.

Well, there you have it! A fun, albeit girly, card that can be used for many occasions! I’m so grateful to the design team over at Retro Sketches for such an awesome sketch this week!

I spent a wonderfully lazy Sunday at home, working in my office and napping with all the windows open so we could all enjoy the out of season but thoroughly enjoyably warm day today! I hope your day was lovely as well!

Wishing you joy and blessings!

Products Used:

Cardstock: Rustic White by Papertrey Ink

Pattern Paper: Paris & Co by My Mind’s Eye

Ink:  Sahara Sand by Stampin’ Up!; Ocean Tides, Ripe Avocado, and Spring Moss by Papertrey Ink and Cobblestone by Simon Says Stamp (for the sentiment)

Stamps:  Up, Up & Away by Papertrey Ink

Dies:  Up, Up & Away by Papertrey Ink and Envelope Liner Die by Stampin’ Up!

Tools:  MISTI by My Sweet Petunia

Embellishments: Cream Linen Thread by Papertrey Ink (no longer Available) and misc gold sequins

SKP Watermarked Photos2-122

Ladybug Hugs – Retro Sketches #154

01-IMG_7694Happy Monday Friends!! Since it’s Monday, I decided to send you all a ladybug hug, guaranteed to bring a smile 🙂

This fun little card was inspired by the sketch over at Retro Sketches this week:

rs154I wanted to use some more stamps from The Stamps of Life and thought this little bug from the stamp set ladybugs2love would be perfect for the sketch.

05-IMG_7699I had a lot of fun with this one, starting with trying out a this stitched pattern die from from Lil ‘Inker called Circles & Diamonds. It is really beautiful! The ladybug was fun to stamp as it is a builder set. I stamped the bug, then the red on her wings, then the black spots, and finally her behind. I realized when I was done I could have skipped the red stamping on her wings and just colored them with my Blendabilities…next time!

06-IMG_7700After I had the ladybug, sentiment, banner and button all in place I thought she just needed a bit more. I found a teeny tiny ladybug stamp so I stamped, colored and fussy it cut two of them out to add to the card. Love!! But then I decided that if I were a lady bug, I would like to be sparkly so I used Wink of Stella to color all of their wings. Ca-yoot!!

04-IMG_7698I decided that since it’s such a fun card, sure to get a smile, that it should be a get well card. With some more lady bugs of course!!

My card also fits within the challenge of “Anything Goes” over at Can You Case It, so I think I’ll link up with them as well!

CYCI58-232x300

Thanks to the design team at Retro Sketches for inspiring me today!!

Wishing you joy and blessings!

Products Used:

Cardstock: Pure Poppy, True Black and Stamper’s Select White by Papertrey

Pattern Paper: The Story of Us by Simple Stories

Ink:  Tuxedo Back by Memento; Cherry Cobbler by Stampin’ Up!

Stamps:  ladybugs2love by The Stamps of Life; Inside & Out: Healing Touch by Papertrey Ink

Dies: Stitched Pattern Die – Circles & Diamonds by Lil ‘Inker and Envelope Liner Die by Stampin’ Up!

Tools:  MISTI by My Sweet Petunia

Embellishments: Regal Collection Buttons by Stampin’ Up!

Balloon Builders Birthday – The Paper Players #233

Welcome friends! I hope you have had a wonderful week (and stayed reasonably warm if you are on the East Coast)! I truly LOVED seeing all your creations last week using feathery friends! This week, The Paper Players has a sketch challenge from the very talented Sandy…I had so much fun working with this sketch and I’m sure you will too!

pp233Isn’t is fun?? My first inclination was to go with a the sketch and use a feather, but I discovered I just wasn’t in a feather-y mood, I wanted something bright. I pulled out a new-to-me set and got right to work creating a bright and fun card…

SKP Watermarked Photos2-079What do you think?? Is it bright enough?? lol. That’s one thing I love about Doodlebug Designs papers, they do bright very well! When picking my papers, I knew that I wanted the circle cut out to feature a bright and fun pattern. I felt that plain card stock would be a bit boring so I paired up my feature polka dot paper with a more subdued pattern. It’s a nice bright small pattern so as to add visual interest but not compete with either the balloons or the feature paper. I decided to add in a layer of Enchanted Evening card stock to help define the pattern paper a bit more.

SKP Watermarked Photos2-080I fell in love with this coordinating stamp and die set from Lil ‘Inkers called Balloon Builders. The die cut balloon strings was the clincher for me. No more trying to attach baker’s twine to make my balloon strings, thank you very much! I pulled the colors for my balloon from my polka dot paper and decided to go more masculine with the colors, ending up using Island Indigo, Gumball Green, and Tangelo Twist for my balloons.

SKP Watermarked Photos2-081In the end, I decided I wanted to add a bow to my balloons and copied the shape of the die cut, using glue to tack down the ends of the baker’s twine. I think it’s a fun detail!

SKP Watermarked Photos2-082Perhaps I went a bit wild with my sprinkles, but they are just so cute that I couldn’t help myself! And, that’s what they are for, to use…or so I keep telling my other side who is screaming that they won’t last!! If I run out, I know where I can get more! (wink)

So, I hope you will visit the rest of the team and be inspired by their amazing artwork and then settle down to have a go at the sketch! I can’t wait to see your creations!!!

The Paper Players Design Team

Wishing you joy and blessings!

Products Used:

Cardstock:

 Stamper’s Select White and Enchanted Evening by Papertrey Ink

Pattern Paper: Hip Hip Hooray by Doodlebug

Ink:  Gumball Green (retired), Island Indigo and Tangelo Twist by Stampin’ Up!; Enchanted Evening by Papertrey Ink

Stamps:  Balloon Builders by Lil ‘Inker

Tools: MISTI

Dies: Balloon Builders by Lil ‘Inker; Stitched Mats: Circles by Lil ‘Inker, and Envelope Liner Die by Stampin’ Up!

Embellishments: Blue Jean, Limeade and Tangerine Sprinkles by Doodlebug Designs